Add a Child FX Form (in FX Mobile)
You can set up child FX Forms to record information related to another FX Form.
Before you can add a child FX Form, enable the Job Share Trigger field. It is needed for the form to only download the related records that pertain to that object.
If an FX Form records details for wireline logging tickets, add a Child FX Form to record the measurements made during each logging run.
Child FX Forms have a master-detail relationship with a parent FX Form.
|
Customers should review the terms and conditions of the Software Subscription and Support Agreement (including the SFDC Supplemental Terms) to understand the rights and restrictions that Customers have regarding creating custom objects. |
-
Continue with Add a custom object for the child FX Form.
Add a Custom Object for the Child FX Form
Click to expand
Start by adding a custom object for the FX Form.
-
From Setup, enter
schemain the Quick Find box, then select Schema Builder. -
Click the Elements tab.
-
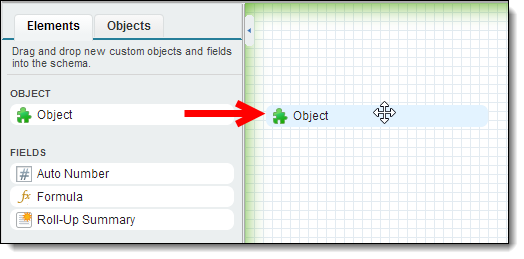
Drag Object from the Elements panel onto the grid.
-
Complete the following:
Field Action Example Label
Enter a name for the FX Form
JSAPlural Label
Enter a plural name for the FX Form
JSAsStarts With
Select "Consonant" or "Vowel"
Description
Enter an object description.
This object is for Job Safety AuditsData Type
Select "Text"
-
Select Allow Reports.
-
Click Save.
 Figure 1. Start of JSA__c Object
 -
Select Add Google Docs, Notes, Attachments, related list to default page layout.
Continue with Add the Master-Detail and SyncId fields.
Add the Master-Detail and SyncId fields
Click to expand
-
Add the Master-Detail field:
You must add a Master-Detail field to every Child FX Form and Child eForm. -
Drag Master-Detail from the Elements panel onto the child FX Form or a FieldFX eForm object.
-
Configure the following:
Field Name Options Field Label &
Field Name:Description
Enter
JSA Object for JobRelated To:
-
Click Save.
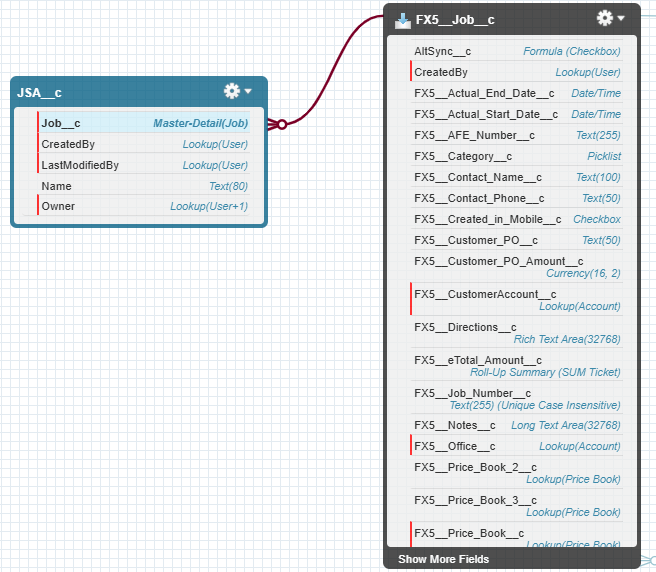 Figure 2. The JSA Object linked to the Job Object
-
-
Add the SyncId field (required if for an eForm):
You must add a SyncId field to every Child FX Form or Child eForm. -
Drag Text from the Elements panel onto the child FX Form object.
-
Complete these fields:
Field Name Action Field Label
Enter
SyncId.The Field Label and Field Name fields are case-sensitive, so you must enter SyncIdcorrectly.Field Name
Length
Enter
50.Unique
Select checkbox.
Is Case Sensitive
Select Treat "ABC" and "abc" as duplicate values (case-insensitive).
External ID.
Select checkbox.
-
Click Save.
 Figure 3. JSA Object with SyncId Field
-
Continue with Add Fields to Collect Data.
Add Fields to Collect Data
Click to expand
-
Drag a field type from the Elements panel onto the FX Form/FieldFX eForm object.
-
Enter field attributes.
Don’t give a custom field the same name as a field on a FieldFX object. -
Click Save.
-
To add more fields, repeat these steps.
See Typical JSA Form fields for suggestions on the fields to include tailored to your org and industry.
Continue with Define the Page Layout.
Define the Page Layout
Click to expand
-
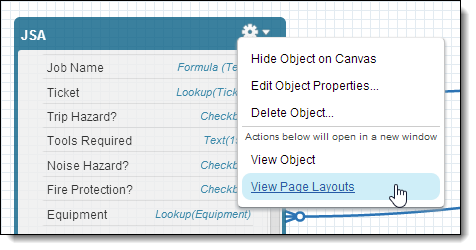
Click the gear icon on the FX Form or FieldFX eForm object and select View Page Layouts.
-
Under Page Layouts, click Edit next to the default page layout.
-
Drag fields onto the page layout to create the FX Form or the FieldFX eForm.
-
On the toolbar, click Related Lists.
-
Drag Notes & Attachments into the Related Lists section.
-
Click Save.
-
Add a Related List to page layouts:
-
From Setup, enter
objectin the Quick Find box, then select Objects.
-
-
If the FX Form or FieldFX eForm is for:
-
Under Page Layouts, click Edit next to a page layout for FieldFX Back Office.
-
On the toolbar, click Related Lists.
-
For eForms only, find the object you created for the eForm and drag it down to the Related Lists section.
The eForm object appears in the Related Lists section.
-
-
Drag the FX Form or FieldFX eForm into the Related Lists section.
-
Click Save.
-
Click Yes.
-
Repeat these steps if other page layouts are needed.
-
Complete one of the following:
-
Add a HTML report to replicate the child FX Form in report format.
HTML Reports have been deprecated. Use the Report Template Editor to create reports. -
Add a PDF report to replicate the child FX Form in report format.
-
Continue with Add a Report Template.
Add a Report Template
Click to expand
Now you can add a report template for the report version of the Child FX Form.
-
Move back to FieldFX Back Office.
-
Open the Report Templates tab.
-
Click New.
-
In Report Template Name, enter a name for the report template.
-
In SObject, enter the API name of the child FX Form object.
-
Click Save.
-
Click Attach File.
-
Click Choose File.
-
Select the report you defined for the Child FX Form.
-
Click Attach File.
-
Click Done.
Continue with Add a Visualforce Page for the Report Version.
Add a Visualforce Page for the Report Version
Click to expand
Add a Visualforce page for the report version of the child FieldFX eForm.
-
From Setup, enter
pagesin the Quick Find box, then select Visualforce Pages. -
Click New.
-
In Label, enter the name of the child FieldFX eForm.
-
In Name, enter the name of the child FieldFX eForm with underscores for spaces.
-
Copy the following code:
<apex:page standardController="ObjectName" extensions="FX5.ReportTemplateExtension"> <apex:includeScript value="{!$Resource.FX5__jquery1102minjs}"/> <style type="text/css"> div.apexp { margin-left:-10px; } body { margin-left:0px !important; } a { text-decoration:none; } </style> <script type="text/javascript"> $('td.labelCol.empty').remove(); $('td.dataCol.empty').css('width','50%'); $('td.labelCol.first').css('vertical-align', 'bottom'); $('td.dataCol.first').css('vertical-align', 'bottom'); $('input[type=submit]').appendTo('td.dataCol.empty'); function jsOpenReport(entityId, templateId, objectTypeId, namespace) { var pagePath ='apex'; var ctrl = document.querySelectorAll("[id$='reportPagePath']")[0]; var customUrl=''; if(ctrl!=null) { pagePath = ctrl.innerText; if(pagePath && pagePath.toLowerCase()!='apex') { customUrl='&customUrl=' + pagePath; } } var href = '/' + pagePath + '/' + namespace + 'Reporting?templateId='+ templateId + '&objectId=' + entityId + '&objectType=' + objectTypeId + customUrl; window.open(href, '_blank'); window.top.location=window.top.location; } </script> <div style="display:none;"> <apex:outputText id="reportPagePath" value="{!PagePath}" /> </div> <apex:dynamicComponent componentValue="{!form}" id="dynamic"/> </apex:page> -
Replace the code on the Visualforce Markup tab by pasting over it with the code you copied.
-
In the first line of the code, replace "ObjectName" with the API name of the child FieldFX eForm object.
<apex:page standardController="Logging_Run__c" extensions="FX5.ReportTemplateExtension"> -
Click the Version Settings tab.
-
Click -- Select to Add Installed Package -- and select "FieldFX Base Package".
-
Click Save.
Continue with Update Page Layouts.
Update Page Layouts
Click to expand
See page layouts for more information.
-
From Setup, enter
objectin the Quick Find box, then select Objects. -
Open the FieldFX eForm object.
-
Under Page Layouts, click Edit next to a page layout for FieldFX Back Office.
-
On the toolbar, click Visualforce Pages.
-
Drag Section from the toolbar to a suitable location on the layout.
-
In Section Name, enter
Reports. -
Under Layout, select 1-Column.
-
Click OK.
-
Drag the Visualforce page for the FieldFX eForm report into the Reports section.
-
Click Save on the toolbar.
-
Repeat for other page layouts as needed..
Continue with Add a Workflow Rule.
Add a Workflow Rule
Click to expand
You can add a workflow rule so that FX Forms sync to FieldFX Mobile or for an Audit Log for email notifications.
-
From Setup, enter
workflow rulesin the Quick Find box, then select Workflow Rules. -
Click New Rule.
-
In Object,
Type Action For FX Forms or eForms
For Audit Logs (Email Notifications),
Select Audit Log.
-
Click Next.
-
Complete the following:
Field Action For FX Forms & eForms
Rule Name
Enter
Sync Id AssignmentEvaluate the rule when a record is
Select created
Run this rule if the following
-
Select formula evaluates to true
-
Enter the following formula:
ISBLANK (SyncId__c)For Audit Log (Email Notifications)
Rule Name
Enter
Sync Upload Error.Description
Enter
Email notification for sync upload errors.Evaluate the rule when a record is
Select created.
Rule Criteria
-
In Run this rule if the following:, select created.
-
Under Field:, select Audit Log: Type
-
Under Operator: Select equals
-
Under Value: Select SyncUploadError

-
-
Click Save & Next.
-
Click Add Workflow Action → New Field Update.
-
Complete the following:
Field Action For FX Forms and eForms
Name
Enter
Sync Id.Field to Update
Select "SyncId".
Text Options
-
select Use a formula to set the new value.
-
Enter the following formula:
CASESAFEID(Id)
-
-
Click Save and then click Done.
-
Click Activate.
Click to expand for Workflow Deprecation
Salesforce will retire Workflow Rules and their Process Builder. The current FieldFX Managed Package workflows and process builder should be migrated over the flows before that.
-
Workflow Rules
-
Inventory_Location_Name_RSLB -
OnStatusWorkflowPropertyChanged -
RuleCriteriaHasChange -
SyncConfigurationChange -
UniqueWarehouseCatalogItem -
UpdateUniqueId
-
-
Process Builder
-
Show all versions
-
Update PO Status from PO Misc Cost Receipt
-
Update Transfer Order from Transfer Order Line
-
Salesforce has a tool to assist in the conversion. In your org’s setup, use Quick Find search and enter Migrate to Flow. Follow the steps in Salesforce Help: Convert Workflow Rules to Flows with the Migrate to Flow Tool (Beta).
For more information, see:
Continue with Grant permissions.
Grant permissions
These permissions are required to use the child FX Form.
Click to expand
-
From Setup, enter
permissionin the Quick Find box, then select Permission Sets. -
Open a permission set.
If the permission has a Namespace of FX5, it is part of the FieldFX Managed Package and is locked and can’t be edited. -
Under Apps, click Object Settings.
-
Open the FieldFX eForm object.
-
Click Edit.
-
Under Record Type Assignments, select the record types.
-
Under Object Permissions, select Read, Create, and Edit
For FX Forms, if you didn’t select Unique when adding the SyncId field, grant View All permission for the FX Form object. -
Under Field Permissions, grant Read and Edit permission for every field.
-
Click Save.
-
At the top of the page, click the arrow next to Object Settings and select Visualforce Page Access.
-
Click Edit.
-
Add the Visualforce page for the FX Form or Child eForm to Enabled Visualforce Pages.
-
Click Save.
-
Repeat these steps for other permission sets as needed.
Continue with Configure Sharing Settings and Inline Help.
Configure Sharing Settings and Inline Help
-
Configure sharing settings to grant access to the Child FX Form.
-
Continue to Finished adding a Child FX Form.