Create a Template
-
At the main screen, click + New Template.
-
At the Start a new document window, click Blank and then click Create Template.
-
With a blank template, complete these in order:
Define the Template Name and Type
-
At the window under Report Name, enter the name of the report.
-
If you have created other templates, their names appear in a tooltip.
-
If you selected DataGuide as the template type, you can select the name of the DataGuide form in Form dropdown and also the Form Version.
-
-
To select the Object type, use the dropdown.
The object types shown depend on what permissions the currently logged in user has and what other FieldFX modules the user can use. -
Click Finish.
-
A blank report template appears.
With the blank report canvas, you can start dragging over elements to populate the Report Canvas.
Define the Layout Information
In the Layout Properties, you can:
|
|
To set the layout information,
-
Expand the Layout Information panel.
-
Use the Default Page Font dropdown to set the default page font.
-
Use the Paper Size dropdown to set the page size for the report.
-
Use the Page Orientation dropdown to choose either Portrait or Landscape.
-
Under Watermark, click Add watermark image.
This begins the process of setting a watermark image for the report.The watermark image only appears when you print or preview the report. -
Use the checkboxes under Include to add the Header or Footer.
To further define the header or footer, see Change the Header or Footer.
-
Set the Margins by using the dropdowns for Top, Bottom, Left, and Right.
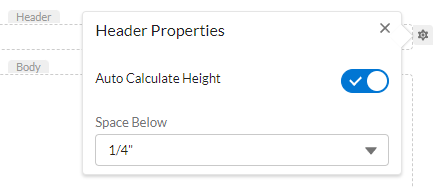
Change the Header or Footer
-
In the Report canvas, click the gear icon in either the header or footer.
-
In the Header Properties or Footer Properties,

-
Toggle the Auto Calculate Height slider.
This will auto calculate the height of the header or footer depending on the contents.
-
For the header, set the Space Below by using the dropdown to set the measurement in inches.
-
You can select 0 inches, or 1/4 inch increments up to 1 inch
-
-
For the footer, set the Space Above by using the dropdown to set the measurement in inches.
-
You can select 0 inches, or 1/4 inch increments up to 1 inch
-
-
-
Click X to exit the window.
Define the File Properties
-
Click the arrow to expand the File Properties window,
-
Enter the title of the report in Title.
-
The editor automatically fills in the Author field with the
Current User > UserNameData Element. You can also add other text or Data Elements. -
Enter a subject or description for the report in Subject/Description.
-
Enter keywords in Keywords.
-
Enter each keyword and press Enter to advance to the next line.
Use a separate line for each Keyword.
-
-
Click Apply.
Use Advanced Filtering
You can set up advanced filters for the template. Clear the filter to show all the child records. For the filter to work, there should be more than one SObject in the data table.
| Adding multiple conditions, multiple groups, and multiple conditions in a filter group within a filter could affect report template performance. |
-
Click the Advanced Filtering tab.
-
Define the first field by clicking in the box marked 1.. You can use the search icon to search for a field.
-
Select the object type and then the record type.
The options in the dropdown menu may be different depending on the object chosen. -
Select the Operator for the filter.
Operator Purpose is null
Shows results that has
is blank
Shows results where the Field is blank.
is not blank
Shows results where the Field isn’t blank.
is not null
Shows results that only has numbers in the Field.
contains
The results only contain what is in the Value column.
Select the object type and then select the sub object (which is based on the chosen object).
doesn’t contain
The results ignore what is in the Value column.
Select the object type and then select the sub object (which is based on the chosen object).
starts with
Shows results from the Value column.
Select the object type and then select the sub object (which is based on the chosen object).
-
Enter the Value for the filter.
You can’t use this field with all operators. Depending on the value in Field, the Value could be a choice of an object and sub-object.
-
Repeat these steps to add more conditions.
-
In Filter Logic, define the order of the conditions.
If there is only one filter condition, that number appears in Filter Logic.
-
-
To finish, click Save.
-
Continue with Design a Template.
Recommended Reading
For more information, see:
| FieldFX Documentation | Salesforce Documentation |
|---|---|
|