Staged Data
Staged Data in FieldFX is information prepared and organized for use within the org but not yet fully committed to production. It is typically imported from external sources (like spreadsheets and third-party systems) and resides in a temporary or intermediate state where it can be reviewed, modified, or validated before being finalized.
FieldFX Staged Data act as a buffer ensuring only clean, accurate, and complete information is added to a live environment. Quality and reliability is maintained of the system’s data.
Cautions
Keep these cautions in mind when using and syncing staged data:
Performance impact on syncing more than 100K lookups |
If syncing more than 100K records, there will be an impact to performance including:
Best Practices: Implement data filters, archive policies and advanced download criteria to avoid syncing unnecessary records. With event objects, archive when the count exceeds 200K. |
Key Aspects
Staged data includes:
Validation: |
Staged Data is checked ensuring all system requirements are met like proper formatting, consistency, and completeness. Errors or discrepancies can be identified and corrected here. |
Temporary State: |
Data remains in a holding area that is separate from the live production environment avoiding accidental overwrites or data corruption. |
Review/Approval: |
Users or admins can review the data, adjust the data, and confirm the accuracy before it’s integrated into the FieldFX system. |
Integration: |
After approval, the data can be pushed into production to update or enhance records like customer information, job details, or pricing updates. |
Process: |
This ensures a controlled and organized method for updating system data, reducing error risk, and overall data integrity improvement. |
Staged Data List Layout
The default layout for staged data records is in the following columns:
| Column Name | Description |
|---|---|
StagedData Name |
The name of the individual staged data record. |
Profile |
The sync profile that has this record. |
SObjectType |
The name of the SObject. |
Digest URL |
This URL is used to view detailed information about the specific data set like its content, status, and validation results. You can use the link to examine the data in a readable format to help verify its accuracy and completeness. |
Bulk URL |
This URL is used for operations involving multiple staged data records. You can use the URL to examine the data in a readable format. |
|
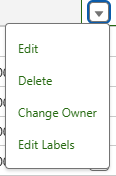
If you have the right permissions, click and select from one of the options:
|

Step-by-Step Guides
With Staged Data, you can:
Run Sync Staged Data As
When changing Staged Data in the Sync Profile Wizard, the user changing the data shouldn’t be the same user who syncs data to to users with a specific sync profile. There should be a specific user just used to sync the staged data.
In the Sync Profile Wizard, you can run the Sync Staged Data as that specific user.
Complete these in order before moving on:
Sync Profile Wizard
| Sync Profile Wizard version 97 is required to use the Run As function. |
Check to see which version of the Sync Profile Wizard you are running.
Continue on with Create Staged Data in the Sync Profile Wizard.
Create Staged Data in the Sync Profile Wizard
-
In your org, use the App Finder to select SMFX E-Ticketing.
-
Use the App Finder to select Admin Dashboard.
Click to expand TIP
If you use the Admin Dashboard frequently, you can add that entry to the nav bar for one-click access:
-
Click
 .
. -
At the Edit <name of module> App Navigation Items, click Add More Items.
-
Under Available Items, click All.
-
For example, to add the Admin Dashboard, click Admin Dashboard.
The
 to
to  .
. -
Click Add x Nav Item(s).
x is the number of nav items.
The Admin Dashboard item (or the item you chose) is in italics appears at the bottom of the list.
-
Use the
 to move the added items to the desired position on the nav bar.
 -
Click Save.
The new items appear on the nav bar.
-
-
Click Sync Profile Wizard.
-
After you’ve made changes to the sync profile, click Sync Staged Data Setup.
-
Click Prepare Sync Data which starts the SyncStagedData job.
Anytime you change a profile, update the sync data files. The sync data starts processing:

Once finished, the sync data can be viewed in Back Office. See Access Staged Data in FieldFX Back Office.
Recommended Reading
For more information, see:
| FieldFX Documentation | Salesforce Documentation |
|---|---|
|