FieldFX eForm Setup
Introduction
In FieldFX, you can must setup a Parent eForm or a Child eForm, underneath the parent.
Complete these tasks in order. Before you begin, review the Guidelines.
Prerequisites
To setup and use FieldFX eForms, you need to:
| Have these user licenses | Have these permissions | Complete these tasks and review these topics before continuing |
|---|---|---|
|
| For eForms to appear when viewing Jobs or Tickets in the FieldFX Mobile App, the eForm object must be added to the object’s page layout - Related List section. |
Guidelines
When setting up FieldFX eForms, keep in mind these details about the Master-Detail, SyncID, and Job Share Trigger fields:
Master-Detail Field
-
The Master-Detail field controls the parent object for an FieldFX eForm. This field also determines the type of record for which you can add the FieldFX eForm.
If an FieldFX eForm has a master-detail relationship with the Ticket object, you can add the FieldFX eForm to tickets. -
Every FieldFX eForm requires a Master-Detail field.
SyncId Field
-
The SyncId field controls whether an FieldFX eForm syncs to FieldFX Mobile.
FieldFX eForms only sync if they have a unique value set in the SyncId field.
-
To prevent sync issues, you must:
-
Add a SyncId field to every FieldFX eForm.
-
Add a workflow rule to assign unique sync ids to FieldFX eForms automatically.
-
Job Share Trigger Field
Use the Job Share Trigger to download only the child records you want in FieldFX Mobile that are associated with a parent object.
If there are 5 JSA (Job Safety Analysis) records associated with one Job record in mobile, only the 5 JSA records that is associated with the Job will be downloaded to mobile, not all records in the JSA object.
You should have for the Job Share (Job_Share__c) field at least Read permission in the form object in a profile or in a permission set that is associated with a Fieldfx mobile user.
Enable Job Share Trigger Field
-
Ensure that you have the Job Share Trigger added to each of your eForm Config records.
-
Ensure that you have read permission and have the Doc Share field populated.
-
Under Setup > Object Manager > Form_Name > Field & Relationships, ensure there is a
Job_Share__cfield.Form_Name is the name of your form.
The
Job_Share__cfield must be a lookup data type field to the job. -
Under Setup > Object Manager > Form Name > Triggers, ensure there is a trigger called
<form name>Trigger_FX5Auto.Form_Name and
<form name>is the name of your form.If there is a
Job_Share__cfield, the trigger is automatically created.
Example: Job Safety Audit (JSA) eForm - Typical Fields
For a JSA form in the oil and gas industry, the eForm would typically include the following fields per the intended purpose:
| All these fields aren’t necessarily needed for a JSA form. |
| Category | Suggested Fields | |||
|---|---|---|---|---|
General |
|
|||
Hazard |
|
|||
Control Measures |
|
|||
Equipment & Tools |
|
|||
Signatures |
|
FieldFX eForm Configurations
An FieldFX eForm configuration controls when an FieldFX eForm is available for use.
You must add an FieldFX eForm configuration for every basic FieldFX eForm.
| Child RX Forms use the FieldFX eForm configuration for their parent FieldFX eForm. |
Add an FieldFX eForm Configuration
Click to expand
-
Open the eForm Configs tab.
-
Click New.
-
In Key SObject, select:
-
If the FieldFX eForm is for jobs, use FX5__Job__c.
-
If the FieldFX eForm is for tickets, use FX5__Ticket__c.
-
-
In eForm SObject, for example, enter
JSA__cfor the API name of the FieldFX eForm object.The sObject name, which is case-sensitive, must be the object’s API name. -
Specify when to use the FieldFX eForm:
If you don’t select one of the following options, users can add the FieldFX eForm to any job / ticket. Section Field Action Information
Key SObject Record Type
Select a record type to use the eForm for that record type.
Filtering
Account
Office
Segment
Price Book
Select a price book to use the eForm for jobs/tickets linked to that price book.
If the Price Book field isn’t available, you may have to add it to the eForm Config Page Layout. -
Click Save.
-
Configure sharing settings to grant access to the FieldFX eForm configuration.
Continue with Record Types.
Record Types
You can Set up record types if you need to complete eForms differently based on a certain aspect of a job.
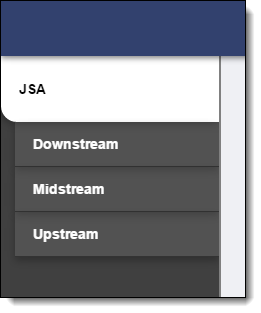
For example, if needed, you can add Downstream, Midstream, and Upstream record types for an FieldFX eForm. The user would complete these differently at downstream, midstream, and upstream work sites.
| How Record Types Appear in FX Mobile | How Record Types Appear in the FieldFX Mobile App |
|---|---|
|
When you add record types, add a page layout for each record type. This allows you to display different fields on each version of the FieldFX eForm.
Add Record Types for an FieldFX eForm
Click to expand
-
From Setup, enter
objectin the Quick Find box, then select Object Manager. -
Open the FX Form object.
-
Under Record Types, click New.
-
In Existing Record Type, select "--Master--".
-
In Record Type Label, enter the record type.
-
Select Active then click Next.
-
Click Save & New.
-
Repeat these steps for other record types as needed.
-
Click Save to finish and then click Back to Custom Object at the top of the page.
Continue with Add Page Layouts for Record Types.
Add Page Layouts for Record Types
Click to expand
-
From Setup, enter
objectin the Quick Find box, then select Object Manager. -
Open the FX Form object.
-
Under Record Types, click New.
-
In Existing Record Type, select "--Master--".
-
In Record Type Label, enter the record type.
-
Select Active then click Next.
-
Click Save & New.
-
Repeat these steps for other record types as needed.
-
Click Save to finish and then click Back to Custom Object at the top of the page.
Continue with Assign Page Layouts to Record Types.
Assign Page Layouts to Record Types
Click to expand
-
From Setup, enter
objectin the Quick Find box, then select Object Manager. -
Open the FX Form object.
-
Under Record Types, click New.
-
In Existing Record Type, select "--Master--".
-
In Record Type Label, enter the record type.
-
Select Active then click Next.
-
Click Save & New.
-
Repeat these steps for other record types as needed.
-
Click Save to finish and then click Back to Custom Object at the top of the page.
Continue with Grant permission to use the record types.
Grant permission to use the record types
Click to expand
-
From Setup, enter
permissionin the Quick Find box, then select Permission Sets. -
Open a permission set.
If the permission has a Namespace of FX5, it is part of the FieldFX Managed Package and is locked and can’t be edited. -
Under Apps, click Object Settings.
-
Open the FieldFX eForm object.
-
Click Edit.
-
Under Record Type Assignments, select the record types.
-
Under Object Permissions, select Read, Create, and Edit
For FX Forms, if you didn’t select Unique when adding the SyncId field, grant View All permission for the FX Form object. -
Under Field Permissions, grant Read and Edit permission for every field.
-
Click Save.
-
At the top of the page, click the arrow next to Object Settings and select Visualforce Page Access.
-
Click Edit.
-
Add the Visualforce page for the FX Form or Child eForm to Enabled Visualforce Pages.
-
Click Save.
-
Repeat these steps for other permission sets as needed.