FX Mobile Ticket Item Grid
| This information and these steps are for the older FieldFX Mobile and not the newer FieldFX Mobile App. |
Introduction
Use the Ticket Item grid to manage ticket items in FieldFX Mobile.
Prerequisites
To use the Ticket Item grid, you need to:
| Have these user licenses | Have these permissions | Complete these tasks and review these topics before continuing |
|---|---|---|
Record Type Filters
Use the Record Type filters to filter the Ticket Item grid by record type.

FX Header
When the FX Header is configured, the fields selected to display on it are identified on the Ticket Details of a ticket.
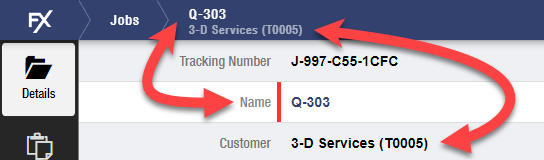
The expandable and collapsible FX Header displays at the top of the Ticket Item grid of a ticket.
The FX Header displays the same preselected fields across all Record Type filters.
To collapse the FX Header when it is expanded, click the Header tab.

You can customize the FX header in FX Mobile to show specific information about the Ticket.
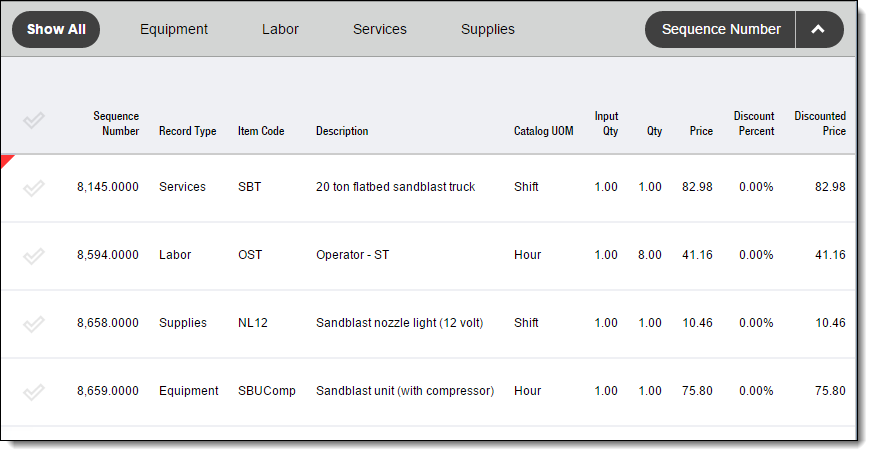
Items List
The Items list displays the items on the ticket and includes:
Required Items
A red triangle displays next to required items.

An item is required if the linked price book item has Required Item selected or the item is required by a rule.
Required items get added automatically and can’t be deleted.
Parent & Child Items
The Items list groups parent and child items together, with child items indented under the parent.
| Child items get added automatically when you add their parent item. |
Sorting Items
The Items list changes based on the Record Type filter you select.
The default sort order is by sequence number.
Use the Sort control to change the sort order:

Select a field on the control to sort items based on entries in that field.
Select the arrow on the control to toggle between ascending/descending order.
Locked Fields
Ticket Item Fields can be controlled by a locking field, either default or custom locking fields.
If the locking field is True, then the locked field cannot be edited.
FX Mobile Action Buttons
Use the action buttons in the FX Mobile interface to add, edit, and delete ticket items:
| Button | Description |
|---|---|
|
Select to add items |
|
Select to make grid fields editable |
|
Select to make grid fields read-only |
|
Select to edit, copy, add child items, apply stage pricing, or delete the selected item(s) |
Walkthrough
Basics
Use the walkthrough to view explanations of buttons and controls available on the current screen.
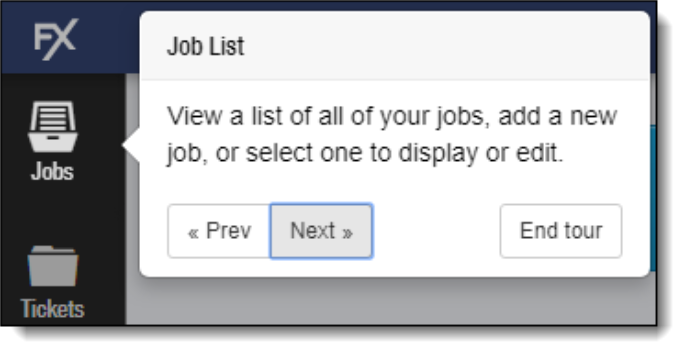
Using the Walkthrough
To display the walkthrough, select the help question mark button on the sidebar.

To move through the explanations of each feature, select Prev or Next.
To close the walkthrough, select End tour.
Customizing Walkthrough Text
Administrators can customize the text that displays in the walkthrough messages to conform to your processes and language.
In addition to text, the walkthrough can display images, PDFs, and videos available from a static URL.
Each stop can display multiple slides.
For details on customizing the help text, see FX Mobile Tour Builder.
Step-by-Step Guides
Open a ticket in FieldFX Mobile and select Items on the sidebar.
| This information and these steps are for the older FieldFX Mobile and not the newer FieldFX Mobile App. |
You can:
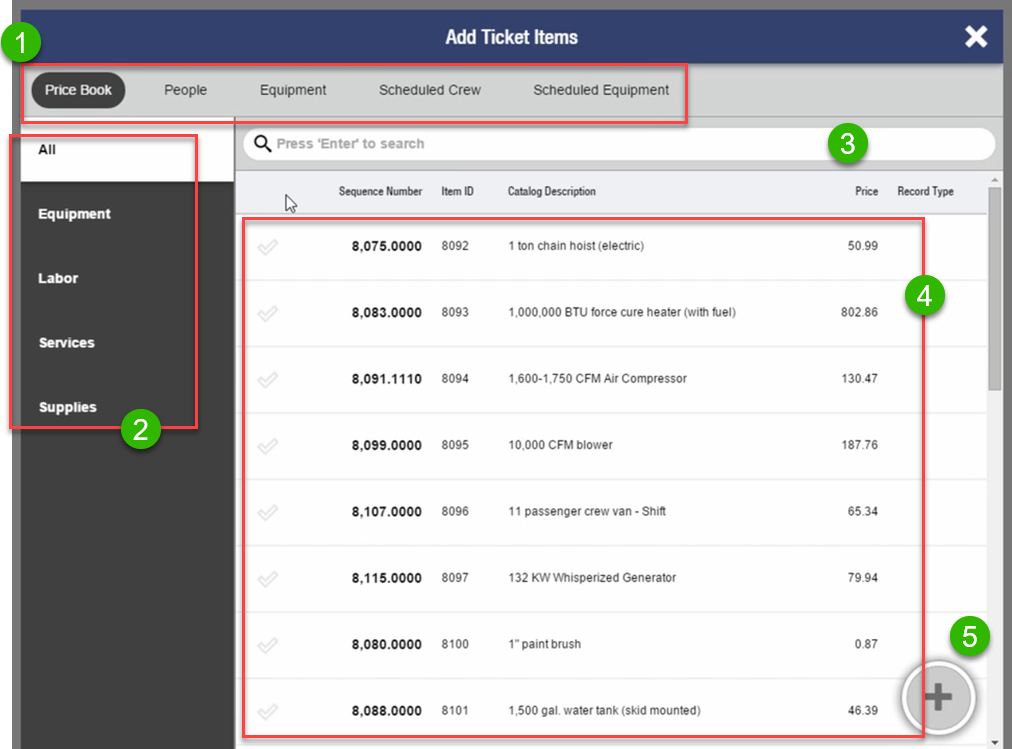
Add Ticket Items
| Callout | Description | ||
|---|---|---|---|
1 |
Search for a specific ticket item. |
||
2 |
Set the sort order of the ticket items. The column names are different depending on the ticket item category selected.
Select |
||
3 |
Select the record type filters for ticket items. The categories shown along the side changes depending on the category selected. |
||
4 |
Select to show the type of ticket items. |
||
5 |
List of available ticket items that can be added to the ticket. |
||
6 |
This opens the barcode scanner. It only works if the device has a barcode scanner or camera connected or built into the device. See Barcode Scanning for more information. |
||
7 |
When you have selected the ticket item, this icon turns green. Select to finish adding the ticket items. |


-
Select Tickets on the sidebar.
-
Select the ticket.
-
Select Items on the sidebar.
If no items exist on the ticket,
No Ticket Itemsappears on the screen. -
Select
 .
.The Ticket Item Wizard displays.
-
Select from the category to see the list of ticket items matching that category.
The category names might not be the same depending on the ticket items that available to the ticket in the back office.
The filters along the top display the available ticket items.
-
Select
 in the ticket item row to select the ticket item to add.
The selected ticket item row now has a
 .
.The
 changes to .
 -
To finish adding the ticket item(s), select
.
Add Child Ticket Items
| For more information, see Parent & Child Items. |
Click to expand, click again to collapse
-
Select Tickets on the sidebar.
-
Select the ticket.
-
Select Items on the sidebar.
-
Select a dynamic parent item.
Enable Dynamic Parenting must be selected in the linked Price Book. -
Select
 .
. -
Select Add Child Items.
-
Select child items.
-
Select
 .
. -
At the confirmation to add details before saving each ticket item, select YES (to add the details) or NO (to continue adding them).
The ticket grid appears showing the ticket items as a child item underneath the parent item.

-
You can also enter details before saving.
-
The child items display below the parent item.
Copy Ticket Items
| Complete Configure the Ticket Item Copy feature first. |
Click to expand, click again to collapse
-
Select Tickets on the sidebar.
-
Select the ticket.
-
Select Items on the sidebar.
-
Select the item or items to copy from the grid.
-
Select
.If there is a number in the corner of the icon, it is the number of selected items to copy.
-
From the menu that appears, select
 .
.The number of items you selected is shown below the actions.
The new copied items appear on the grid already selected. You can edit them if needed.
Sort Ticket Items
Click to expand, click again to collapse
You can sort ticket items in FX Mobile.
| Most item type lists have a standard sort that cannot be changed, such as the Sequence Number or Item ID. Items sort in ascending order. |
Edit Data on the Ticket Item Grid
Click to expand, click again to collapse
-
Select Tickets on the sidebar.
-
Select the ticket.
-
Select Items on the sidebar.
-
Select
 .
.Edit mode is now enabled.

-
Select the field to edit.
IMPORTANT: Keep these in mind:
-
You will be notified which fields cannot be edited (because they are locked).
-
You can’t edit the discount for items that have Locked Discount (in the Price Book Constraints > How It Works section) selected.
-
You can’t edit the price for items that have Locked Price/Markup (in the Price Book Constraints > How It Works section) selected.
-
-
Enter new information.
-
Select
.Edit mode is now disabled.
Edit A Ticket Item
Click to expand, click again to collapse
-
Select Tickets on the sidebar.
-
Select the ticket.
-
Select Items on the sidebar.
-
Select the item.
-
Make edits to the ticket item.
You can’t edit the discount for items that have Locked Discount (in the Price Book Constraints > How It Works section) selected and the price of items that have Locked Price/Markup (in the Price Book Constraints > How It Works section) selected. -
Select
.
Edit Multiple Ticket Items
Click to expand, click again to collapse
-
Select Tickets on the sidebar.
-
Select the ticket
-
Select Items on the sidebar.
-
Select the items to edit.
-
Select
.If there is a number in the corner of the icon, it is the number of selected items to delete.
-
Select
 .
. -
Select the field to edit.
IMPORTANT You can’t edit the discount for items that have Locked Discount (in the Price Book Constraints > How It Works section) selected. You can’t edit the price of items that have Locked Price/Markup (in the Price Book Constraints > How It Works section) selected.
-
Enter new information.
-
Select
.
Apply Stage Pricing to Ticket Items
| Complete Set up Stage Pricing for tickets first. |
Click to expand, click again to collapse
-
Select Tickets on the sidebar.
-
Select the ticket.
-
Select Items on the sidebar.
-
Select items.
You can’t apply stage pricing to items that have Locked Discount (in the Price Book Constraints > How It Works section) selected. -
Select
.If you have selected multiple items, a number appears in the upper corner of the icon.
-
Select
 .
. -
In Total Stage Pricing, enter the price to charge for the items.
-
Select
 .
.NOTE: The total price for the items is now the specified stage price. The discount percentage of each item also updates. To remove stage pricing, delete the items and then re-add them.
Delete Ticket Items
Click to expand, click again to collapse
-
Select Tickets on the sidebar.
-
Select the ticket.
-
Select Items on the sidebar.
-
Select the items to delete.
IMPORTANT:
You can’t delete a ticket item if:-
The linked price book item is required by a rule.
-
The linked price book item has Required Item selected.
-
Child items get deleted automatically when you delete their parent item.
-
Select
.If there is a number in the corner of the icon, it is the number of selected items to delete.
-
Select Delete.
-
Select DELETE.
Use Bulk Edit for Lookup Fields in FieldFX Mobile
With the new release (v4.0.1.4870), you can now use Bulk Edit for Lookup Fields when filtering Ticket Items only.
-
In FX Mobile, open a ticket that has ticket items.
-
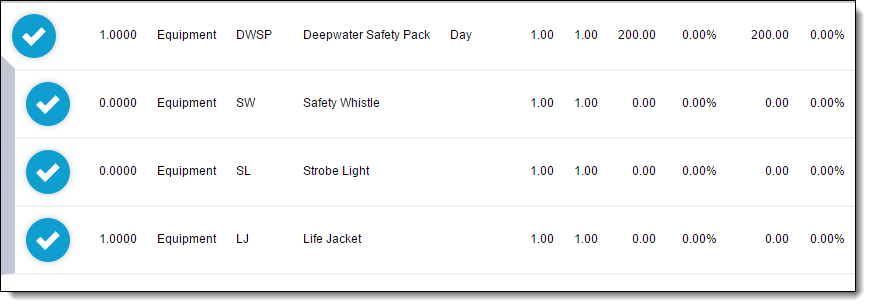
Tap
to select the item.-
To select all the ticket items, tap
in the header of the list. -
The selected items appear with a
 in a circled item numbers.
-
-
Tap
to open the menu selection. -
Tap the Bulk Edit option.
A message can appear in the Bulk Editing X Items(s) window if you have selected items with different record types.X is the number of items. -
Tap the name of the Lookup Field filter that you created in Create Filtered Lookup for Ticket Items.
The results of the filter appear.
To use Bulk Edit for Jobs, a bulk edit lookup filter must exist for the job object first.
Recommended Reading
-
Ticket Item Grid Setup - Learn how to set up the Ticket Item Grid
-
Configure FX Header in the Ticket Item Grid on FX Mobile - Configure the FX Header which can appear when viewing a ticket in FX Mobile
-
-
FX E-Ticketing Minimum Permissions - Learn the minimum permissions required to use the Ticket Item Grid
-
Permission Sets - Learn more about using Permission Sets
-
User Profiles - Learn more about using User Profiles