Sync Profile Manager Admin Tool
The Sync Profile Editor Admin Tool is a redesign of the Sync Profile Wizard Admin Tool. This new tool provides admins more functionality such as:
-
Manage sync profiles by adding new or deleting existing ones
-
Manage layouts for transaction objects and lookups
|
To use the Sync Profile Manager Admin Tool, the user needs access to the Mobile Object Layout object ( |
For more detailed information and configuration requirements, see Tool Configuration Requirements.
The terms Sync Profile Manager and Sync Profile Editor refer to the same Admin Tool.
Overview
Simply put, as a system admin, you can:
-
Define what data a mobile user gets (Jobs, Tickets, Account Access, Ticket Items, Price Book access, picklists, etc.)
-
Assign users to a profile so the user’s device syncs only the records they need
-
Activate, test and adjust rules without writing code all from one place
A sync profile can be thought of as a recipe of filters and other related data rules. When a user is assigned a profile, the sync engine is told which recipe to use for that user’s device.
If you, as a system admin, have to sync jobs for planning dates on the crew for that job, select the option to sync the jobs/price books as long as the crew planning record is active.
-
For Example: If the job is scheduled for the whole month of October, but the Mobile user has a crew planning record valid from 10/1 to 10/8, sync the job/price book for this user only for the period 10/1 to 10/8. After 10/8, the job/price book should not sync for this user anymore. They don’t have an active crew planning record anymore.
|
Job inclusion in Sync Wizard or Sync Profile Manager does not guarantee that a job syncs to mobile devices. The FieldFX Sync Engine always evaluates the Job Sync field. If the Job record’s Sync field is set to false, the job does not sync, even if it is included by Sync Wizard configuration, Sync Profile rules, or Crew Planning assignments. |
Process Flow
As the sys admin in Back Office |
|
|
|
FieldFX Sync Engine |
|
|
|
Mobile app (user device) |
|
Sync Type Triggers
| Full/Baseline Sync triggered when… | Incremental/Delta Sync triggered when… |
|---|---|
|
|
Typical Filter Construction
Filters can be created depending on the purpose of the filter:
| By… | Then… |
|---|---|
Job Assignment / Crew |
Pull Jobs and Tickets where the user is the Job Resource or part of the assigned crew. |
Region / Business Unit (BU) |
Include Accounts / Jobs / Tickets with a matching region or BU field. |
Time Window |
Upcoming 14-30 days of scheduled jobs or recent tickets (last 30 to 90 days) for lookback. |
Status |
Only use Open, Scheduled, or In Progress statuses and exclude Canceled or Closed unless needed. |
Include related records |
* Parents: Account, Location, Contacts * Children: Ticket Items, Line Details, Attachments * Reference: Price Books, UOMs, picklists, catalogs |
| Keep the core data small and predictable. Only add the reference table the mobile workflow truly needs. |
Advantages
Using the Sync Profile Manager Admin Tool has these advantages:
Centralized Control |
* All sync profiles and assigned users are managed in a single screen * No digging into each user record or other setup areas. Before the sys admin would have to access each user’s record and manually add the sync profile. |
Bulk Management |
Multiple users can be added to a sync profile at the same time. This is useful when onboarding a whole crew or reassigning teams. |
Visibility |
You can see which users are in which sync profiles at a glance. This makes it easier to audit and confirm the right staff have the correct data access. |
Time Savings |
The number of clicks is reduced compared to adding each user one by one. Onboarding, reassignments, and offboarding are sped up. |
Error Reduction |
There are fewer manual steps meaning less of a chance of placing a user in the wrong sync profile or forgetting to update them. Clear and updated assignment lists help prevent mistakes. |
Future-Proofing |
The tool is designed with FieldFX’s mobile-first workflows so there is better scaling as your team and data volume grows. This keeps administration cleaner as more roles and sync scenarios are added. |
Side by Side Comparison
This table highlights the advantages of using the Sync Profile Manager Admin Tool to not using it:
| Sync Profile Manager | Before Sync Profile Manager | |
|---|---|---|
Where to Manage |
Centralized Sync Profile Manager screen |
User record by record in Salesforce Setup |
Adding Users |
Select a sync profile, add one or bulk add many users at the same time. |
Each user had to be edited individually and sync profiles assigned manually. |
Visibility |
Sync Profile shows full list of assigned users. |
Can’t see all users in a profile. |
Bulk Updates |
Add or remove groups of users. |
None, only one user could be updated at a time. |
Error Risk |
Clear assignment lists and batch actions reduce mistakes. |
Easy to miss a user or assign the wrong sync profile when editing one by one. |
Time Required |
One screen with fewer clicks. |
Slow and repetitive with multiple clicks per user. |
Scalability |
Unmanageable as user count grows. |
Easy upwards scaling with larger teams or multiple profiles. |
Audit/ Reporting |
Difficult to see which user has which profile. Have to access each user to check which profile they are using. |
View all user assignments in one place. |
Object Types
You can choose from the following objects when creating a layout:
| Transaction Objects | Lookup | ||||||||
|---|---|---|---|---|---|---|---|---|---|
|
|
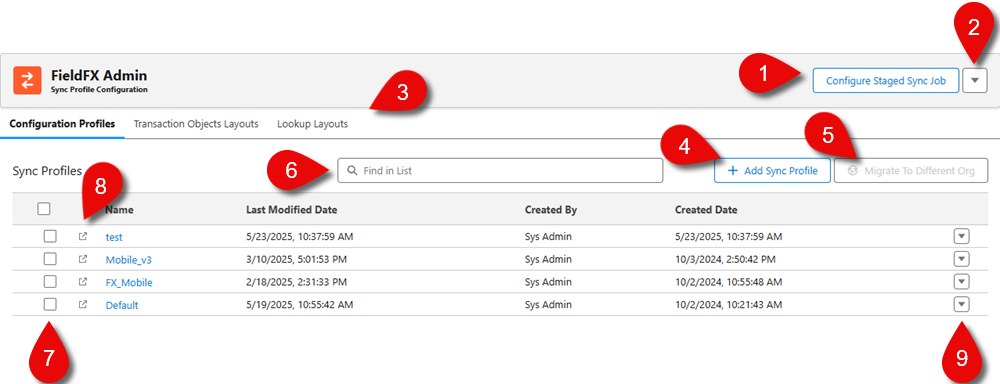
Admin Configuration Profiles Layout
The Sync Profile Editor and Configuration Profiles tab are laid out as follows:
| Callout | Name | Description | ||||||||||
|---|---|---|---|---|---|---|---|---|---|---|---|---|
1 |
Configure Staged |
Click this button to configure the staged sync job for the selected sync profile. |
||||||||||
2 |
Version Information |
Shows the current version of the Admin Tool. |
||||||||||
3 |
Tab Sections |
The different tabs of the tool.
|
||||||||||
4 |
+ Add Sync Profile |
Click to add a blank sync profile that can be customized. |
||||||||||
5 |
Migrate to |
Select multiple sync profiles to migrate them to another org. |
||||||||||
6 |
Search |
Enter a partial name of the sync profile to automatically sort the results. |
||||||||||
7 |
Selection Boxes |
Click the box next to the sync profile or click the box in the column headers to select all the profiles. |
||||||||||
8 |
Raw file |
Click to open a new window to view a read-only file of the sync profile. |
||||||||||
9 |
Profile options |
Click the down arrow to select from these actions:
|
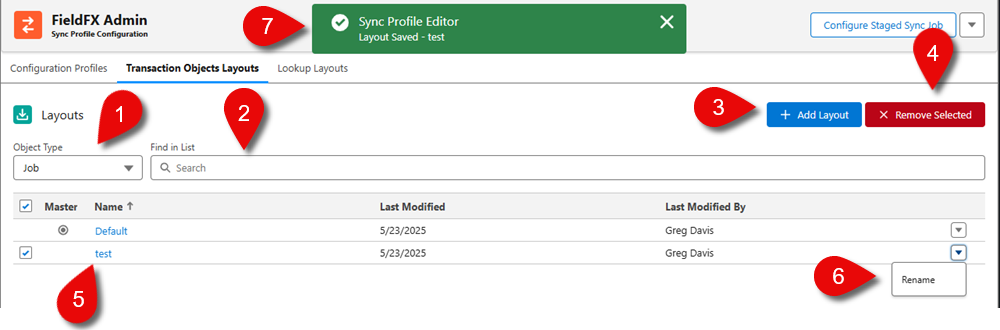
Transaction Objects Layout Tab Layout
In this tab, you can create, delete, and edit a transaction objects layout that are based on these object types.
| Callout | Name | Description |
|---|---|---|
1 |
Object Type |
The object that can be used for the basis of the layout. |
2 |
Search |
Enter the name of the layout if the list contains multiple layouts. The list is filtered down to show the entered text. |
3 |
+ Add Layout |
Click this button to add new global blank layout. |
4 |
X Remove Selected |
If you want to delete a layout, select it and then the X Remove Selected button is available. Click to remove the layout. You can’t delete the default layout. A dialog box appears confirming the delete. Click Confirm to delete the layout. |
5 |
Layout list |
The layouts for the transaction objects. Once you create another layout, a Default layout appears in the list. Open the layout from the list to edit it. |
6 |
Layout option |
Click the down arrow button to select: * Rename - This option allows you to rename the layout. |
7 |
Action toast message |
Confirmation messages displayed when an action (Save, rename, or delete) is performed. |
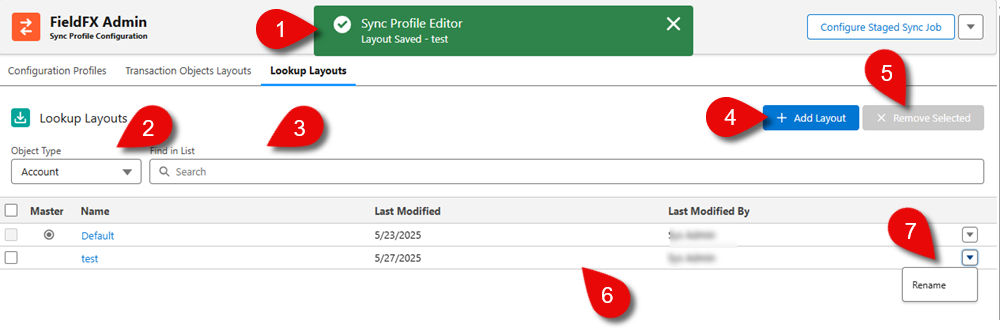
Lookup Layouts List Tab
You can create, delete, or edit a lookup layout. These layouts control how users search and select related records when they fill out forms either in Mobile or Back Office that contain lookup fields.
|
If a field is used in a lookup filter, the field is automatically added to the lookup object on the next sync. |
| Callout | Name | Description |
|---|---|---|
1 |
Action toast message |
This is what confirmation messages appear when an action (Save, rename, or delete) is performed. |
2 |
Object Type |
Use the dropdown to select an object type to filter by these lookup object types. |
3 |
Search |
Enter the name of the layout if the list contains multiple layouts. The list is filtered down to show results matching the entered text. |
4 |
+ Add Layout |
Click to add new global blank layout. |
5 |
X Remove Selected |
If you want to delete a layout, select a layout and then the X Remove Selected button is available. Click to remove the layout. You can’t delete the default layout. A dialog box appears confirming the delete. Click Confirm to delete the layout. |
6 |
Layout list |
The layouts for the lookup objects. Once you create another layout, a Default layout appears in the list. Click on the layout to edit it. |
7 |
Layout option |
Click the down arrow to display other actions that can be performed on the layout. * Rename - This option allows you to rename the layout. |
Best Practices
-
Use fewer, clearer profiles instead of many small variants, which are easier to support and reason
-
Keep window time window tight; using the upcoming 14-21 days plus 30-60 days of history is usually enough
-
Bundle reference data so only the price book and catalogs are the ones users actually use
-
Pilot before rollout by using one or two field users to verify counts and sync duration
-
Use Wi-Fi for baselines so you avoid first-time cellular downloads since full syncs can be large
-
Document your profile logic in a short admin note so in the future you know why each filter exists
Troubleshooting
Master Layout Import Issues
If master layouts are not importing correctly into Sync Profile Manager (for example, transactional object layouts are missing or not available for mobile):
-
Confirm the admin user has access to the AdminServices Apex class.
-
Verify the admin user has Read and Create access on the Staged Data object.
-
Verify the admin user has Read and Create access on the Mobile Object Layouts (
FX5__ffxMobile_Object_Layout__c) object.
Once these permissions are in place, re-run the master layout import process from Sync Profile Manager.
Record not Syncing
If the record doesn’t sync, try these steps in order:
|
Ensure the job’s BU, Region, Date, and Status assignment in question matches the profile. |
|
|
|
If the Account/Location in question isn’t included, children may be skipped. |
|
|
|
|
|
|
|
Was the change made after the last successful sync? Try another incremental sync. |
|
|
|
|
|
|
|
If a profile was changed recently, trigger a full sync on the device. |