Status Workflow
Prerequisites
To setup and use status workflows, you need to:
| Have these user licenses | Have these permissions | Complete these tasks and review these topics before continuing |
|---|---|---|
|
|
Introduction
Status Workflow in FieldFX from ServiceMax defines the sequence of statuses a record of a certain record type can follow. The Status determines when:
-
The record is available in FX Back Office (formerly labeled "Console")
-
The record is available in FX Mobile
-
The record is available in Customer Self Service (referred to as "Admin Portal")
-
The Workflow determines what the next available status can be for a record.
-
With Status Workflows, you can:
How Status Workflows Work
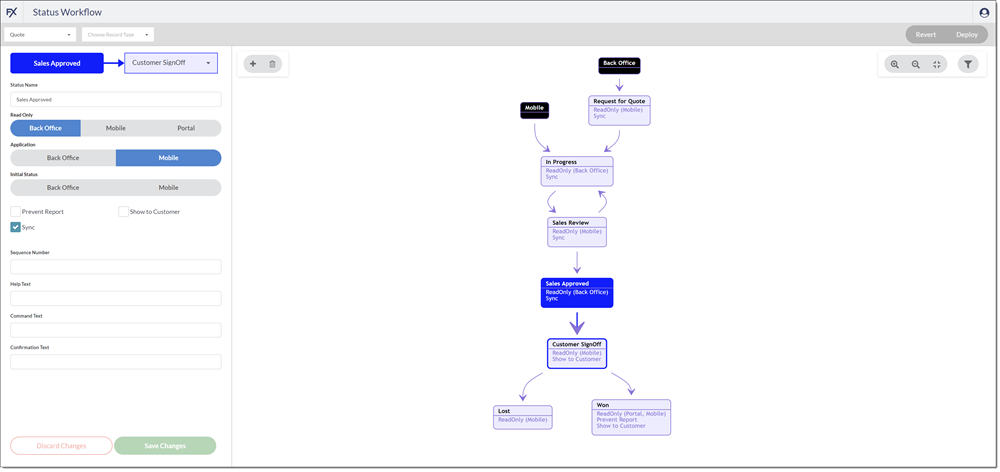
The Status Workflow shows all available statuses for the selected object and record type. Arrows indicate how a record can change from one status to another. The Workflow automatically updates as you make changes.
Use the Status Workflow Tool
After selecting an object and Record Type, the window divides into two panels.
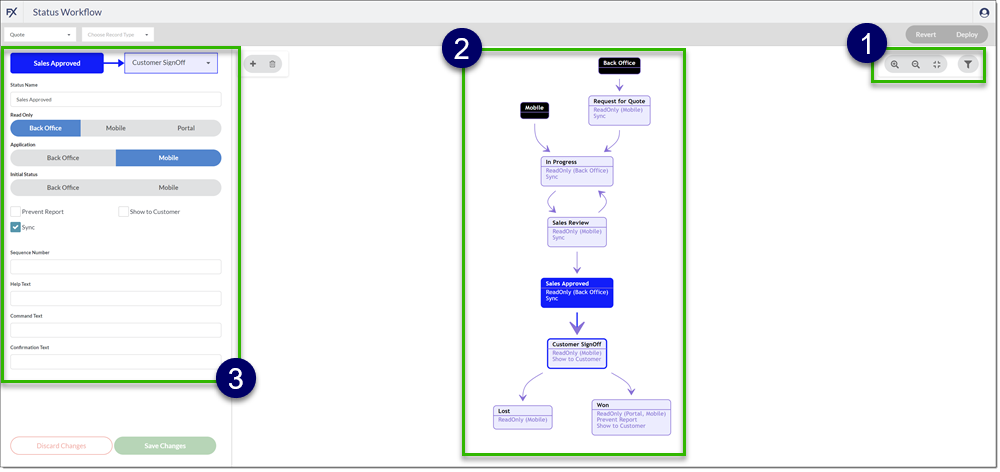
| Callout | Description | Image |
|---|---|---|
1 |
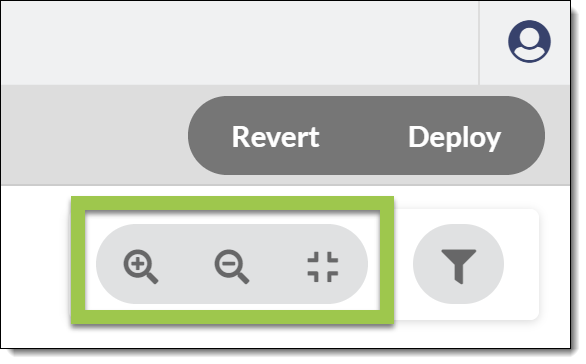
Use icons on the screen to zoom in, zoom out, reset zoom to show whole workflow, or filter the view. |
|
2 |
Status Workflow displays a graphical view of the selected record type’s workflow. |

|
3 |
Use the left panel to make entries and edits to the selected status or transition. |
|
Step-by-Step Guides
Access the Admin Portal
| Inside of FieldFX Back Office, the Admin Dashboard accesses the FieldFX Admin Portal. |
Click to expand
-
Access the Admin Portal either by:
-
Open a browser tab to admin.fieldfx.com and log into the org with your system credentials.
-
In FieldFX Back Office,
-
Click on
 and type
 admin. -
Select Admin Dashboard.
The Admin Dashboard tab appears along the top of the nav bar as the last item.
-
-
Click Add X Nav Item(s).
-
Move the newly added nav item by clicking on the item and dragging the move icon up or down on the list. If you want to add more items, repeat the steps above.
-
When in position, click Save.
A browser toast message appears that the nav item was added.
-
-
To save the Admin Dashboard tab as a permanent tab,
-
click
 to open the navigation items edit box.
The name in the title differs depending on the FieldFX module you are in. If you switch FieldFX modules, the nav item won’t appear. Repeat these steps to add the Admin Dashboard tab to the FieldFX module you are in. -
Click Add More Items.
-
Click Available Items > All
-
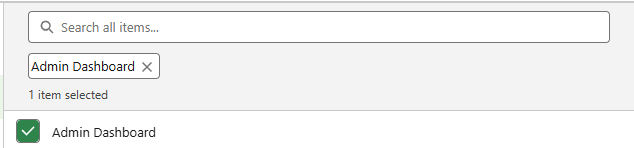
Click Admin Dashboard.
A green check appears next to Admin Dashboard item and a "Admin Dashboard" pill appears below the search field. The number of items selected is also displayed.
-
Add a New Workflow
-
Access the Admin Portal and choose to login to a Production or Sandbox org.
-
Enter the appropriate credentials to login to the desired org.
-
Select Status Workflow from the Admin Portal’s Dashboard.
-
Choose an sObject from the dropdown field.
For custom objects in a status workflow, you can use Salesforce Paths. -
If available, choose a Record Type.
-
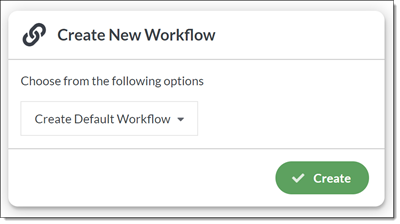
If this is the very first workflow for the object, a dialog box prompts to create a new workflow based on standard defaults.
-
If the workflow is for a ticket, you can optionally click the Transition requires signature checkbox.

This checkbox prompts the field employee and/or customer rep to add a digital signature to a ticket report before the transition can occur.
-
Click Create.
If desired, you can create a workflow from scratch by changing Create Default Workflow to Create Single Status.
However, you must use care when creating a flow from scratch. FieldFX strongly recommends starting with a default and modifying to suit the business needs.
Add a Status for a Workflow
-
Access the Admin Portal and choose to login to a Production or Sandbox org.
-
Enter the appropriate credentials to login to the desired org.
-
Select Status Workflow from the Admin Portal’s Dashboard.
-
Choose an sObject from the dropdown field.
For custom objects in a status workflow, you can use Salesforce Paths. -
If available, choose a Record Type.
The workflow displays.
-
On the workflow, select the status that should precede the new status.
-
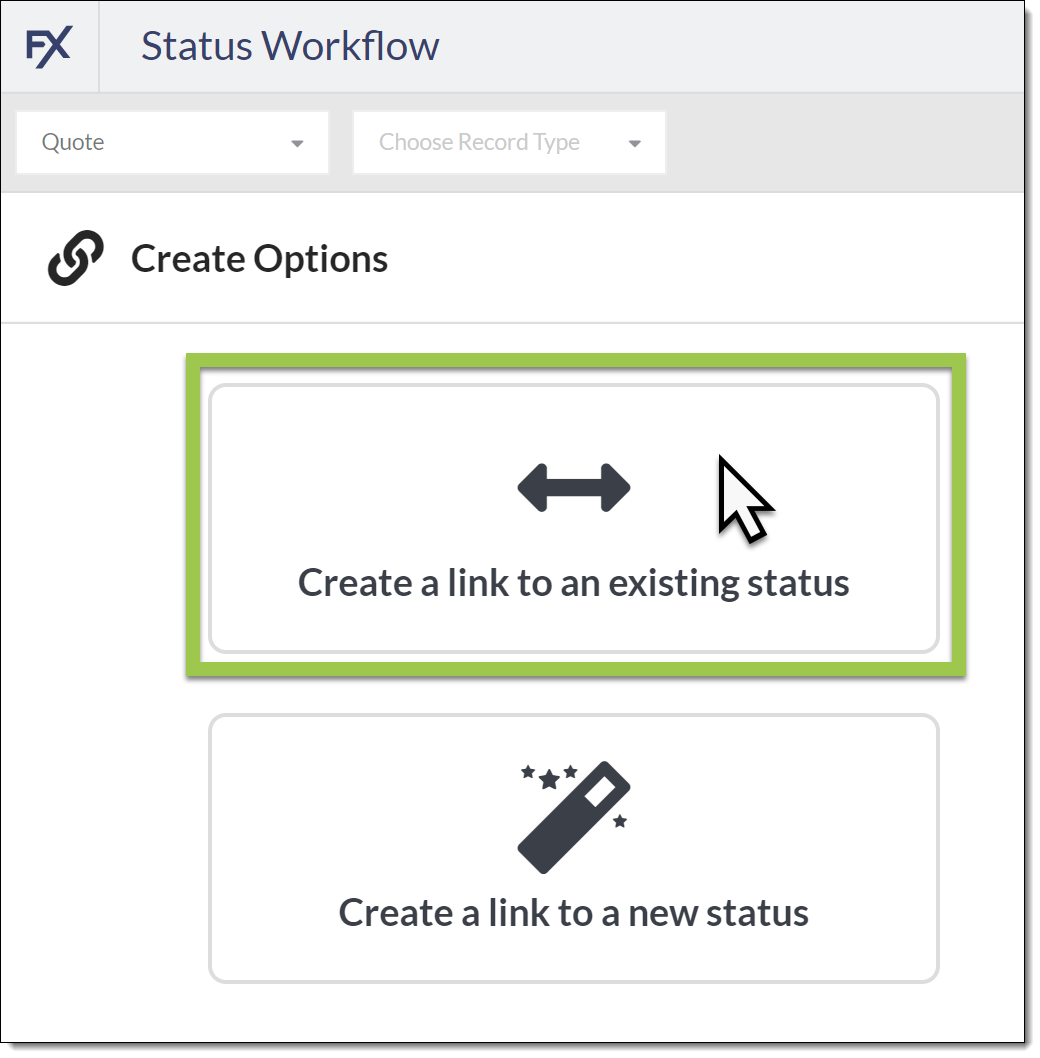
Click the Create options button.
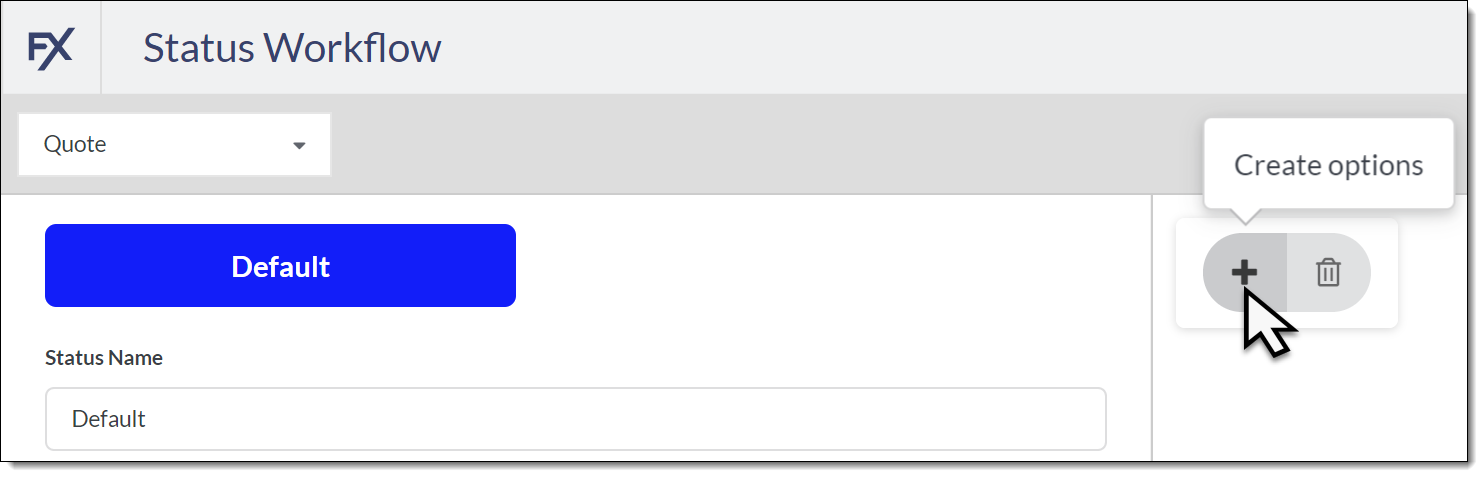
-
Click Create a link to a new status.
-
Enter a Status Name, then click Preview.
The workflow updates with the new status.
-
Make changes if necessary, then click Create.
-
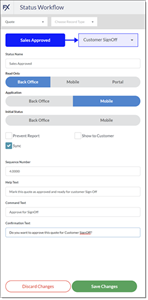
Make the following entries as needed:
Entry Description Read Only:
Select the application where the record in this status should be Read Only
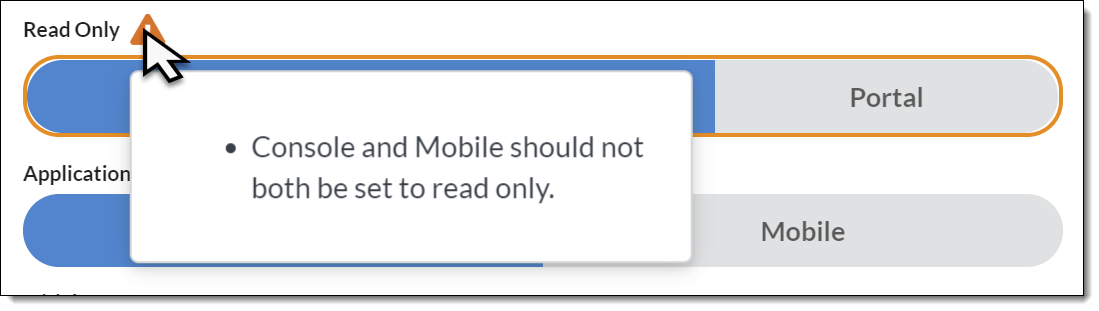
Do not select both Back Office and Mobile
Initial Status:
Select an application if this is the first status for a record created in that interface
Do not select an application if it was already selected as Read Only.
Prevent Report:
Select if a report cannot be attached to a record in this status
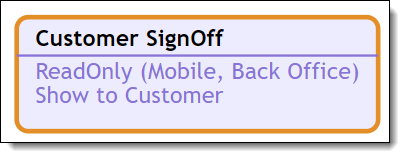
Show to Customer:
Select if a record in this status should be available in Customer Self Service
Sync:
Select if a record in this status should sync to mobile devices
-
If the status can transition to another status, make the following entries:
Entry Description Application:
Select where the transition from this status should occur
For example, if an In Progress status should only change on a mobile device, select Mobile for that status.
Sequence Number:
Specify the sequence number for the status,
Sequence Numbers determine the order of the status in lists.
Help Text:
Message to display to user when hovering over the command button
Command Text:
Enter the label for the button users select to transition from this status to another status
Confirmation Text:
Message to display to users when transitioning a record from this status to another status
-
Click Save Changes.
A Workflow does not update for users until it is Deployed.
Add a Transition to an Existing Status
-
Access the Admin Portal and choose to login to a Production or Sandbox org.
-
Enter the appropriate credentials to login to the desired org.
-
Select Status Workflow from the Admin Portal’s Dashboard.
-
Choose an sObject from the dropdown field.
For custom objects in a status workflow, you can use Salesforce Paths. -
If available, choose a Record Type.
-
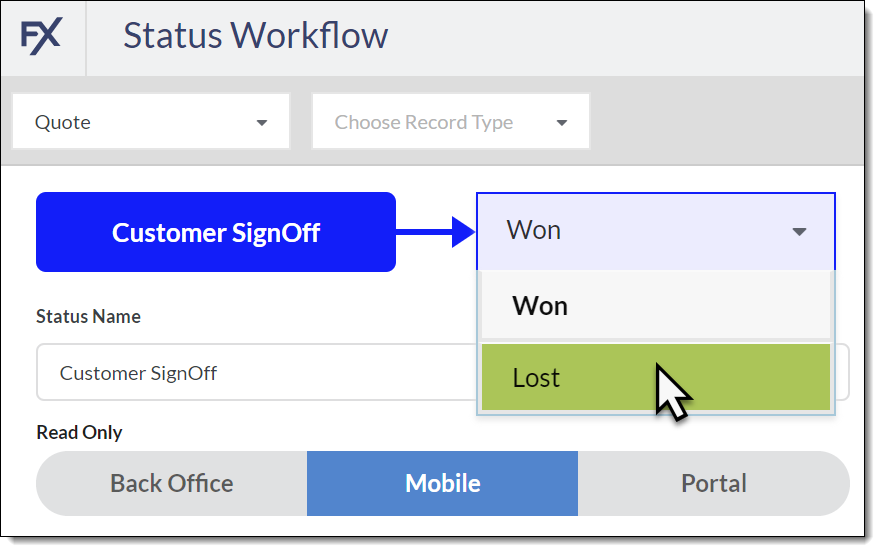
Select the Status the record changes from.
-
In the left bar, select Create a link to an existing status.
-
In the Statuses dropdown, select the existing status the record can change to, then click Preview.
-
Confirm the workflow appears as desired, then click Create.
If necessary, select a different Existing Status, then click Preview again.
-
Make the following entries about the transition:
Entry Description Read Only:
Select the application where the record in this status should be Read Only
Do not select both Back Office and Mobile.
Initial Status:
Select an application if this is the first status for a record created in that interface
Do not select an application if it was already selected as Read Only.
Prevent Report:
Select if a report cannot be attached to a record in this status
Show to Customer:
Select if a record in this status should be available in Customer Self Service
Sync:
Select if a record in this status should sync to mobile devices
Application:
Select where the transition from this status should occur
For example, if an In Progress status should only change on a mobile device, select Mobile for that status.
Sequence Number:
Specify the sequence number for the status
Sequence Numbers determine the order of the status in lists.
Help Text:
Command Text:
Enter the label for the button users select to transition from this status to another status
Confirmation Text:
Message to display to users when transitioning a record from this status to another status
-
Click Save Changes.
This saves the work in progress for the current session. However, the workflow is not saved or available to end users until it is Deployed.
|
You can also Create a link to a new status. Select that option instead, then add the status as described above. |
Delete a Transition Between Statuses
-
Access the Admin Portal and choose to login to a Production or Sandbox org.
-
Enter the appropriate credentials to login to the desired org.
-
Select Status Workflow from the Admin Portal’s Dashboard.
-
Choose an sObject from the dropdown field.
For custom objects in a status workflow, you can use Salesforce Paths. -
If available, choose a Record Type.
-
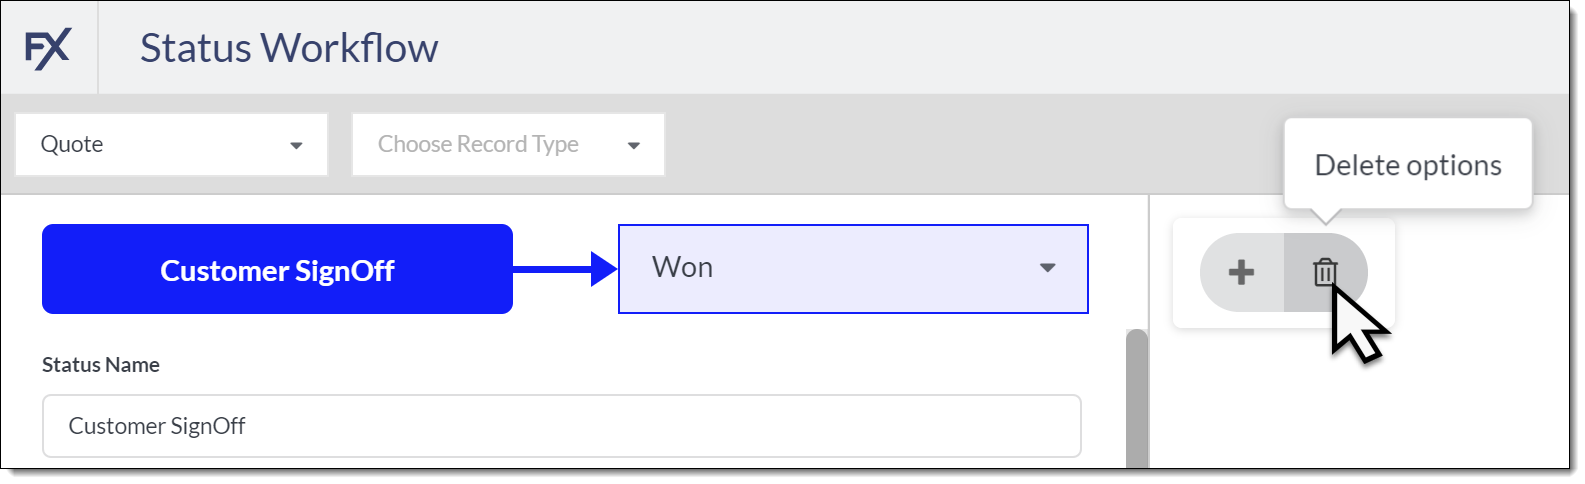
Select the beginning status of the transition.
-
If the selected status can transition to more than one other status, select the status you want to delete from the drop down in the top left.
The transition arrow highlights in the Status Workflow workspace.
You can select the transition arrow on the workspace directly.
-
Select the Delete options trashcan icon.
-
Select the Delete the Transition… option, then click the Delete button.
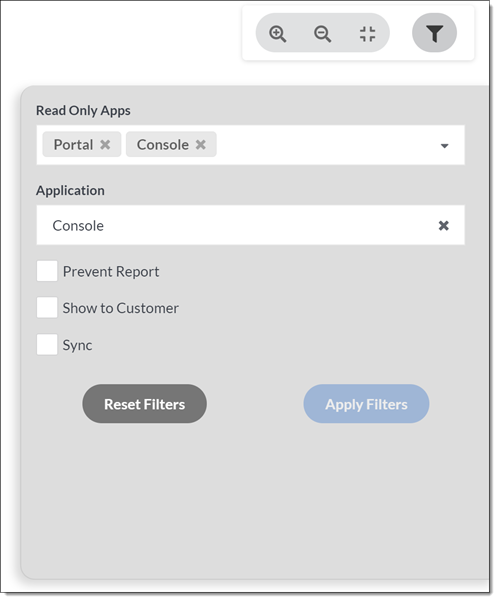
Filter Workflow
Filter the statuses that display in the workflow to focus on a subset of statuses.
For example, show only statuses that sync to mobile or statuses that change from the Back Office.
Applicable statuses remain in full color. Other statuses continue to show in a lighter color.
-
Access the Admin Portal and choose to login to a Production or Sandbox org.
-
Enter the appropriate credentials to login to the desired org.
-
Select Status Workflow from the Admin Portal’s Dashboard.
-
Choose an sObject and Record Type from the dropdown fields.
For custom objects in a status workflow, you can use Salesforce Paths. -
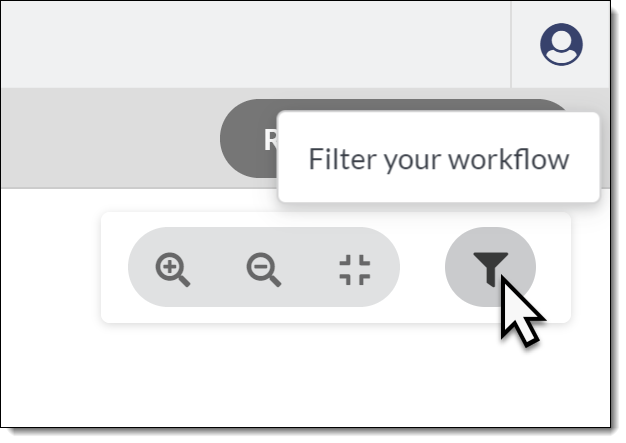
Click the Filter your workflow icon.
-
Select one or more options:
-
Read Only Apps: Highlight statuses that are read only in the selected app(s).
-
Application: Highlight statuses that transition from the selected app.
-
Prevent Report: Highlight statuses that are marked to prevent report attachments.
-
Show to Customer: Highlight statuses that display to customers in Customer Self Service.
-
Sync: Highlight statuses that sync to mobile devices.
-
-
Click Apply Filters.
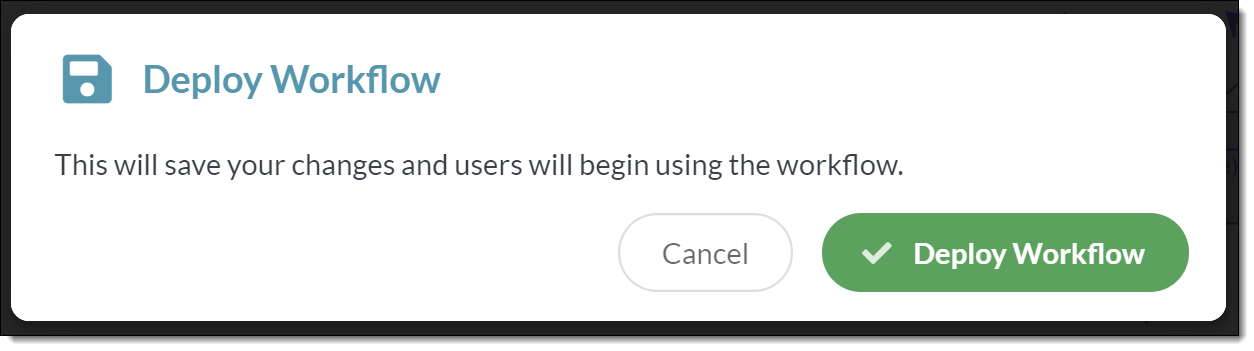
Deploy a Workflow
Deploying a Workflow saves the workflow and makes it available for users.
-
Access the Admin Portal and choose to login to a Production or Sandbox org.
-
Enter the appropriate credentials to login to the desired org.
-
Select Status Workflow from the Admin Portal’s Dashboard.
-
Choose an sObject and Record Type from the dropdown fields.
For custom objects in a status workflow, you can use Salesforce Paths. -
Make and save any changes to the workflow.
See step by step instructions above.
-
Click Deploy.

-
Confirm launching the workflow for users by clicking Deploy Workflow.
Workflow Warnings
-
Status Workflow runs validations on the workflow.
-
When errors are identified, a warning icon displays.
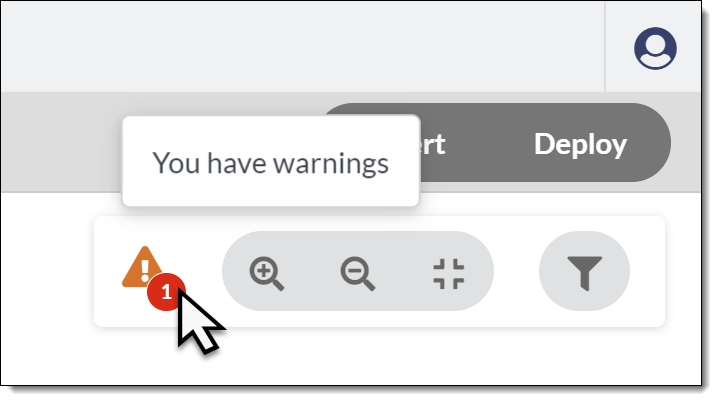
-
Statuses with errors highlight with an orange border in the workspace.
-
After selecting the status, the entries with errors highlight in an orange border in the left panel.
A warning icon also displays.

-
Hover over the entry’s warning icon to display the reason for the warning.