Add a New or Delete a Sync Profile in the Sync Profile Manager
You can use the Sync Profile Manager to create a new sync profile or delete an existing sync profile.
Configuration Profiles Tab
The Sync Profile Configuration Profiles tab list are laid out as follows:
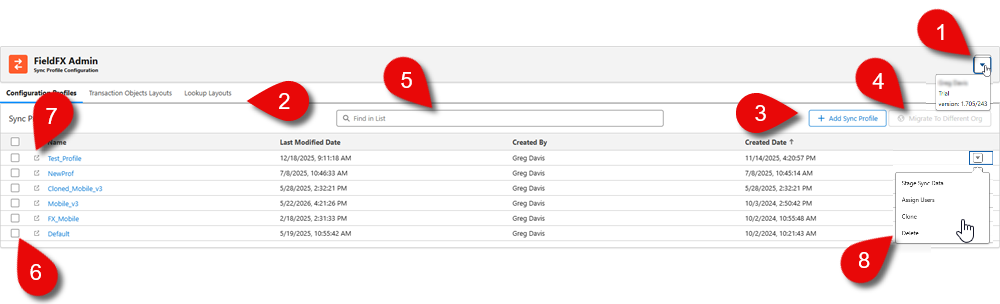
| Callout | Name | Description |
|---|---|---|
1 |
Version Information |
Shows the current version of the Admin Tool. |
2 |
Tab Sections |
The different tabs of the tool:
|
3 |
+ Add Sync Profile Button |
Click to add a blank sync profile that can be customized. |
4 |
Migrate to *Different Org Button |
Select multiple sync profiles to migrate them to another org. |
5 |
Search |
Enter a partial name of the sync profile to automatically sort the results. |
6 |
Selection Boxes |
Click the box next to the sync profile or click the box in the column headers to select all the profiles. |
7 |
Raw file |
Click to open a new window to view a read-only file of the sync profile. |
9 |
Profile options |
Click the down arrow to select from these actions:
|
Landing Page section
Use this dropdown to select the landing page for users assigned to this sync profile. The landing page is the first screen users see when they log in to the mobile app. The options are:
Transaction Objects
This section allows an admin to manage the syncable objects for which records can be created in Mobile.
These objects are used to store operational data that users interact with on a daily basis and users make use of them when they need to view, edit, or create that specific type of data on mobile.
The admin can determine which:
-
fields are visible to the Mobile user for these type of objects
-
which data is visible for these type of objects
Object Layout
In this tab, you can create, delete, and edit a transaction objects layout that are based on these object types.
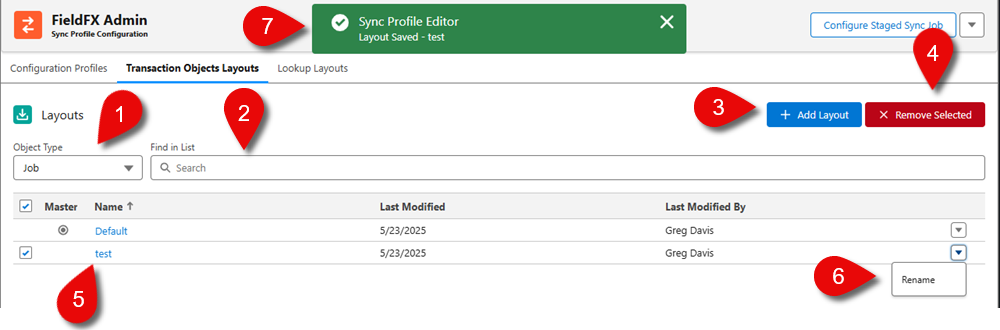
| Callout | Name | Description |
|---|---|---|
1 |
Object Type |
The object that can be used for the basis of the layout. |
2 |
Search |
Enter the name of the layout if the list contains multiple layouts. The list is filtered down to show the entered text. |
3 |
+ Add Layout |
Click this button to add new global blank layout. |
4 |
X Remove Selected |
If you want to delete a layout, select it and then the X Remove Selected button is available. Click to remove the layout. You can’t delete the default layout. A dialog box appears confirming the delete. Click Confirm to delete the layout. |
5 |
Layout list |
The layouts for the transaction objects. Once you create another layout, a Default layout appears in the list. Open the layout from the list to edit it. |
6 |
Layout option |
Click the down arrow button to select: * Rename - This option allows you to rename the layout. |
7 |
Action toast message |
Confirmation messages displayed when an action (Save, rename, or delete) is performed. |
Lookup Objects
This section allows an admin to manage the sync-able reference (look-up) objects in the Mobile app.
With lookup layouts, you can define which fields are searchable and appear in the search results when a user accesses a lookup field.
Object Layout
|
The maximum number of records that can be downloaded by a look-up object is 200K. If a field is used in a lookup filter, the field is automatically added to the lookup object on the next sync. |
The objects that appear are dependent on the modules selected for the sync profile.
You can create, delete, or edit a lookup layout. These layouts control how users search and select related records when they fill out forms either in Mobile or Back Office that contain lookup fields.
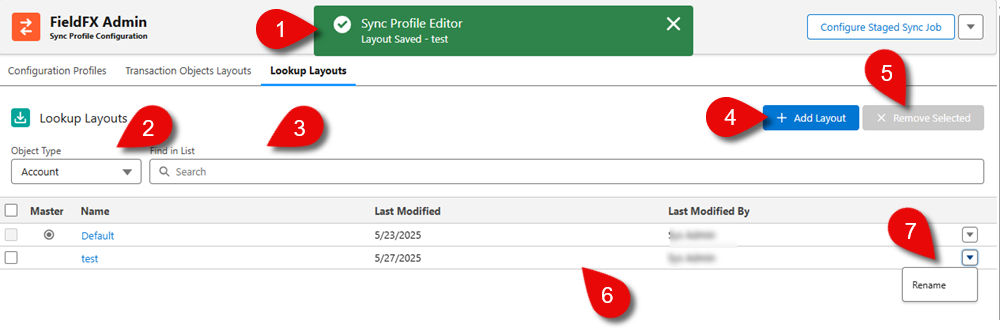
| Callout | Name | Description |
|---|---|---|
1 |
Action toast message |
This is what confirmation messages appear when an action (Save, rename, or delete) is performed. |
2 |
Object Type Dropdown |
Use the dropdown to select an object type to filter by these lookup object types. |
3 |
Search |
Enter the name of the layout if the list contains multiple layouts. The list is filtered down to show results matching the entered text. |
4 |
+ Add Layout Button |
Click to add new global blank layout. |
5 |
X Remove Selected Button |
If you want to delete a layout, select a layout and then the X Remove Selected button is available. Click to remove the layout. You can’t delete the default layout. A dialog box appears confirming the delete. Click Confirm to delete the layout. |
6 |
Layout list |
The layouts for the lookup objects. Once you create another layout, a Default layout appears in the list. Click on the layout to edit it. |
7 |
Layout option |
Click the down arrow to display other actions that can be performed on the layout. * Rename - This option allows you to rename the layout. |
Add a Sync Profile
-
Click + Add Sync Profile button.
-
At the Add New Sync Profile modal, enter a name for the sync profile.
The Static Resource name can only contain alphanumeric characters, must begin with a letter, and must be unique. The name can’t start with an underscore, have 2 underscore characters in a row, or end in an underscore.
-
Click Add to continue the adding process.
The new sync profile appears in the list and a confirmation message appears that the sync profile is added.
Once the sync profile is saved, the
FieldFX_StagedDataPermissionSetpermission set is updated. -
To configure the sync profile you created, follow the steps in editing a sync profile.