Edit a Sync Profile
Once a sync profile is created, you can edit it to customize what modules it can access, its settings, Transaction Objects, and Lookup Objects.
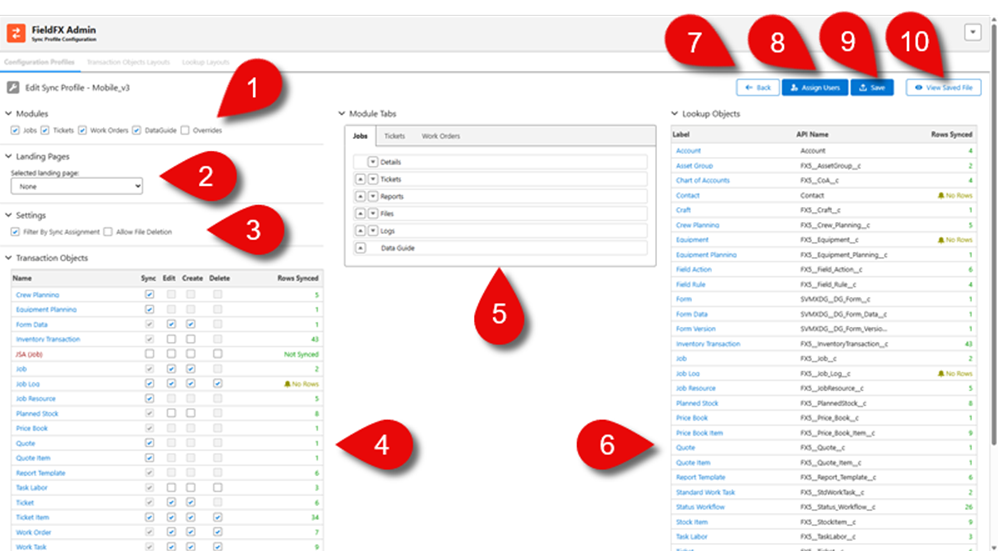
| Callout | Name | Description | ||
|---|---|---|---|---|
1 |
Select which modules users of the sync profile can see in Mobile. Users with this sync profile can see these modules:
|
|||
2 |
The default page that users using the sync profile sees when logging into Mobile. Users with this sync profile see this module upon logging in:
|
|||
3 |
Use these checkboxes to limits the data synced to a mobile user based on their active crew or job assignment records:
|
|||
4 |
A list of transaction objects that users of the sync profile can access in Mobile. The list is based on the modules selected above. The objects are shown in a table with the following columns:
If the object isn’t used, No Rows is shown. If the object doesn’t sync, Not Synced is shown. |
|||
5 |
Use this area to arrange the tabs a mobile users sees if they are viewing:
Click the arrow icons next to the tab name to move it left or right in the FieldFX Mobile App interface. The first tab is the default landing page for that module and has no down arrow icon. Only the tabs shown for each module can be arranged here. For example, if you don’t select the Tickets module, you won’t see the Tickets tabs here.
|
|||
6 |
A list of transaction objects that users of the sync profile can access in Mobile. The list is based on the modules selected above. The objects are shown in a table with the following columns:
The admin can determine which:
|
|||
7 |
Back button |
Click to return to the Sync Profile Manager main screen. If you have unsaved changes, a pop-up appears asking you to save or discard your changes. |
||
8 |
Assign Users button |
Click to assign users to the sync profile. This opens the Assign Users screen where you can select which users have this sync profile. |
||
9 |
Save button |
Click to save the changes to the sync profile. If you have unsaved changes and try to navigate away from the page, a pop-up appears asking you to save or discard your changes. |
||
10 |
View Saved File |
Click to view the read-only file that was generated when you last saved the sync profile. This file is used for troubleshooting and contains the sync profile’s settings, modules, transaction objects, and lookup objects. |
Transaction Objects
Select one or more of the checkboxes.
Configuration Rules Summary
This table breaks down the configuration rules by module selected, what object is affected and the resulting access or condition.
|
Objects can’t be added to the list because they are calculated. Lookup objects can only be added by going into a transaction object and adding the lookup to a layout. |
| Module | Object | Access / Condition | Notes | Meaning |
|---|---|---|---|---|
Job Module |
Job |
Read is ON |
Users can view Job records; no edit unless other permissions apply. |
|
Job Crew |
All unset |
Included as a child or related node under the Job object |
No permissions by default; linked as a child of Job for relational queries. |
|
Equipment Planning |
All unset |
Same as above; part of Job’s data graph for hierarchy. |
||
Job Resource |
All unset |
Included under Job for dependency tracking; no direct access unless configured. |
||
Price Book |
Added only if Create is ON for Job |
Price Book object appears only when Job creation is allowed. |
||
Ticket Module |
Ticket |
Read is ON |
Users can view Ticket records; no edit unless other permissions apply. |
|
Ticket Item |
Read is ON |
Included as a child or related node under the Ticket object |
Ticket Item is readable and treated as a child node of Ticket in the data graph. |
|
Price Book |
Read access if Ticket Item Create is ON |
Not editable |
Price Book becomes visible (read-only) when Ticket Item creation is enabled. |
|
Price Book Item |
Added to Lookup Objects if Ticket Item Create is ON |
Lookup relationship added for referencing Price Book Items. |
||
Quote |
All unset |
No permissions by default; requires explicit configuration. |
||
Quote Item |
All unset |
Included as a child or related node under the Quote object |
Linked under Quote for hierarchy; no default access. |
Standard Predicates
As an admin, add these predicates to the sync profile:
| Object | Predicate |
|---|---|
Job |
Tracking Number and Sync ID cannot be null |
Ticket |
|
Ticket Item |
Sync ID cannot be null |
Eforms & Children |
Automatically Added Objects (Non-Configurable)
These are automatically added and not configured by the user:
| Object | Condition / Predicate |
|---|---|
RecordType |
Always added |
|
Lookup added if Price Book Items are added |
|
|
|
Lookup added if Price Book Items are added |
|
Apply Filter for a Transaction Object
Some Transaction objects don’t have layouts but a filter can be created for records shown in the List and Table views.
|
Make sure you have an understanding of SOQL and constructing SOQL statements. There is no validation on the SOQL and there is no indicators that its valid. |
-
Click on the transaction object name.
-
At the Transaction Object Config - <Transaction Object Name>, enter a valid SOQL filter.
-
Click Apply.
The filter only applies to records in that transaction object for that sync profile.
Change Record Type
You can change the record type of the object to the other record types that are configured for that object and in your org.
-
In a profile’s Transaction Objects list, click on an object.
-
In the Transaction Object Config - <object name>, find the Default config.
Some objects may not have one.
-
Open the default.
-
Choose the record types in the list.
Only the record types configured in your org for that object appear in the list.
The selected record type appears in the RecordTypes column.
Add Global Layout
You can add global layouts to an object.
-
In a profile’s Transaction Objects list, click on an object.
-
In the Transaction Object Config - <object name>, click + Select Global Layout.
-
Choose the layout listed in the Select Layout modal.
The Record Types checkboxes correspond to the chosen layout.
Lookup Objects
See Lookup Objects.
Apply Filter for a Lookup Object
Some Lookup objects don’t have layouts but a filter can be created for records shown in the List and Table views.
|
Make sure you have an understanding of SOQL and constructing SOQL statements. |
-
Click on the lookup object name.
-
At the Lookup Object Config - <Lookup Object Name>, enter a valid SOQL filter.
-
Click Apply.
The filter only applies to records in that lookup object for that sync profile.
Step-by-Step Guides
-
Open the sync profile you want to edit.
-
Edit the following as needed:
-
modules the sync profile should access
-
If there is red text in the Rows Synced column, it means there is an issue with the sync for that object. Check the error message for details on the issue by hovering over the text to see the details.
-
If there is red text in the Rows Synced column, it means there is an issue with the sync for that object. Check the error message for details on the issue by hovering over the text to see the details.
-
-
Click Assign Users button to assign users to the sync profile. See Assign Users to Sync Profile for instructions.
-
Click
 to save changes to the sync profile.
Remove a Field from a Sync Profile
To fully remove a field from a sync profile so that it no longer appears on Mobile:
-
In Back Office, navigate to the sync profile’s page layout for the relevant object (e.g., Ticket Item).
-
Delete or remove the field from the layout.
-
Save the layout.
-
Verify the field no longer appears in the page layout editor.
-
Open every affected layout on the sync profile in the Sync Profile Manager.
-
Re-save the profile to regenerate the static resource (description) file.
-
Wait for the next Mobile sync cycle, then confirm the field no longer appears on the Mobile page layout.
|
Do not skip steps 5–6. The scheduled Stage Data Apex job does not detect field deletions. If you skip the manual re-save, the deleted field will continue to appear on Mobile indefinitely. See [stage-data-field-deletion-limitation] for details. |
Troubleshooting
If you make changes to the sync profile and don’t see the expected results in Mobile, check the following:
General
| Question | What to Check |
|---|---|
Did you click the Save button after making changes to the sync profile? |
Changes aren’t applied until you click Save. |
If you made changes to the Transaction Objects or Lookup Objects, did you click the Apply button in those sections before clicking Save? |
Changes to the objects aren’t applied until you click Apply and then Save. |
INVALID_FIELD – No such column 'AltSync__c' on entity 'User'
When generating staged data or validating a sync profile, the following error occurs when hovering over the INVALID_FIELD text in the Rows Synced column for a lookup object:
SELECT count() FROM User WHERE (AltSync__c=true)
ERROR: No such column 'AltSync__c' on entity 'User'
This error occurs when a sync profile references the AltSync__c field in a filter for an object that does not contain that field.
To resolve this issue, remove the reference to the AltSync__c field from the filter for that object in the sync profile. Then click Apply and Save to save the changes to the sync profile.
MALFORMED_QUERY – Invalid SOSL query
This error occurs when a sync profile filter uses a non-ID field in a query context that requires an ID field.
To resolve it, update the filter so that relationship or subquery conditions use valid ID fields, or simplify the filter to remove unsupported query logic.