Lookup Setup
Prerequisites
To set up lookups, you need the following permissions:
-
Minimum permissions for the FieldFX modules you are using:
-
System permissions:
-
Customize Application
-
View Setup and Configuration
-
Introduction
Lookups are predefined lists of values to standardize data entry across the FieldFX system. They help users to quickly select options instead of manually typing data over and over, possible introducing errors and inconsistencies. They also are commonly used for fields like job statuses, service types, equipment lists, and customer categories. Admins can customize these lists to fit their company’s needs.
Considerations
-
FieldFX doesn’t support lookups to transactional objects from FieldFX Mobile.
Transactional objects include:
-
Job
-
Ticket
-
Ticket Item
-
Ticket Log
-
Price Book
-
Quote
-
Quote Item
-
FX Forms
-
Master-Detail children of FX Forms
-
-
You can’t create lookups and child collections on the same object where both have the same
relationshipName. -
Other objects not supported:
-
FX Forms Data - Custom forms use DataGuide rules that control how data is entered and validated, instead of Lookups
-
Mobile Attachments - File uploads like images or PDFs aren’t managed by Lookups
-
Complex calculations and derived fields - Fields that rely on calculations or formulas that pull data dynamically rather than use static lists
-
Timekeeping records - Time entries are managed through specific timekeeping workflows, not Lookups
-
Job Line items pricing - Pricing is typically handled via price books, not predefined Lookup lists.
-
Add a Lookup
-
From Setup, enter
objectin the Quick Find box, then select Objects. -
Open the custom object on which to add the lookup.
-
Complete the following:
-
Under Custom Fields & Relationships, click New.
-
Select Lookup Relationship.
-
Click Next.
-
Select the object for the lookup and click Next.
For example, select "Contact" if you are adding a Contact lookup.
-
Enter field attributes and click Next.
-
Click Visible twice and click Next.
-
Select the page layouts on which to include the lookup and click Next.
-
Set related list options and cClick Save.
-
-
Grant permissions for the lookup.
Lookup Filters
In FieldFX, you can use Lookup filters to control the records that appear.
| Permission sets and sharing settings control the records you have permission to access. |
With Lookup filters, FieldFX improves data quality by preventing you from selecting invalid records. They are maintained separately in FieldFX Back Office from the filters used for FieldFX Mobile.
Examples
These lookups can be used in the following examples:
Customer Lookup
Basic Customer Lookup on the Job Object
"Account": {
  "FX5__Job__c.FX5__CustomerAccount__c": {
    "predicate": "Account.RecordType.DeveloperName != 'Office' && (ISNULL($Source.FX5__Price_Book__c) || ISNULL($Source.FX5__Price_Book__r.FX5__Account__c) || $Source.FX5__Price_Book__r.FX5__Account__c==Account.Id)"
  }
}Advanced Customer Lookup on the Job Object
"Account": {
  "FX5__Job__c.FX5__CustomerAccount__c": {
    "predicate": "Account.RecordType.DeveloperName != 'Office' && (ISNULL($Source.FX5__Price_Book__c) || ISNULL($Source.FX5__Price_Book__r.FX5__Account__c) || $Source.FX5__Price_Book__r.FX5__Account__c==Account.Id)",
    "sortFormula": {
      "formula": "Account.Name",
      "limit": "10",
      "sort": "asc"
    }
  }
}
|
Contact Lookup
Basic Contact Lookup on Ticket Item Object
"Contact": {
  "FX5__Ticket_Item__c.FX5__Contact__c": {
    "predicate": "Contact.FX5__Available_for_Field_Work__c==true"
  }
}Advanced Contact Lookup on Ticket Item object
"Contact": {
  "FX5__Ticket_Item__c.FX5__Contact__c": {
    "predicate": "Contact.Contact_Record_Type__c=='User Contact'"
  }
}
|
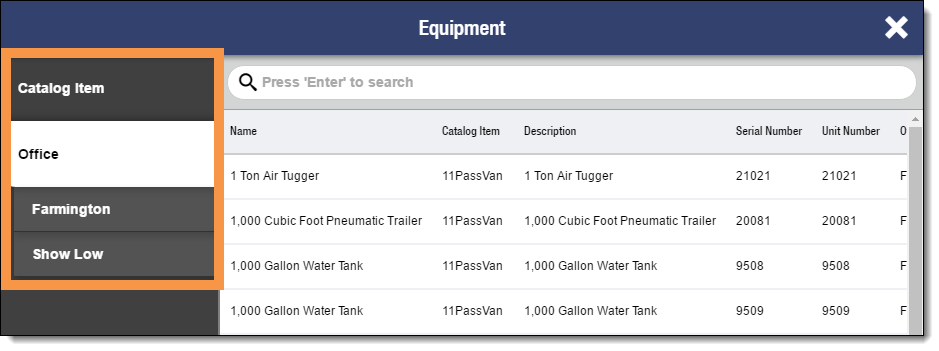
Equipment Lookup
Basic Equipment Lookup on the Ticket Item Object
"FX5__Equipment__c" : {
  "FX5__Ticket_Item__c.FX5__Equipment__c": {
    "predicate": "($Source.CatItem_ID__c==FX5__Equipment__c.CatItem_ID__c)"
  }
}
The predicate formula configures the lookup to display equipment linked to a catalog item.
|
Office Lookup
Scenario
Here’s a lookup filter for the Office lookup on the Job object.
"Account": {
  "FX5__Job__c.FX5__Office__c": {
    "predicate": "Account.RecordType.DeveloperName=='Office' && (ISNULL($Source.FX5__Price_Book__c) || ISNULL($Source.FX5__Price_Book__r.FX5__Office__c) || $Source.FX5__Price_Book__r.FX5__Office__c==Account.Id)"
  }
}Well Lookup
Advanced Well Lookup on the Job Object
"FX5__Well__c": {
  "FX5__Job__c.FX5__Well__c": {
    "sortFormula": {
      "formula": "FX5__Well__c.FX5__Current_Drilling_Depth__c",
      "thresholdFloor": "3000",
      "thresholdCeiling": "9000",
      "limit": "25",
      "sort": "desc"
    }
  }
}|
Use these settings:
|
Add a Lookup Filter
FieldFX Back Office
|
The user’s Profile or Permission Set must grant access to the |
-
From Setup, enter
objectin the Quick Find box, then select Objects. -
Open the object that features the lookup.
-
Under Custom Fields & Relationships, click Edit next to the lookup.
-
Under Lookup Filter, click Show Filter Settings.
-
Under Filter Criteria, select the criteria to use for the lookup filter.
-
Click Save.
FieldFX Mobile
| This information and these steps are for the older FieldFX Mobile and not the newer FieldFX Mobile App. |
| Maintain Mobile filters in the Admin Portal’s dedicated Mobile Filters tool. |
-
Add a FX_Mobile_Filters static resource:
-
Open a text editor.
-
Enter the following to name the static resource:
window.FX_Mobile_Filters = { -
Enter the API name of the related object for the lookup:
window.FX_Mobile_Filters = { "FX5__Price_Book__c": { -
Enter the lookup’s object followed by the lookup’s API name:
window.FX_Mobile_Filters = {
  "FX5__Price_Book__c": {
    "FX5__Job__c.FX5__Price_Book__c": {
You can only add lookup filters for lookups on these objects:
-
Quote
-
Quote Item
-
Job
-
Ticket
-
Ticket Item
-
FX Form
You can add an unlimited number of lookup filters for each supported object.
-
-
Enter the formula to use for the lookup filter:
Click to expand code sample
window.FX_Mobile_Filters = {
  "FX5__Price_Book__c": {
    "FX5__Job__c.FX5__Price_Book__c": {
      "predicate": "(ISNULL($Source.FX5__CustomerAccount__c) || $Source.FX5__CustomerAccount__c==FX5__Price_Book__c.FX5__Account__r.Id || ISNULL(FX5__Price_Book__c.FX5__Account__r.Id)) && (ISNULL($Source.FX5__Office__c) || $Source.FX5__Office__c==FX5__Price_Book__c.FX5__Office__r.Id || ISNULL(FX5__Price_Book__c.FX5__Office__r.Id)) && (ISNULL($Source.FX5__Segment__c) || $Source.FX5__Segment__c==FX5__Price_Book__c.FX5__Segment__c || ISNULL(FX5__Price_Book__c.FX5__Segment__c))"
    }
  }
}
Don’t use Roll-Up Summary fields in the formula. Only use supported functions and operators in the formula. Refer to the Formulas article for a list of supported functions and operators. -
Add closing braces
}to end the lookup filter:Click to expand for code sample
window.FX_Mobile_Filters = {
  "FX5__Price_Book__c": {
    "FX5__Job__c.FX5__Price_Book__c": {
      "predicate": "(ISNULL($Source.FX5__CustomerAccount__c) || $Source.FX5__CustomerAccount__c==FX5__Price_Book__c.FX5__Account__r.Id || ISNULL(FX5__Price_Book__c.FX5__Account__r.Id)) && (ISNULL($Source.FX5__Office__c) || $Source.FX5__Office__c==FX5__Price_Book__c.FX5__Office__r.Id || ISNULL(FX5__Price_Book__c.FX5__Office__r.Id)) && (ISNULL($Source.FX5__Segment__c) || $Source.FX5__Segment__c==FX5__Price_Book__c.FX5__Segment__c || ISNULL(FX5__Price_Book__c.FX5__Segment__c))"
    }
  }
}
Every left brace {should have a matching right brace}. -
Save the file with the name
FX_Mobile_Filters.
-
-
Upload the FX_Mobile_Filters file to FieldFX Back Office:
-
From Setup, enter
staticin the Quick Find box, then select Static Resources. -
Click New.
-
In Name, enter
FX_Mobile_Filters. -
In Cache Control, select "Public".
-
Click Choose File.
-
Select the FX_Mobile_Filters file.
-
Click Save.
Lookup Filter Builder
Define the lookup filters for FieldFX Back Office and FieldFX Mobile separately.
Mobile lookup filters are maintained in the Admin Portal’s dedicated Mobile Filters tool.
The Lookup Filter Builder makes it easier to add lookup filters that work systemwide.
Optional Filters
You can optionally use lookup filters but keep in mind the filtering logic is enforced on the validation rule only when creating a new record on these objects:
| Object | API Name | Lookup Filter |
|---|---|---|
Job |
|
|
Quote Item |
|
|
Ticket Item |
|
How the Lookup Filter Builder Works
When Lookup Filter Builder runs, it:
-
Analyzes FieldFX Back Office to look for lookup filters.
-
Creates a new FX5__Mobile_Filters static resource containing every lookup filter in FieldFX Back Office
-
Creates a backup copy of the current FX5__Mobile_Filters file for your org.
-
Replaces the existing FX5__Mobile_Filters file with the new FX5__Mobile_Filters file.
-
Uploads the backup copy of the previous FX5__Mobile_Filters file to the static resource list for your org.
Once the Lookup Filter Builder uploads a new FX5__Mobile_Filters file, the lookup filters listed in the file work systemwide.
Set Up the Lookup Filter Builder
-
From Setup, enter
remotein the Quick Find box, then select Remote Site Settings. -
Click New Remote Site.
-
In Remote Site Name, enter
SFDCToolingAPI. -
In Remote Site URL, enter the domain in which your org runs.
Example 1. Finding your domainTo get the URL for your domain, copy the first part of the URL from the address bar in your browser:
Use your customized my domain URL that is specific to your org instead of your instance specific URL. You can find your my domain here.
Don’t use instanced URLs when logging in to Salesforce with code or as a user. When your org is moved to another Salesforce instance, code using the instanced URL breaks. If you find instanced URLs in your code, replace them with your My Domain login URL or the default Salesforce login URL. See Log In to Salesforce with Code for more information.
The Remote Site URL field is case-sensitive. Make sure the URL you enter uses the correct capitalization.
-
Click Active.
-
Click Save.
-
Complete one of the following:
Schedule the Lookup Filter Builder to Run Automatically
Prerequisite
Complete Set Up the Lookup Filter Builder first.
-
From Setup, enter
apexin the Quick Find box, then select Apex Classes. -
Click Schedule Apex.
-
In Job Name, enter "Lookup Filter Builder".
-
In Apex Class, select "LookupFilterHandler".
-
Select how often you want the Lookup Filter Builder to run.
Select a frequency of at least once per week. -
Click Save
Run the Lookup Filter Builder Manually
Prerequisite
Complete Set Up the Lookup Filter Builder first.
-
Select Utilities → Apex Execute.
-
Enter the following script:
System.debug(FX5.FXWorkerLauncher.DoWork('FX5.LookupFilterHandler', null)); -
Click Execute.
The Lookup Filter Builder:
-
Analyzes FieldFX Back Office to look for lookup filters.
-
Creates a new FX5__Mobile_Filters static resource containing every lookup filter in FieldFX Back Office
-
Creates a backup copy of the current FX5__Mobile_Filters file for your org.
-
Replaces the existing FX5Mobile_Filters file with the new FX5Mobile_Filters file.
-
Uploads the backup copy of the previous FX5__Mobile_Filters file to the static resource list for your org.
-
Search Filters
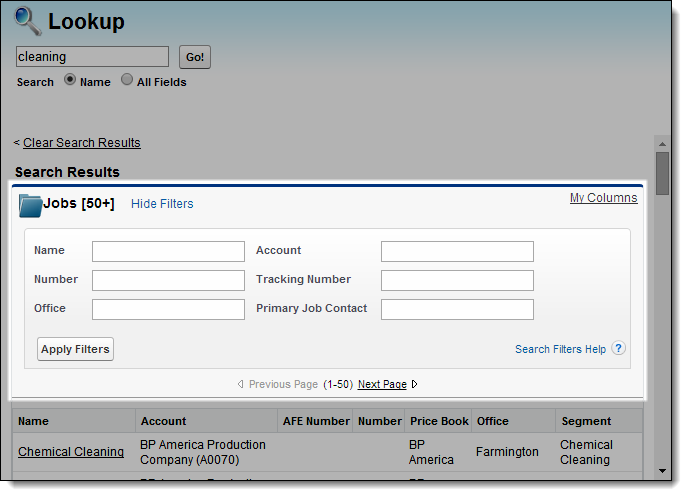
You can use Search filters to refine the lookup search results.
How Search Filters Work using Salesforce Classic in Back Office
In FieldFX Back Office lookups, search filters display above search results.
| This information and these steps are for the older FieldFX Mobile and not the newer FieldFX Mobile App. |
In FieldFX Mobile lookups, search filters display on the sidebar.
How Search Filters Work using the Lightning Experience in Back Office
Search filters help users refine and locate records within different FieldFX modules. These search filter types work dynamically allowing for real-time data updates and customization.
Global Search |
|
List View |
|
Advanced Report |
|
Dynamic |
|
Enable Enhanced Lookups
You must enable the Enhanced Lookups feature to use search filters in FieldFX Back Office lookups.
-
From Setup, enter
search settingsin the Quick Find box, then select Search Settings -
Select Enhanced Lookups under Lookup Settings.
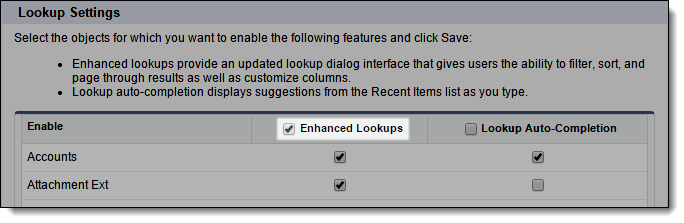
-
Click Save
Add Search Filters
The steps for adding a search filter is different between FieldFX Back Office and FieldFX Mobile.
FieldFX Back Office
Prerequisite |
Complete Enable Enhanced Lookups. |
-
From Setup, enter
objectin the Quick Find box, then select Objects. -
Open the Settings page for the lookup’s related object.
Example 2. To add an Equipment lookupOpen the Settings page for the Equipment object.
-
Complete the following:
-
Under Search Layouts, click Edit next to Lookup Filter Fields.
-
In Available Fields, select fields to use as search filters.
-
Click Add.
-
Click Save.
-
FieldFX Mobile
| This information and these steps are for the older FieldFX Mobile and not the newer FieldFX Mobile App. |
-
From Setup, enter
objectin the Quick Find box, then select Objects. -
Open the Settings page for the lookup’s related object.
Example 3. To add an Equipment lookupOpen the Settings page for the Equipment object.
-
Complete the following:
-
Under Search Layouts, click Edit next to Search Results.
-
In Available Fields, select fields to use as search filters.
-
Click Add.
-
Click Save.
-
Search Results Fields
Search results fields display information about search results in a lookup.
Configure Search Results Fields
The steps for adding a search filter is different between FieldFX Back Office and FieldFX Mobile.
FieldFX Back Office
-
From Setup, enter
objectin the Quick Find box, then select Objects. -
Open the object that features the lookup.
-
Complete the following:
-
Under Search Layouts, click Edit next to Lookup Dialogs.
-
In Available Fields, select new fields to include.
-
Click Add.
-
In Selected Fields,
-
Select fields to remove and click Remove.
-
Or change the order.
-
-
Select Override the search result column customizations for all users.
-
Click Save.
-
FieldFX Mobile
| This information and these steps are for the older FieldFX Mobile and not the newer FieldFX Mobile App. |
-
From Setup, enter
objectin the Quick Find box, then select Objects. -
Open the object that features the lookup.
-
Complete the following:
-
Under Search Layouts, click Edit next to Search Results.
-
In Available Fields,
-
Select new fields to include and click Add.
-
Or to remove fields, select the fields and click Remove.
-
-
In Selected Fields, change the order.
-
Select Override the search result column customizations for all users.
-
Click Save.
-
Optimize Lookup Load Times
Your permissions and record access both affect how long it takes to open lookups.
To optimize performance:
-
Add lookup filters to every lookup so that only relevant records display
-
Only give FieldFX Mobile users Read permission to essential fields on each object
Custom Editors
You can use Custom Editors to enhance FieldFX Back Office lookups.
Refer to the Custom Editors Setup article for details.