JobEditor Custom Editor Setup
How the JobEditor Works
With the JobEditor, you can use the following lookups:
Customer Lookup
| Setting | Value | Impact |
|---|---|---|
Lookup Filter |
Impact: Only accounts that aren’t offices display available for selection. |
|
Fields for Available Records |
|
The listed fields display for customers in search results. |
Fields Analyzed for Keyword Searches |
|
Keyword searches analyze the names of customers. |
Sort Order of Available Records |
|
Customers sort in alphabetical order by name. |
Office Lookup
| Setting | Value | Impact |
|---|---|---|
Lookup Filter |
|
Only office accounts display available for selection. |
Fields for Available Records |
|
The listed fields display for offices in search results. |
Fields Analyzed for Keyword Searches |
|
Keyword searches analyze the names of offices. |
Sort Order of Available Records |
|
Offices sort in alphabetical order by name. |
Price Book Lookup
| Setting | Value | Impact |
|---|---|---|
Lookup Filter |
Impact: Only active price books linked to the job’s customer, office, or segment display available for selection. |
|
Fields for Available Records |
Impact: The listed fields display for price books in search results. |
|
Fields Analyzed for Keyword Searches |
Impact: Keyword searches analyze the name, customer, office, and segment of price books. |
|
Sort Order of Available Records |
|
Price books sort in alphabetical order by name. |
Switch to Use the JobEditor
Prerequisite Set up the Custom Editors feature
-
Complete the following:
Configure the JobEditor
-
From Setup, enter
objectin the Quick Find box, then select Objects. -
Click Job.
-
Under Buttons, Links, and Actions,
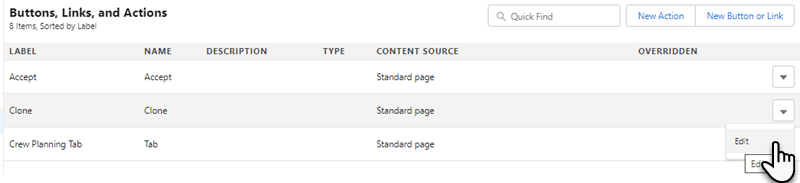
Even though this image is for the CrewPlanningEditor, the Edit option is located in the same location.
Action Clone row Edit row New row In the Override With, select
VisualforcePage
Select
JobEditor
-
Continue with Add a RESTEndPoint Remote Site Setting.
Add a RESTEndPoint Remote Site Setting
-
Open the Jobs tab.
-
Open a job.
-
Click Edit.
-
If the JobEditor displays, proceed Grant Permission to the JobEditor.
-
If an error message displays, proceed to the next step.
-
-
Copy the domain listed in the error message.
Example 1. Sample domain name to copyUse your customized my domain URL that is specific to your org instead of your instance specific URL. You can find your my domain here.
Don’t use instanced URLs when logging in to Salesforce with code or as a user. When your org is moved to another Salesforce instance, code using the instanced URL breaks. If you find instanced URLs in your code, replace them with your My Domain login URL or the default Salesforce login URL. See Log In to Salesforce with Code for more information.
-
From Setup, enter
remotein the Quick Find box, then select Remote Site Settings. -
Click New Remote Site.
-
In Remote Site Name, enter
RESTEndpoint. -
In Remote Site URL, enter the listed domain you copied.
The Remote Site URL field is case-sensitive so make sure the URL you enter uses the correct capitalization.
-
Click Active.
-
Click Save.
-
Continue with Grant Permission to the JobEditor.
Grant Permission to the JobEditor
-
From Setup, enter
permissionin the Quick Find box, then select Permission Sets. -
Open a permission set for Visualforce pages.
-
Under Apps, click Visualforce Page Access.
-
Click Edit.
-
Add "FX5.JobEditor" to Enabled Visualforce Pages.
-
Click Save.
-
Repeat these steps for other permission sets as needed.