Job/Ticket Log
FieldFX has specific objects called Job Log and Ticket Log where mobile users can create log entries on a specific job or ticket.
Field users can capture activities that are happening on a job or ticket throughout the length of a job. Some customers require their users to track their activities at the job level.
|
Before the addition of Job Logs, a system admin creates a custom FX Form or uses a customized ticket log object. The user, on the other hand, who makes the ticket log goes inside the job’s ticket and tracks the activities related to the ticket.
With the old FX Forms, values in the log entry can’t be forward to a new log entry. Using the new job logs, values can be brought forward to a new job log entry.
A job can consist of multiple tickets:
-
where a ticket could be created for each day on the job
or -
where a ticket could be created for any activity performed on the job, or both).
The job can be active over multiple days.
Features
-
Job Log Entries can be captured either in Back Office or Mobile
-
If there are many job entries, the user can collapse the log entries by day
-
In Mobile, a user can see if there is a missing entry for a day
-
When copying a job log entry to a new log entry of the same type,
-
The field values are copied from the original except for the start and end times so the job entries have the same information
-
New copies of existing job log entries have the start date which is the end date of the latest previous job log entry
-
-
A mobile user can quickly add new log entries
-
Job Log supports multiple record types after the System Administrator configures the layouts and assigns the appropriate picklist values for each record type
-
The system administrator can build custom fields for each record type
-
A report designer can pull job logs into the parent job PDF report
Schema
Entries in the schema are usually created in the FieldFX Mobile App, but can also be added in Back Office. These are used for auditing, payroll time validation, customer review, and job performance tracking. They are often triggered automatically by your org’s workflow (for example, starting a ticket). Any read-only logs could be auto-generated by your system.

Field Sets can control what fields mobile users can see and use. Layouts and Permission Sets in Back Office control their access.
The schema for the FX5__Job_Log__c object has the following types of fields:
| These objects and fields are typical for a Job Log object. Depending on your org’s setup and workflow, not all objects and fields may appear or as named below. |
| Types | Object | Description |
|---|---|---|
Lookup |
These fields connect the job to related records. |
|
Job |
This object associates the log entry with a specific job. |
|
Ticket |
If the log entry is tied to a particular ticket. |
|
Created By / |
Standard Salesforce user lookups. |
|
Core Log Entry Fields |
These fields track the actual log details. |
|
Start Date/Time |
The date and time the event was started. |
|
User/Technician Info |
Records who made the entry. |
|
Created By |
Usually auto-populates with the back office or mobile user. |
|
Time Tracking |
These fields support labor tracking or job duration: |
|
Start Date/Time |
Labor or Job start time. |
|
Stop Date/Time |
Labor or Job end time. |
|
How Job Logs Work
This could be a typical flow of how Job Logs work across the FieldFX Mobile App and FieldFX Back Office. Your workflow and processes in your org may differ depending on your specific needs.
Logs record events that aren’t physical but are critical (for example, waiting, downtime, or arrival).
-
A field user in FieldFX Mobile opens a job ticket in the FieldFX Mobile App.
-
The job log entry is synced to back office.
During a sync, the entry is uploaded. Office staff can see in real time when the mobile user started the job. They can run reports on job duration, any pauses or delays.
-
Manual or Automated Entries
Users can manually enter logs like "Paused for weather" or "Waiting on customer." The system can also automatically generate logs like "Job Completed," "Ticket Finalized, or "Mobile Sync Failed."
-
Use Time Tracking and Billing (if enabled)
The logs can include start and end times. The timestamps can drive payroll timesheets, used by billing calculations, and help verify time spent on site during disputes.
-
Audit and Compliance functions
Logs serve as a permanent audit trail. You can use them for regulatory compliance, internal reviews, or customer proof of when work was performed.
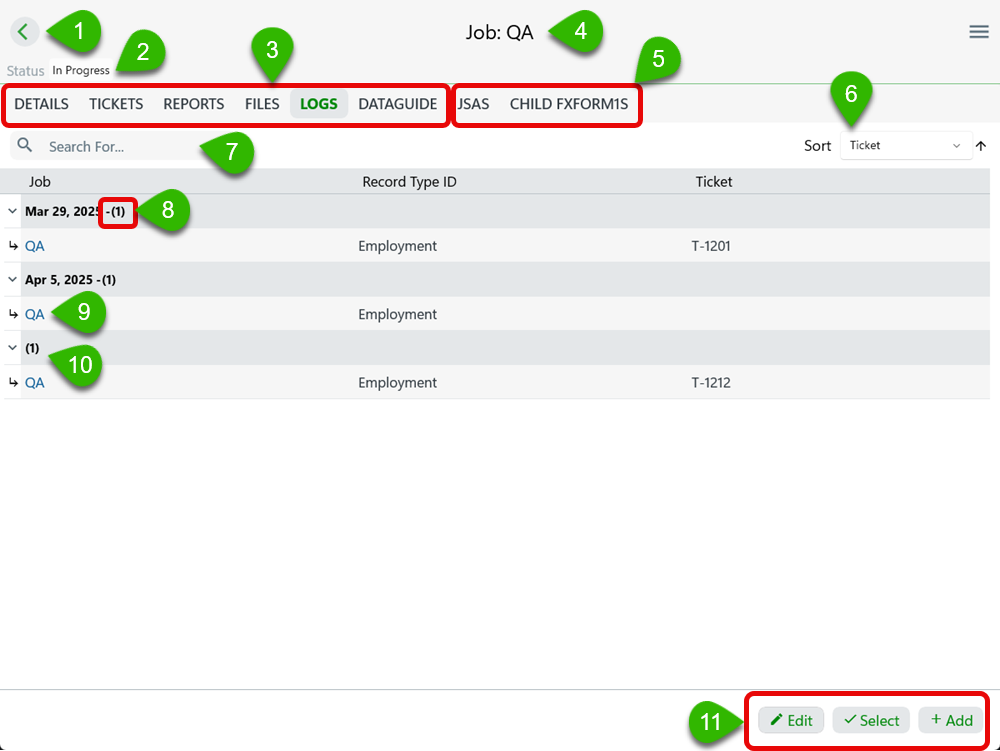
Logs Tab Layout
If a job or ticket have log entries, they are grouped by date and individual log entries are shown underneath the date. They are organized in a table with columns. Swipe to the right to show more fields (if they are on the Job Record).
| Callout | Name | Description | ||||||||||||||||||
|---|---|---|---|---|---|---|---|---|---|---|---|---|---|---|---|---|---|---|---|---|
1 |
Back Arrow |
|
||||||||||||||||||
2 |
Status |
Status of the job or ticket. |
||||||||||||||||||
3 |
Tabs |
These are the same if you are on a job or ticket. |
||||||||||||||||||
4 |
Header |
The header is different if you are on a job or ticket and contains these items:
|
||||||||||||||||||
5 |
Tab sections |
The order of the tabs varies whether you are looking at a job or ticket.
|
||||||||||||||||||
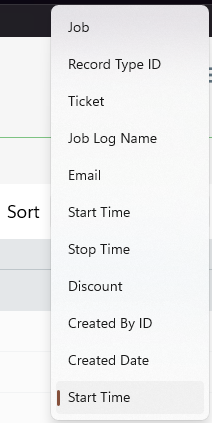
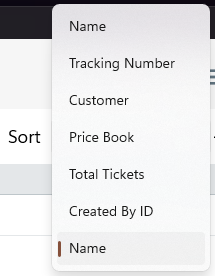
6 |
Sort List View |
You can sort the log entries differently depending if you are on the Job or Ticket tab.
|
||||||||||||||||||
7 |
Search |
If there are many job entries for a job log or ticket log, enter a term and the list automatically sorts to match. |
||||||||||||||||||
8 |
Number of entries |
Log entries are shown by date and if there are multiple for the date, the total number appears in parentheses. |
||||||||||||||||||
9 |
Log entry |
The log entry for that date. |
||||||||||||||||||
10 |
No Date |
If the log entry doesn’t have a start date, it is shown in a separate group. |
||||||||||||||||||
11 |
Log Entry Action Buttons |
|
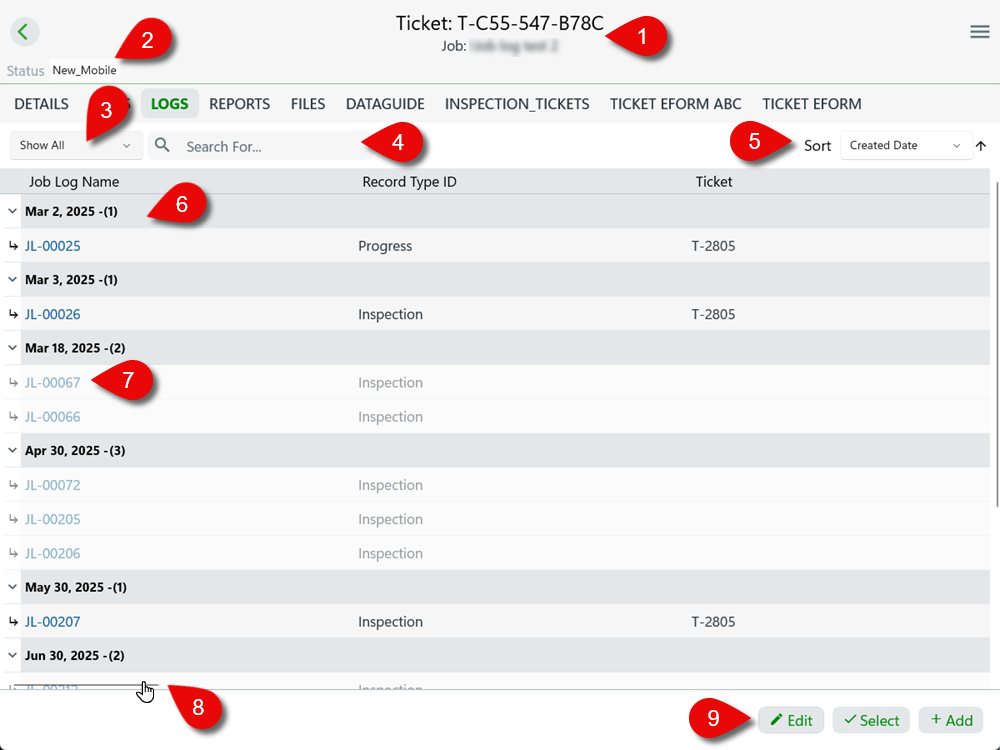
Log Entries Grid
In a Job or Ticket there can be multiple log entries. The layout of these records are the same for Job or Tickets.
| Callout | Name | Description |
|---|---|---|
1 |
Job/Ticket Name |
Shows the name of the ticket the log entries are attached to. |
2 |
Status |
Shows the status of the job or ticket. |
3 |
Show by eForms attached to the Job or Ticket Object |
Use the dropdown menu to show all the log entries or just those by the eForm connected to the object. |
4 |
Search |
Enter text in the field to have the job/ticket entries automatically sort to what was entered. |
5 |
Sort dropdown |
You can sort by the fields shown in the list. |
6 |
Ticket Log Entries |
Ticket Log Entries are displayed by date. |
7 |
Job Log Entries |
If you are viewing the log entries in a ticket, Ticket log entries are selectable while Job Log entries are not. If viewing the log entries in a job, those same entries can be selected. |
8 |
Horizontal scroll bar |
Scroll to display additional columns |
9 |
Action buttons |
Add a new entry using the eForm or select one or more entries to copy or delete them. |
Step-by-Step Guides
After Job Logs are set up, a Mobile user can:
Edit a Mobile Job / Ticket Log Entry to a New Entry
Click to expand - Edit a Job / Ticket Log Entry
Items that are included in a Ticket Item grid, eForm Child records, or Job Logs can be edited inside the grid and the values in the cell can be changed.
-
Enter a ticket/job log/child eForm.
-
Tap the ITEMS menu.
A list of ticket items for that ticket appears.
-
Tap
 to enter the Edit mode.
 -
Edit directly in an editable cell.
Field columns with a gray background are not editable and those with a white background can be edited. -
Tap
 to save the changes.
The new value appears for that cell.
Select One or More Log Entries
-
Tap ✓ Select to open checkboxes before each of the log entries.
-
Tap either ✓ Select All to select all the log entries that appear.
-
Once one or more log entries are selected, tap Copy to make a copy.
A copy appears in the list with the same attributes as the source log entry.
-
Tap 𐄂 Cancel to exit the selection mode.
Add a Mobile Job / Ticket Log Entry Quickly
-
Tap + Add to open the New Log screen.
-
Click on the record type that is at the top of window.
The Record Types differ from org to org. See Sync Engine Record Types for more information. -
Complete the fields in the log entry.
-
Tap Save.
The new entry appears in the job entries list.
Add Job Log entry in Back Office
| Complete the setup of Job Logs before adding a Job Log entry in Back Office. |
Once the configuration for Job Logs is completed, adding a new entry is simple as clicking the New button in the Related List tab of a job.
Copy a Mobile Log Entry
-
In the grid of log entries (for a job or ticket), tap ✓ Select.
-
Select a log entry.
-
Tap Copy.
The copied log entry appears in the grid list. Entries from the log entry you copied (source) are brought into the new log entry (copy).
The copied log entry has the start date of the original log entry’s end date.
For example: Let’s say you copy a log entry that has an end date and time of 12/1/25 4:55pm, the copy has a start date and time of 12/1/25 4:55 pm.
Copy a Job Log Entry in Back Office
-
Navigate to the job in Back Office.
-
Open the job and scroll down to the Related Lists section.
-
At the Job Log table, select the existing job log entry.
-
Click either Clone or Copy (depending on your configuration).
A new job log entry is created with:
-
All field values from the original entry are copied over except Start/End times
-
The new entry’s Start Date defaults to the End Date of the previous log.
-
-
Adjust the details of the new entry like Start/End times and other specific fields for the new entry.
-
Save the new job log entry.
|
Recommended Reading
For more information, see:
| FieldFX Documentation | PTC ServiceMax Help Center | Salesforce Documentation |
|---|---|---|
|
|