Packet Viewer
Introduction
The Packet Viewer is a tool in the Audit Log that displays the contents of sync packets.
-
A sync packet contains changes made in FieldFX Mobile since the last sync.
-
Sync packets get uploaded to FieldFX Back Office when you sync.
-
Every Pre-Sync Upload, SyncUploadComplete, and SyncUploadError entry contains a sync packet.
Use the Packet Viewer to reprocess sync packets that didn’t upload to FieldFX Back Office successfully.
|
Admins: Verify the CDN PacketViewer Resource URL setting is for latest (for example, using setting the Packet Viewer version to |
Deprecated Visualforce Pages
Click to expand
Starting in FX26R1, several legacy Salesforce Visualforce pages used by some back-office users are no longer supported. These pages were deprecated to address security review requirements.
The deprecated pages include:
-
CreditMemo.page -
InvoiceItems.page -
QuoteItems.page -
TicketItems.page -
JobDirections.page -
JobShiftScheduling.page -
JobWhiteboard.page -
PacketViewer.page
If your previous workflows relied on opening these pages directly (for example, from a custom button, tab, or bookmark), you will now use the current UI instead.
Use the following paths to complete your day-to-day tasks:
| Deprecated VF page | New equivalent (if any) | Notes |
|---|---|---|
|
Salesforce Files + updated FieldFX file sync |
Attachment Ext & Chatter integration retired. |
|
No new FieldFX replacement; ERP expected to handle |
Credit Memo objects themselves are retired (see 2023 Feature Retirement). |
|
Lightning related lists + modern FFX grids/CPQ |
Same data; VF grids removed for security; use Lightning pages and newer pricing/CPQ UIs. |
|
Lightning components / custom links to maps |
No direct VF replacement; rely on address fields + external map links. |
|
Service Board / modern scheduling UIs |
Old scheduling VF replaced conceptually by Service Board & new Shift Scheduling app. |
|
Files + document templates on Jobs/Tickets |
Packets represented as generated files/reports. |
|
|
|
| If a button or tab that you used previously now shows an error or no longer opens the expected page, contact your Salesforce administrator. They may need to update your org’s customizations to point to the current FieldFX pages. |
Prerequisites
To setup and use Packet Viewer, you need to:
| Have these user licenses | Have these permissions | Complete these tasks and review these topics before continuing |
|---|---|---|
Access Packet Viewer
Open an Audit Log entry and click Packet Viewer.
Details Panel
The Details panel displays your username and information about your org.

Audit Log Detail Tab
The Audit Log Detail tab displays the Audit Log entry for the sync packet.
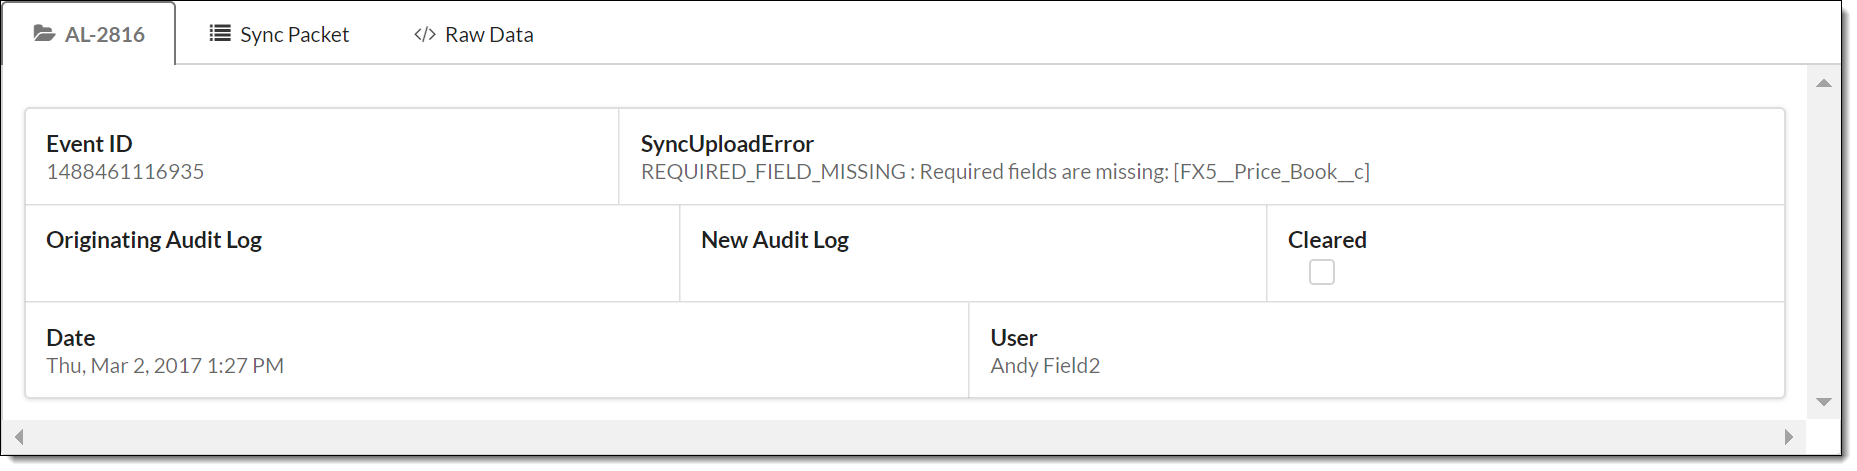
Fields
| Field Name | Description | ||||||||||||||||||
|---|---|---|---|---|---|---|---|---|---|---|---|---|---|---|---|---|---|---|---|
Event ID |
displays the ID of the event that caused a sync upload error for this sync packet. |
||||||||||||||||||
Type |
displays the activity recorded by the Audit Log entry:
|
||||||||||||||||||
Originating Audit Log |
displays a link to Audit Log entry from which this entry was created.
|
||||||||||||||||||
New Audit Log |
displays a link to the Audit Log entry created from this entry. * This field only displays data if you reprocessed a sync packet and are viewing the original sync packet. |
||||||||||||||||||
Cleared |
indicates whether the sync packet was reprocessed successfully.
|
||||||||||||||||||
Date |
displays the date and time of the activity. |
||||||||||||||||||
User |
displays the user responsible for the activity. |
Sync Packet Tab
The Sync Packet tab displays the contents of a sync packet.
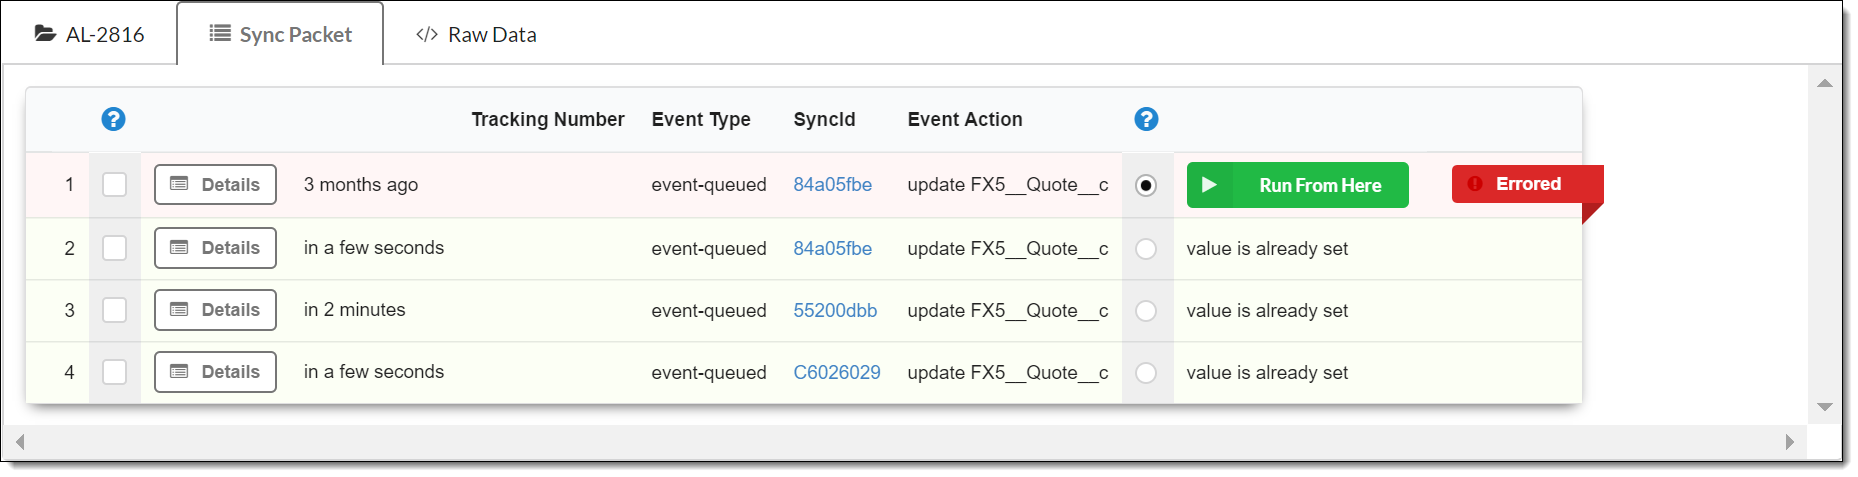
This tab is where you can edit and reprocess sync packets.
Events
An event is an action performed by a user.
Sync packets feature an event for every action performed since the last sync.
The following actions get recorded in sync packets:
| Action | Description |
|---|---|
create Attachment |
User attached an FX Report to a record |
create |
User added a job |
update |
User edited a job |
create |
User added a ticket |
update |
User edited a ticket |
create |
User added a ticket item |
update |
User edited a ticket item |
delete |
User deleted a ticket item |
create |
User added a quote |
update |
User edited a quote |
create |
User added a quote item |
update |
User edited a quote item |
delete |
User deleted a quote item |
create |
User added an FX Form |
update |
User edited an FX Form |
Event Colors
The color of an event lets you know a number of important details.
| Color | Description | ||||||
|---|---|---|---|---|---|---|---|
Gray |
Gray events processed successfully and the data uploaded to FieldFX Back Office. 
Figure 4. Successfully processed events are gray
When you reprocess a sync packet successfully, all of the events that display turn to gray. |
||||||
Pink |
Pink events caused a sync upload error and the data didn’t upload to FieldFX Back Office. 
Figure 5. Events with errors are pink
Click the Tracking Number or Sync ID link on a pink event to view the referenced records. |
||||||
Orange |
Orange events didn’t process and the data didn’t upload to FieldFX Back Office. 
Figure 6. Orange events did not successfully process or upload data to FieldFX Back Office
These events didn’t process due to one of the following reasons:
|
||||||
Green |
Green events didn’t process and the data didn’t upload to FieldFX Back Office. 
Figure 7. Green events did not successfully process or upload data to FieldFX Back Office
Click the Tracking Number or Sync ID link on a green event to view the referenced records. |
Event Status Indicators
The following errors have their own status indicators:
| Errored | Displays on events that caused sync upload errors. .An indicator tag displays for events with errors image::Packet_Viewer_Errored_indicator.png[Screenshot of the Errored indicator] Select this indicator to view the reason for the error. .Selecting the tag displays information about the error image::Packet_Viewer_Errored_indicator_message.gif[Animated GIF of selecting the indicator] | ||
|---|---|---|---|
Modified |
Displays on events you have edited. 
Figure 8. A yellow banner with an asterisk (*) indicates a modified event
|
||
Ignored |
Displays on events you selected to ignore. 
Figure 9. A gray Ignored banner appears on events that have been marked as ignored
Select the checkbox next to an event to ignore it. 
Figure 10. Select the checkbox to ignore an event
|
||
Run From Here |
Displays on events that caused sync upload errors. 
Figure 11. The green Run From Here displays for events that caused sync upload errors
Also displays on events you choose to reprocess. 
Figure 12. Select the radio button for an event to be able see the Run From Here button
Select this indicator to reprocess the event and every unprocessed event after it.
|
Event Details
Click Details on an event to display the Event Details window.

The Event Details window displays the fields completed during an event.
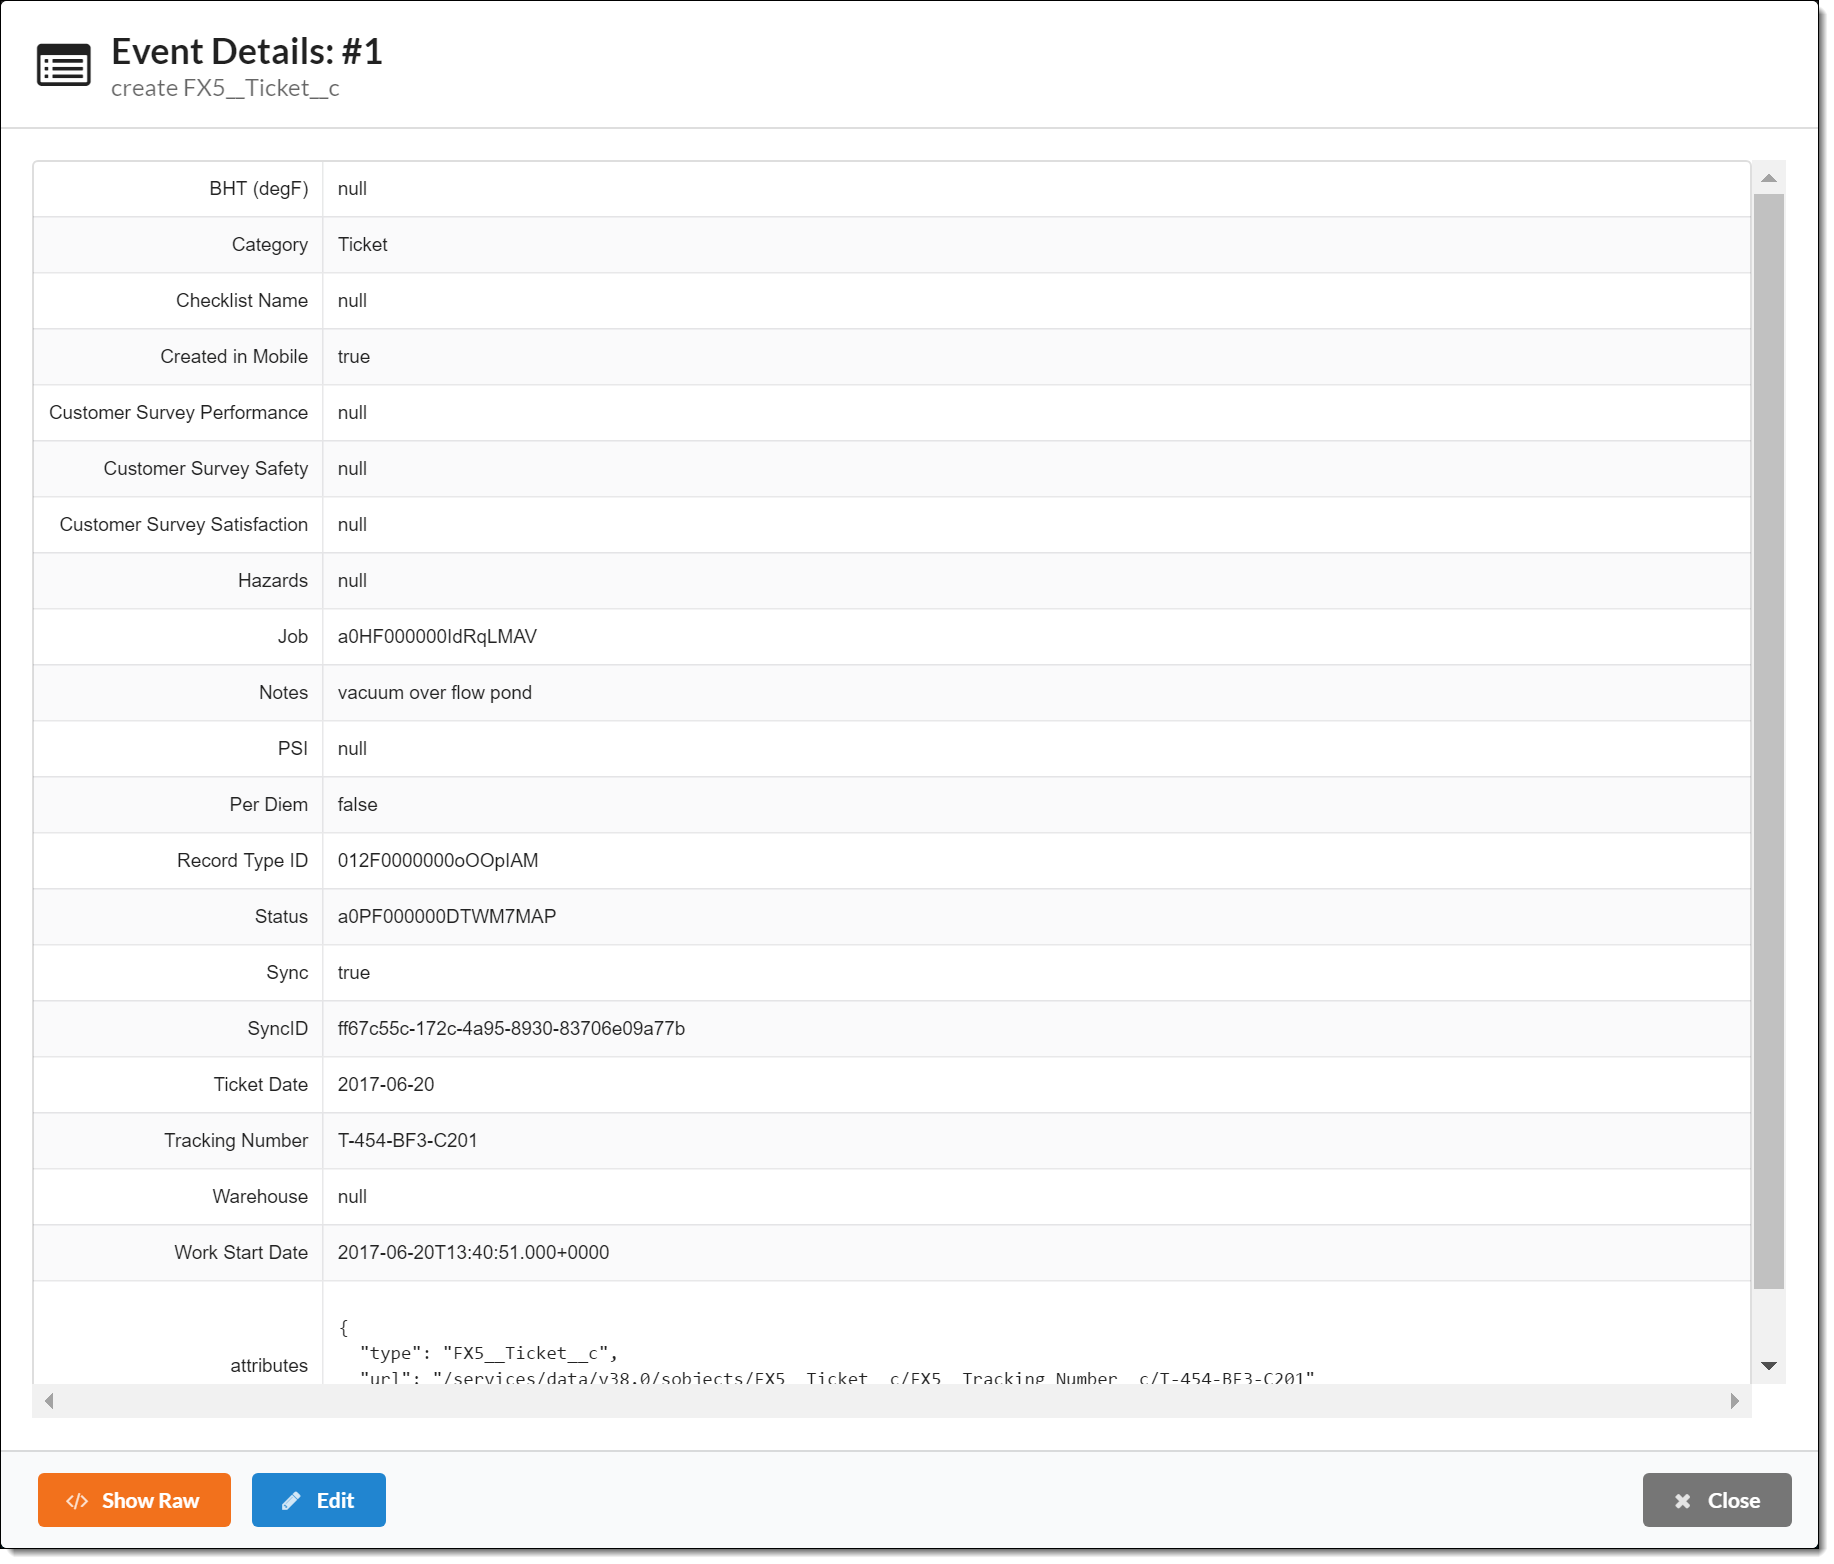
Click Edit to make changes to the event data.
|
When editing an event, click Delete next to a field to remove it from the sync packet. |
Click Show Raw to view the event data in JSON (JavaScript Object Notation) form.
|
You could click Edit to make changes to the event data in JSON format but it isn’t recommended. |
FX Reports
Click View on a create Attachment event to view the FX Report attached to a record during that event.

You can then print or save the report.
Raw Data Tab
The Raw Data tab displays the contents of the sync packet in JSON (JavaScript Object Notation) form.
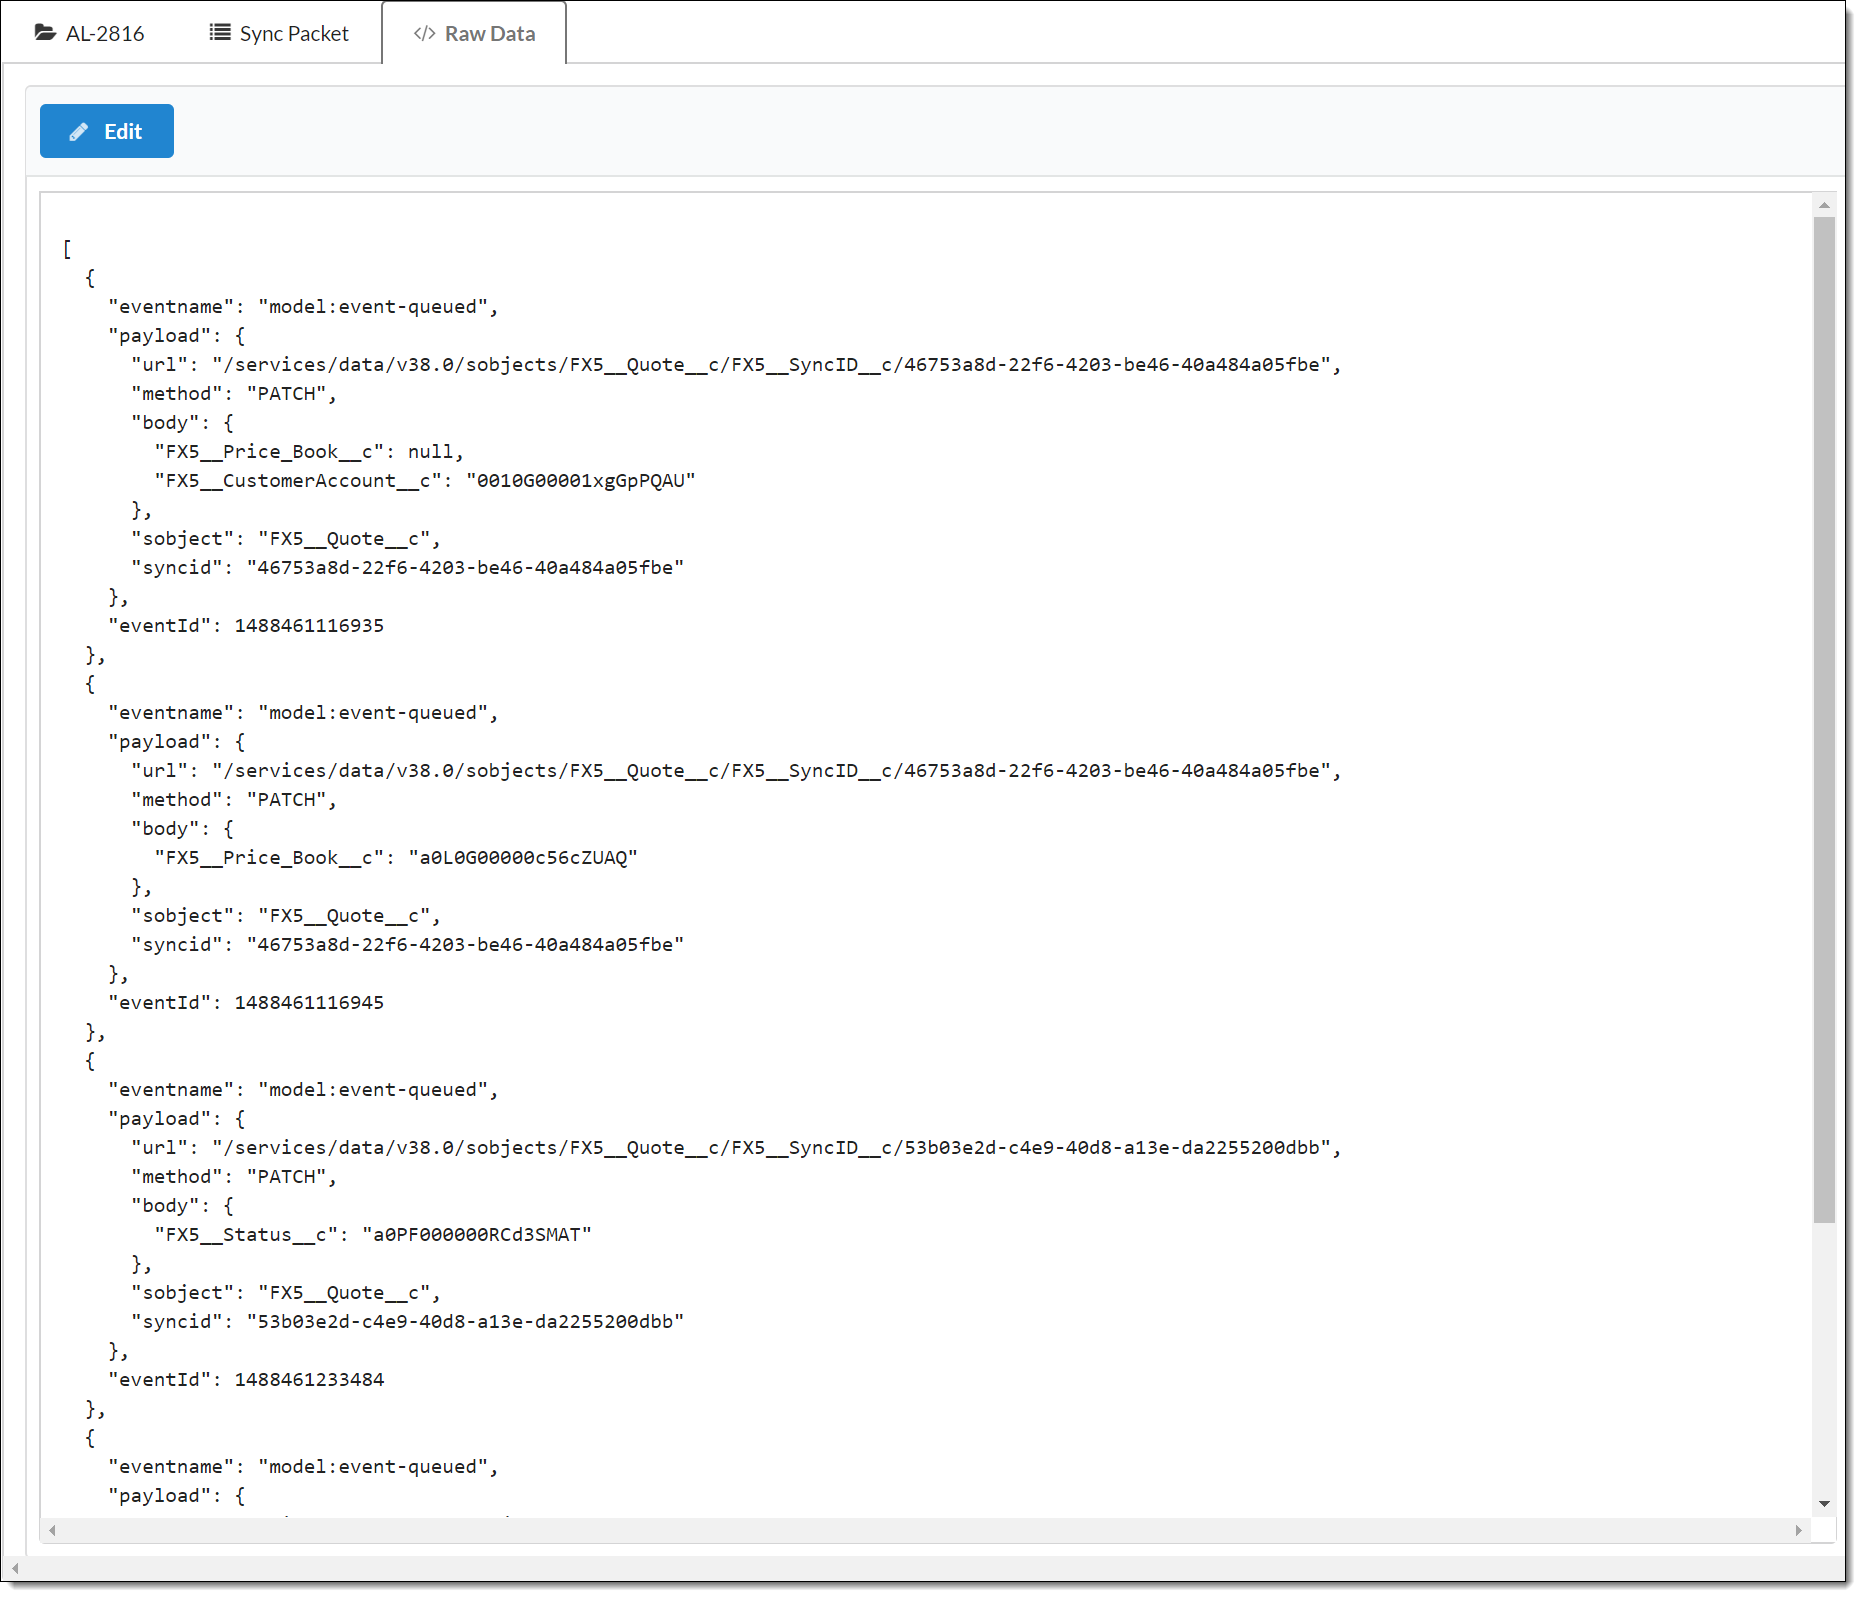
Click Edit to make changes to the sync packet but use with extreme caution. This is not recommended, contact FieldFX Support for guidance.
Step-by-Step Guides
Editing an Event
-
Open the Audit Logs tab.
-
Open the Audit Log entry for the sync packet containing the event.
-
Click Packet Viewer.
-
Click Details on the event.
-
Click Edit.
-
Make changes.
Click Delete next to a field to remove it from the sync packet.
-
Click Back.
-
Click Close.
The yellow modified indicator banner displays on the event.
Restoring a Deleted Record
-
Open the Audit Logs tab.
-
Open the Audit Log entry.
-
Click Packet Viewer.
-
Locate an event that features the deleted record.
-
Click the link to the deleted record.
-
Select the checkbox next to the deleted record.
-
Click Undelete
Reprocessing a Sync Packet
-
Open the Audit Logs tab.
-
Open the Audit Log entry for the sync packet.
-
Click Packet Viewer.
-
Resolve the sync upload error:
-
Move to the pink event.
-
Select the Errored indicator to view the reason for the error.
 Figure 17. Hovering over the Errored indicator for the event reveals the error message in a popup message
 -
Complete the following:
-
If the error states that a record was deleted or no longer exists, restore the deleted record and proceed to step 5.
-
If the error states that a field contains invalid data, correct the data and proceed to step 5.
-
If there are no obvious issues with the fields or records in the event, proceed to step 5.
-
-
-
Reprocess the sync packet and upload unprocessed events to FieldFX Back Office:
-
Complete one of the following:
-
Reprocess All Events
Click Run from here.-
The Packet Viewer attempts to upload the events to FieldFX Back Office and creates a new Audit Log entry to show the results.
-
The Last Modified timestamp for the data in the events now displays your user name, instead of the original user.
-
The New Audit Log window displays once the process is complete.
-
-
Reprocess Selected Events
-
Select the checkbox next to events you don’t want to process.
Figure 18. Use the checkbox to mark events to ignore -
Select the first event you want to process.
Figure 19. Select an event’s radio button to access the Run From Here banner -
Click Run from here
-
The Packet Viewer attempts to upload the events to FieldFX Back Office and creates a new Audit Log entry to show the results.
-
The Last Modified timestamp for the data in the events now displays your user name, instead of the original user.
-
The New Audit Log window displays once the process is complete.
-
-
-
-
Select Click here to go to the new Audit Log.
-
Review the new Audit Log entry:
-
If every event is gray, the sync packet reprocessed successfully and no further action is required.
-
If there is a pink event, repeat steps 4 & 5 until you reprocess the sync packet successfully.
-
If you are unable to reprocess the sync packet successfully after multiple attempts, contact FieldFX Support for further assistance.
-
-