eForms in the FieldFX Mobile App
When using Forms within the new FieldFX Mobile App, each form opens in an additional tab to the right of the DATAGUIDE tab.
Layout
|
The fields shown can vary according to the specific page layouts used in your org. Some fields shown below may or may not be present depending on the needs in your org. For more information, see Page Layouts |
Click to expand
For eForms to appear when viewing a Job or Ticket in the FieldFX Mobile App, the eForm object must be added to the Related List section of an object’s Page Layout.
-
From Setup, enter
objectin the Quick Find box, then select Objects -
If the eForm is for:
-
Under Page Layouts, click Edit next to a page layout for FieldFX Back Office.
-
On the toolbar, click Related Lists.
-
Drag the eForm into the Related Lists section.
-
Click Save.
-
Click Yes.
-
If needed in other page layouts, edit another page layout and drag the eForm into the Related Lists section.
-
Complete one of the following:
-
Use the Report Template Editor to create reports.
-
Add a report template for the report version of the eForm.
-
-
Move back to FieldFX Back Office.
-
Open the Report Templates tab.
-
Click New.
-
In Report Template Name, enter a name for the report template.
-
In SObject, enter the API name of the eForm object,
-
Click Save.
-
Click Attach File.
-
Click Choose File.
-
Select the report you defined for the eForm.
-
Click Attach File.
-
Click Done.
eForms in the FieldFX Mobile App appear as separate tabs next to the DATAGUIDE tab.
eForms List
Once the Mobile user has created multiple eForms, they appear in a list grid.
|
The fields shown can vary according to the specific page layouts used in your org. Some fields shown below may or may not be present depending on the needs in your org. For more information, see Page Layouts |
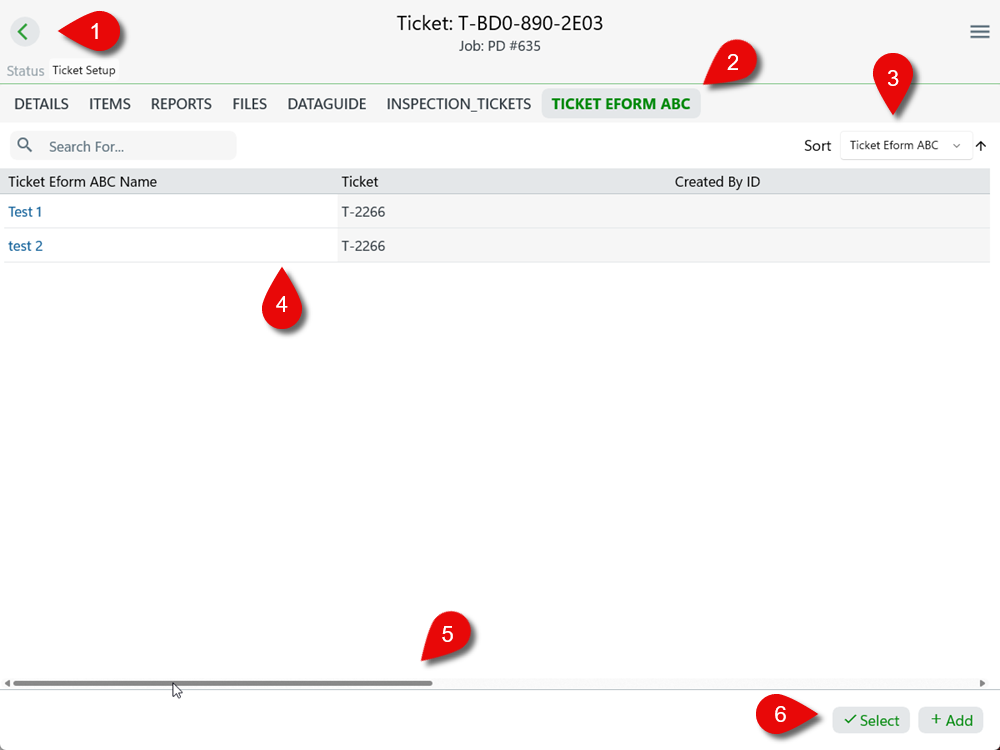
| Callout | Description | ||
|---|---|---|---|
1 |
Back Button - Return to the list of Tickets. |
||
2 |
Name of the eForm
|
||
3 |
Sort dropdown - You can sort by the fields shown in the list. |
||
4 |
List of eForm records. Tap on the eForm record to view the details. |
||
5 |
Scroll bar to display additional columns. |
||
6 |
Action buttons - Add a new record using the eForm or select one or more records to bulk edit, copy, or delete. |
Parent/Child eForm Hierarchy
If eForms for a job has child eForms (in which they become a parent), they are shown in the grid with icons for parent and child.

Step-by-Step Guides
Once the eForm is available for a Job or Ticket, you can use, copy, bulk edit multiple, or delete eForm records.
Use an eForm
To use an eForm,
-
Click the eForm and then click Add.
A blank eForm opens.
-
Complete the eForm.
-
Tap Save.
Bulk Edit, Copy or Delete eForm Records
-
At the eForm Records grid, tap ✓ Select and select the records.
-
Depending on the action, tap the appropriate button:
Some actions may not be available to the user if they don’t have permissions to perform them. Bulk Edit Copy Delete Bulk edit is the ability to change details of eForm records.
Tap for a copy of the selected eForm record to appear in the grid.
Tap to delete the selected record or records
-
To use Bulk Edit, select two or more eForm Records.
-
Tap Bulk Edit to bulk edit the selected records.
-
At the Bulk Edit X items window, change the appropriate form label.
-
Tab ✓ Save to save the changed items.
-
Tap Copy to copy the record.
The details of the new copy of the record appears.
-
Change the details of the copied eForm and tap ✓ Save to save the changes.
-
Tap Delete to delete the record.
The selected records are removed from the grid.
-