Tickets
Introduction
Tickets in FieldFX serve these important purposes for field operations, service management, and customer interactions. FieldFX mainly uses tickets for:
Job Description |
Tickets can document the job details or service performed for a customer. Tickets detail what was done, when it was done, who performed it and any materials or equipment used. |
Work Order Management |
Tickets can function as work orders showing instructions and information to field personnel about tasks that need completing. Tickets ensure that all those involved in the job are all on the same page for the scope and work requirements. |
Time & Expense Tracking |
You can use tickets to track the time spent and expenses incurred during a job. Tickets may include labor hours, equipment usage, and materials consumed. This data is needed for accurate billing and cost management. |
Customer Billing |
Invoices to customers can be generated from tickets. The captured data includes billable activities and materials which enables accurate and detailed invoices. |
Compliance and Auditing |
Tickets provide verification that all performed work is compliant with company policies, industry regulations, and customer agreements. They are a record to be used for auditing purposes for verification that services were delivered as agreed. |
Communication & Coordination |
With tickets, communication between field personnel, back office staff, and customers are established. They are a centralized place where all relevant job information is recorded and easily accessible helping to coordinate efforts and avoid misunderstandings. |
Customer Service |
In keeping detailed records using tickets and services provide, customer service is improved. Tickets enable quick customer inquiry responses since all the job details are readily accessible. |
Performance Analytics |
Data collected through tickets can be analyzed for performance assessment, trend identification, and to improve operational efficiency. + For example, long jobs can be tracked to see how long they take, see any frequent issues, and streamline resource allocation. |
Resource Allocation |
You can use tickets to assist in planning and assigning resources such as personnel, equipment, and materials. Tickets ensure the right resources are available and assigned to each job. |
Inventory Management |
When you track materials and equipment using tickets, you can more effectively manage your inventory. This ensures that the needed items are restocked and are available when requested. |
A ticket records details about specific work completed on a job.
When you add a ticket, you can:
-
Add ticket items
-
Attach FX Reports
-
Attach FX Forms
-
Attach files
The Attachments feature in FieldFX has been deprecated and replaced with the Files API. To upload files to tickets or jobs, make sure the FXL File Viewer Lightning Components is added to the ticket or job record page.
Follow the steps in Set Up Attachments Using the Files API.
-
Use a ticket checklist
Prerequisites
To use tickets, you need to:
| Have these user licenses | Have these permissions | Complete these tasks and review these topics before continuing |
|---|---|---|
Requirements
Keep in mind these requirements when you create and manage existing tickets:
| These requirements can vary depending on the specific FieldFX configuration for your organization and the user role and permissions when accessing the ticket creation process. |
Tickets have these general requirements:
Customer |
|
||
Service |
|
||
Job/Service |
|
||
Line Items |
|
||
Assigned |
|
||
Date & Time |
|
||
Approval/ |
|
||
Compliance & |
|
||
Documentation |
|
||
Custom Fields |
Additional organization required fields for your FieldFX setup. This can include project codes, cost centers, or job categories. |
||
Notes & |
|
||
Status & |
|
||
Cost & Billing |
|
Properly filled out tickets can help streamline your operations, maintain compliance, and increase customer satisfaction.
Step-by-Step Guides
-
Add a Ticket to a job.
-
You can also copy a Ticket.
-
-
Use the Ticket item Builder or #Ticket Item Wizard to add price book items to the ticket.
The Ticket Item Builder has been deprecated and is no longer supported. You should switch to the Lightning Experience and use the tools FieldFX has there instead. -
Attach a ticket report to document the work completed and get the report signed by the company man.
Add a Ticket
You can add a ticket within Back Office or in the FieldFX Mobile App.
| You must have the proper permissions on your user profile to be able to add a ticket. |
FieldFX Back Office
Add Ticket in Back Office - Click to expand
-
Click on the Tickets tab.
-
Click New.
-
Select the correct ticket type using the Record Type dropdown menu.
-
Click Continue to continue creating the ticket.
-
Enter the necessary ticket details in the appropriate fields.
-
Click Save.
-
With the ticket saved, you can add items to the ticket.
Add Ticket Items in Back Office - Click to expand
-
Click on the Tickets tab.
-
Find the ticket in the list view that you want to add ticket items.
For an example of adding ticket items, see Adding Ticket Items from a Price Book.
-
Select price book items.
To set up a price book item, see Price Book Item Setup.
-
Click Add Selected.
Child items get added automatically when you add their parent item. The FX Item Picker should already be configured on the ticket record page in the Lightning Experience. Also, the ticket item record should be setup.
-
Use the FX Item Picker to select and add price book items to the ticket.
The FXL File Viewer Lightning Component must be added to the ticket record page. .. You can add child items to dynamic parent items using the options in the Lightning Experience. .. Attach required FX Reports, FX Forms or files to the ticket using the Files API.
-
If ticket concerns Crew or Planning records, a picklist appears for you to select a crew/planning record.
-
Click Save.
FieldFX Mobile
Add a Ticket in FX Mobile - Click to expand
| This information and these steps are for the older FieldFX Mobile and not the newer FieldFX Mobile App. |
In FX Mobile, you can add a new ticket.
-
Select Jobs on the sidebar.
-
At the list of jobs, select a job and open it.
-
Once the job is open, select Tickets and select
 .
.If the job has no tickets, No Ticketsappears. -
Select a ticket type.
Ticket types vary on how they were set up in the Org’s Back Office.
-
Enter the ticket details and select
 .
.Example to complete the Supervisor: Tap the field and choose from the list of contacts based on the customer selected in the job.
Complete the remaining ticket fields.
-
Add ticket items.
-
Complete the ticket by selecting the Add button.
A new ticket appears in the list of tickets.
-
You can navigate through the new ticket by using the sidebar icons on the main FX Mobile Ticket Page.
Add a Ticket in the FieldFX Mobile App - Click to expand
In the FieldFX Mobile App, you can add new ticket.
-
Open a job from the list of available jobs.
-
Once the job is open, tap the Tickets tab.
The tickets attached to the open job appears.
If the job has no tickets, No Ticketsappears. -
Select a ticket type.
-
Tap + Add.
A new Ticket window appears.
Only certain fields can be edited. -
Complete the different sections of the ticket.
The fields shown can vary according to the specific page layouts used in your org. Some fields shown below may or may not be present depending on the needs in your org. For more information, see Page Layouts
-
When finished, click ✓ Save.
The new ticket appears in the ticket list.
Add a Ticket Item in the FieldFX Mobile App - Click to expand
-
To open a ticket, select Tickets.
-
Select the ticket.
-
Select Items on the top nav bar.
If any items exist on the ticket, they would appear in a grid (if the device is in a landscape orientation) or as a tile (if the mobile device is in portrait orientation).
If no items exist on the ticket,
No Ticket Itemsappears on the screen. -
Tap + Add to add a new ticket item or tap Select then select the ticket item and then click Edit.
A list of available catalog items appears.
-
Tap on checkbox next to the desired ticket item.
-
Select from the category to see the list of ticket items matching that category.
The filters appear in the dropdown at the top of the window.
-
Choose from the filter to select the type for the new ticket item.
The categories shown may be different depending on how tickets are set up in FieldFX Back Office. Table 1. Ticket categories Item Type Description Price Book
Filter to view price book items records in the job’s price book.
Use the All, Equipment, Labor, Services, or Supplies entry on the side to further filter the price book items by record type.
People
Filter to view contact records linked to the labor catalog items in the job’s price book.
The contacts can be organized by their location which appears on the side.
Equipment
Filter to view the equipment records in the job’s price book.
The equipment records can further be filtered and grouped by category on the side.
Scheduled Equipment
Filter to view the equipment scheduled for the job.
Select one of the planning records shown.
Scheduled Crew
Filter to view the crew records scheduled to work on the job.
-
If you are editing a ticket item, make the desired changes and tap Save.
-
To quickly locate an item, use the keyword search bar.
As you type in characters, tickets that match appear in the list.
-
Use the item type dropdown to select which list to pull from.
If records of a type don’t exist, you see
No results found. Add that type of record as a ticket item to the Ticket in Back Office.The record types shown may be different depending on how tickets are set up in FieldFX Back Office.
-
Select the desired item or items.
The checkbox is filled in.
-
Tap + Add Selected at the bottom of the screen.
Child items get added automatically when you add their parent item. -
Complete the fields for the new ticket item. If Yes, add the ticket item details.
The fields shown may be different depending on how tickets items are set up in FieldFX Back Office.
-
When finished, tap ✓ Finish.
The Ticket Item grid shows the item you have added.
Add Quote Items for a Ticket
FieldFX Mobile
| This information and these steps are for the older FieldFX Mobile and not the newer FieldFX Mobile App. |
| The FieldFX Mobile App only supports jobs and tickets. Quotes aren’t supported. |
Add Quote Items in the old FieldFX Mobile - Click to expand
-
Select Tickets on the sidebar.
-
Select a ticket for a job created from a quote.
-
Select Items on the sidebar.
-
The Ticket Item Wizard adds price book items to the ticket automatically if they have Required Item selected.
-
The Rule Engine adds price book items to the ticket automatically if required by a rule.
-
-
Select
. -
Select the Quotes Item type.
When adding quote items, the other item types can’t be selected to add to the ticket. And when adding price book items to a quote, only items from the quote list can be selected.
-
Select Quote item.
-
Select
.Child items get added automatically when you add their parent item. -
You can also add the details before saving.
Copy a Ticket
FieldFX Mobile
Copy a Ticket in FX Mobile - Click to expand
-
In FX Mobile, click Jobs and then open a job.
-
Select on a listed job to open it.
-
Select on Tickets.
A list of tickets for that job appears.
-
To copy a ticket, tap
 next to the ticket you want to copy.
All the information and ticket items for that ticket are copied into a new ticket. Use when you want to add a new ticket that is similar to an existing ticket.
-
On the Copy Ticket window, edit any ticket details if necessary.
-
Select Add to finish the copy.
The ticket now has been copied and you can further edit the new ticket as necessary.
Copy a Ticket in the FieldFX Mobile App - Click to expand
-
Open the ticket list in the FieldFX Mobile App.
-
Tap the ✓ Select button and then select the Ticket you want to copy.
-
Tap the Copy button to copy the ticket.
-
Change the information in the Items Details window and tap Next to move to the next screen.
If the ticket you copied has ticket items, you will need to alter the fields for each item to separate it from the original ticket items on the original ticket.
A field must be changed before the Next link turns from gray to green to separate the information from the ticket being copied. The number of Item Detail screens depends on the layout of the ticket.
A new copy of the selected ticket (with a new tracking number) appears in the list.
Use Ticket Status and History Reports
You can use two standard reports to track the status history of tickets.
Additional Fields for these Reports
These additional fields have been added to the FX5__Status_History__c object:
| Object Name | Description | ||
|---|---|---|---|
|
Records the status from which the Ticket is changing. The entry is copied from the Ticket’s previous status’s New Status field.
|
||
|
Datetime when the record entered the status from which it is changing. The date is copied from the Ticket’s previous status’s Changed Date field.
|
||
|
A formula that calculates the number of days the Ticket remained in |
||
|
A formula field that calculates the number of hours the Ticket remained in |
With FX5 1.309 and later, a post-install script runs to populate data in the new fields in the FX5__Status_Histor__c object.
|
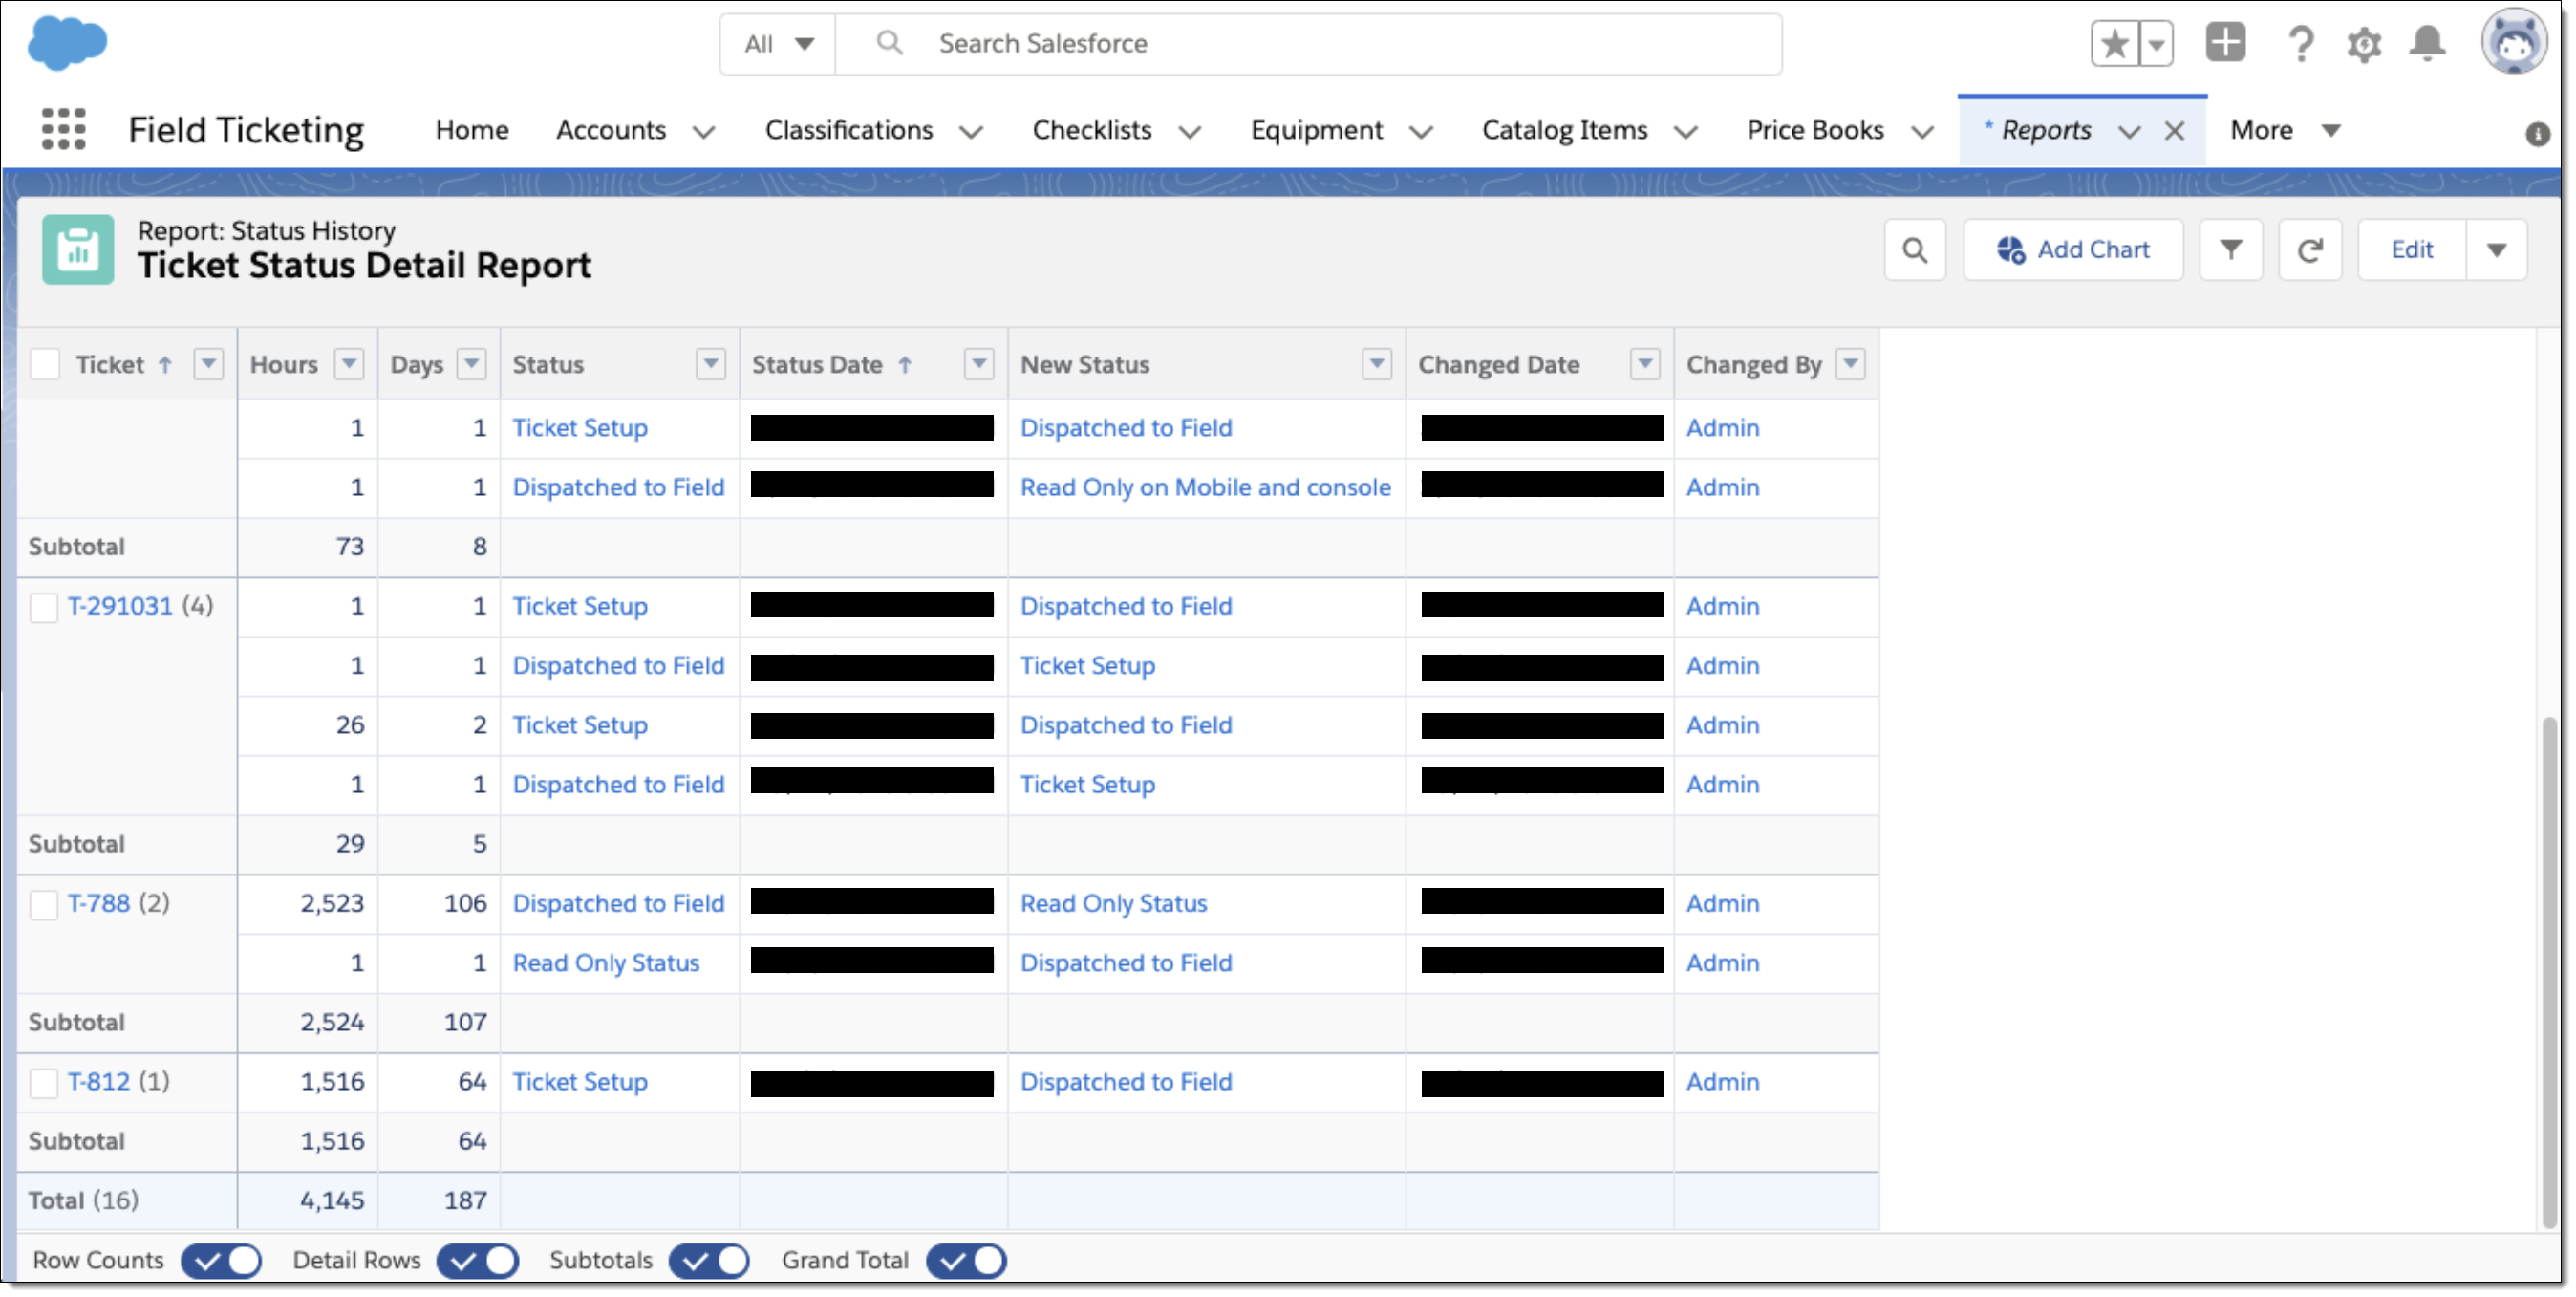
Ticket Status Detail Report
This report displays a list of tickets which can be expanded to show the ticket’s status change history.
For report details and use, click to expand, click again to collapse
Available columns: |
|
|
Rows are grouped by Ticket number. Each ticket is followed by a Subtotal that displays the total number of Hours and Days for the ticket.
The last row displays a Total of all Tickets on the report.
By default, the report shows all tickets statuses where the Hours column is not blank, grouped by Ticket number. Edit the report to modify the Filters to change the Tickets that display. Search Report Filters in Salesforce help for instructions on working with Report filters.
|
Use the four report toggle options to change how the report displays: |
|
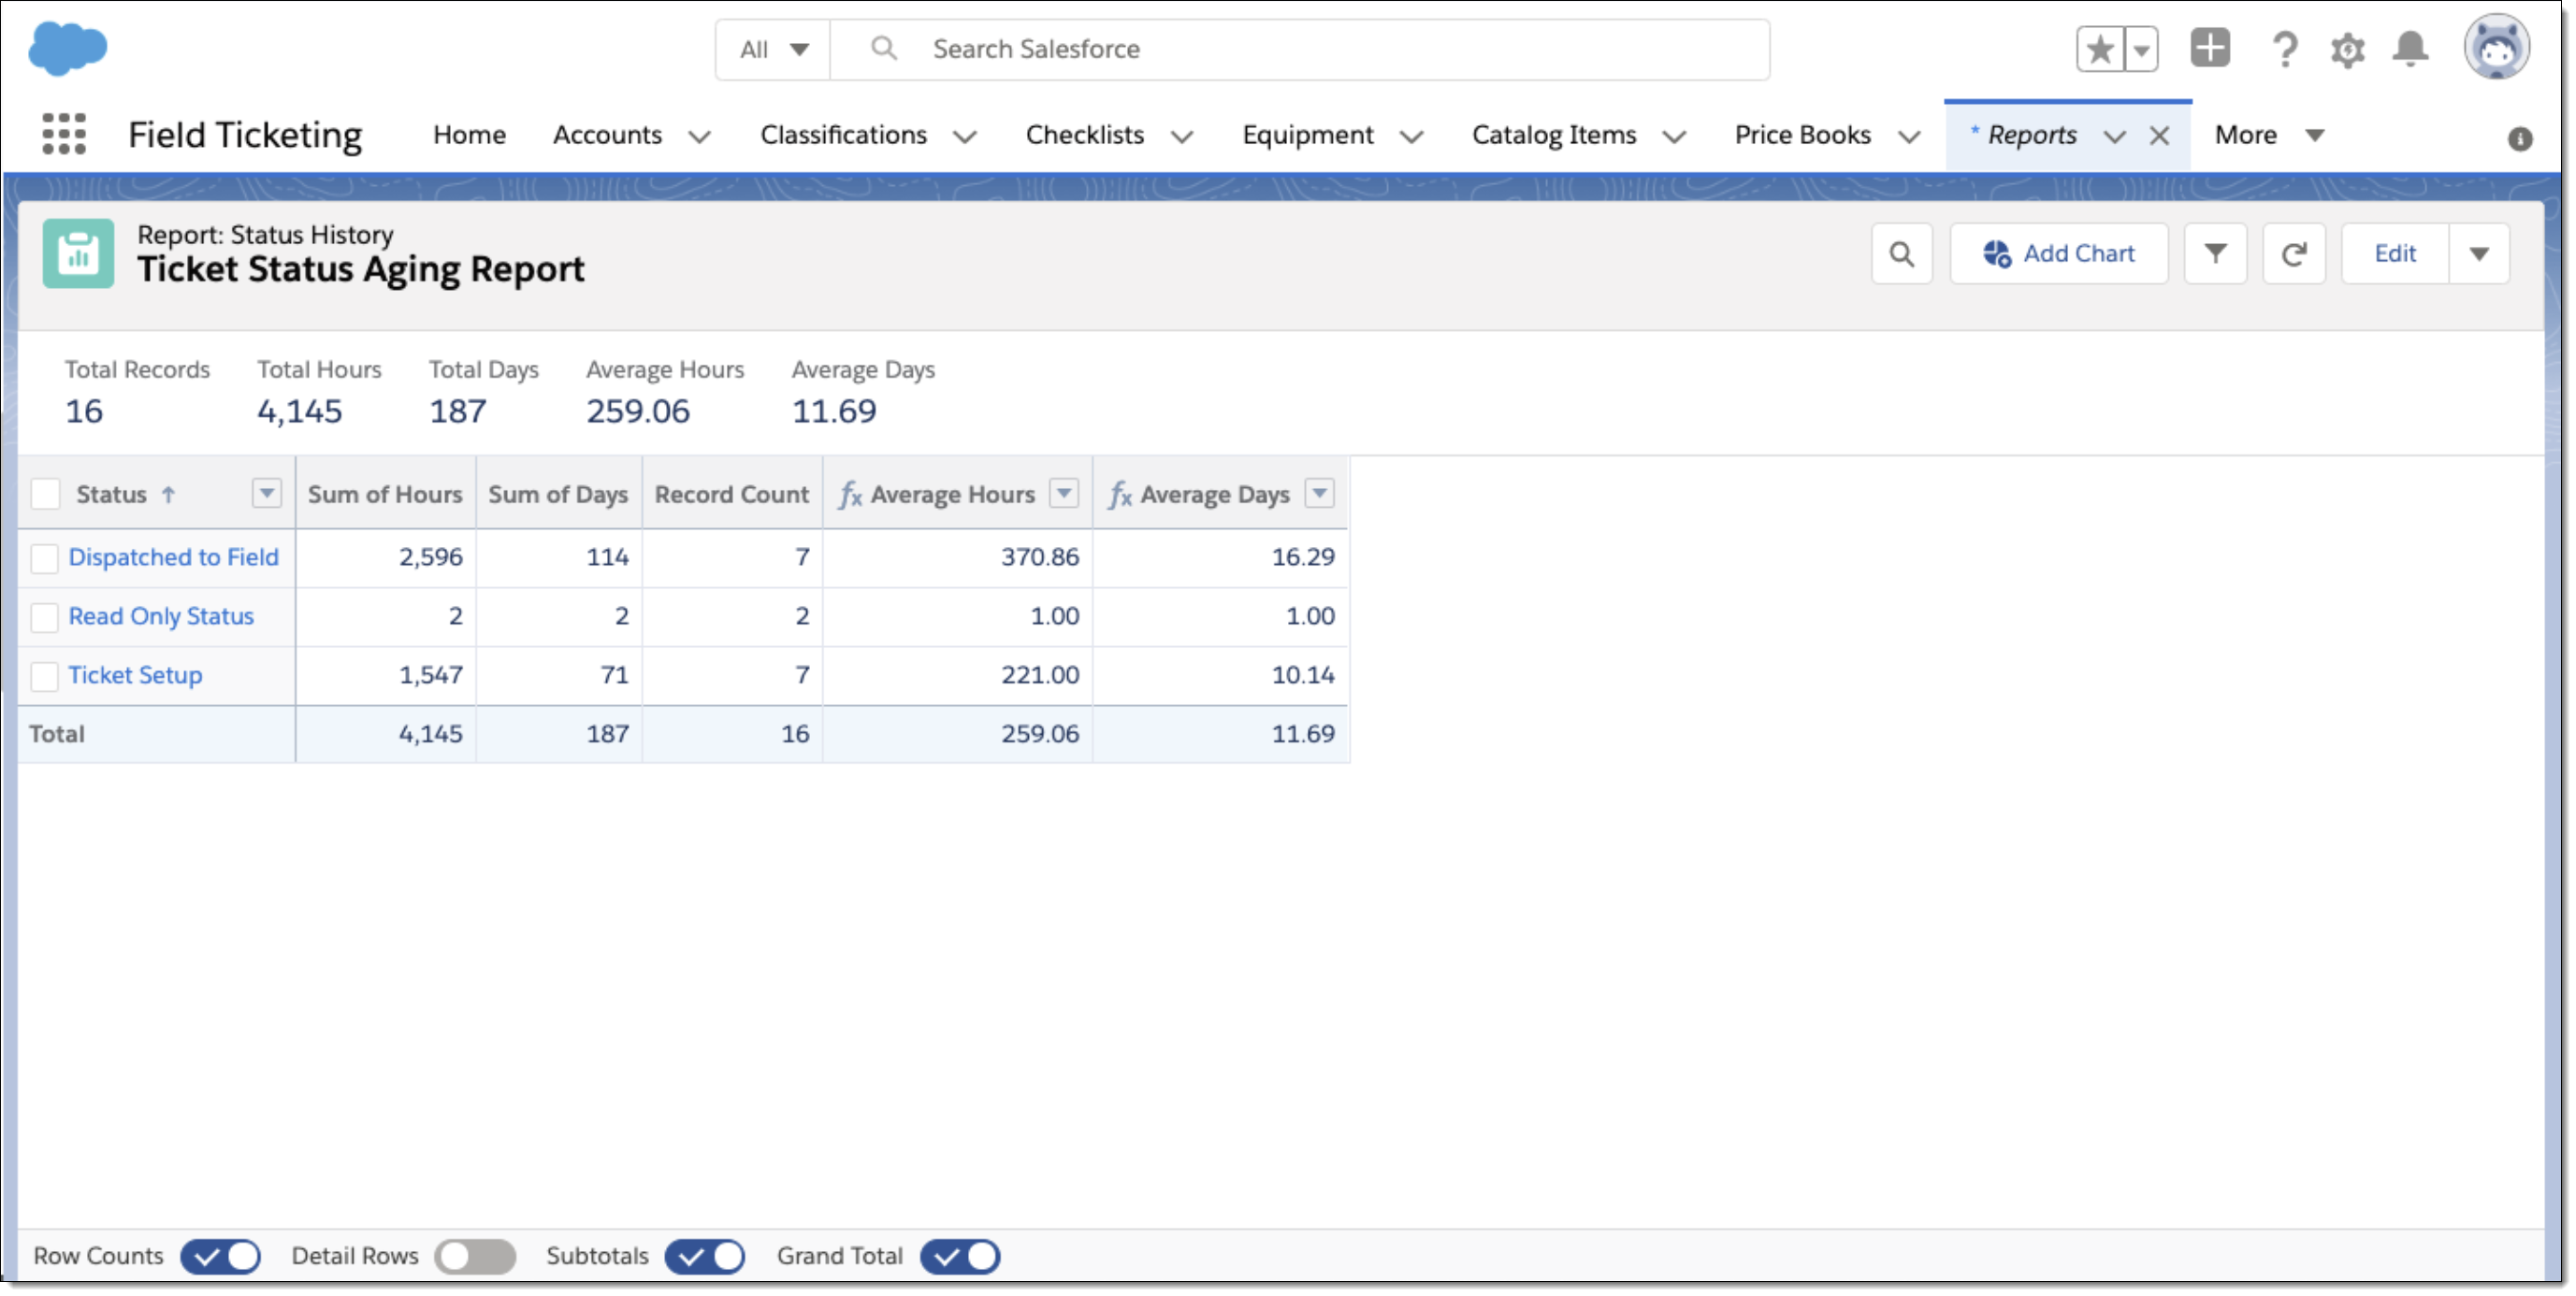
Ticket Status History Aging Report
This report shows a list of Ticket Statuses with information about each Status.
For report details and use, click to expand
This report uses these columns: |
|
The last row displays a Total of all Tickets on the report.
By default, the report shows all tickets statuses where the Hours column is not blank, grouped by Ticket Status. Edit the report to modify the Filters to change the Ticket Statuses that display. Search Report Filters in Salesforce help for instructions on working with Report filters.
|
Use the four report toggle options to change how the report displays: |
|
Recommended Reading
For more information, see:
| FieldFX Documentation | Salesforce Documentation |
|---|---|
|