FX Timecards Module Setup
Prerequisites
To set up and use FX Timecards, you need to:
| Have these user licenses | Have these permissions | Complete these tasks and review these topics before continuing |
|---|---|---|
|
Install the FieldFX Timecards Package
-
Contact FieldFX Support to get an installation link and password for the FieldFX Timecards Package.
-
Open your email app.
-
Look for an email from FieldFX support.
The email contains a customized link to install the Timecards package.
-
Click the installation link from the email you received.
-
Enter the password you from the email you received.
-
Select Install for Admins Only.
-
Click Install.
A notification displays once the installation finishes.
-
Click Done.
Configure FieldFX Back Office
When configuring FX Timecards in FieldFX Back Office, you can:
Create Page Layouts
Add Timecard Page Layouts
-
From Setup, enter
objectin the Quick Find box, then select Objects. -
Click Timecard.
-
Add an Admin layout:
-
Under Fields & Relationships, click New.
-
Select Formula, then click Next.
-
In Field Label, enter
Timecard Type. -
Under Formula Return Type, select Text, then click Next.
-
In Timecard Type (Text), enter the following formula:
IF (FXT2__Input_Hours__c > 0, "Daily", "Hourly") -
Click Next.
-
Make the field visible to system administrators only, then click Next.
-
Deselect Add Field, then click Save.
-
Under Page Layouts, click New.
-
In Existing Page Layout, select "HourlyLabor".
-
In Page Layout Name, enter
Admin, then click Save. -
Add the Timecard Type, Status, User, and Input Hours fields to the layout.
-
Remove the Required property for the Start Time and End Time fields.
-
Click Save
-
Configure Custom Settings
-
From Setup, enter
objectin the Quick Find box, then select Objects. -
Click Catalog Item.
-
Under Fields & Relationships, click Ticket Item Record Type.
-
Under Picklist Options in Values, note the record types for which to add timecards.
For example, Labor
-
From Setup, enter
custom settingsin the Quick Find box, then select Custom Settings. -
Click Manage next to FX Timecard Settings.
-
Click the New button highlighted below.

-
In Ticket Item Record Types for Timecard, enter the record type(s) you noted in step 4 that should generate timecard records automatically.
Enter each record type separated with a comma and space.
For Example: Daily Labor, Hourly Labor
-
Select Create Timecard for Ticket Item to add timecards automatically for the record types listed in Ticket Item Record Types for Timecard.
-
(Optional) Complete the following if the org is going to use custom Apex triggers that conflict with the default Apex triggers in the Timecards package:
-
Select TicketItemTriggerOverridden to disable the Apex trigger that runs when users add and update labor ticket items.
-
Select TimecardTriggerOverridden to disable the Apex trigger that runs when users add and update timecards.
If you don’t want to create Timecard entries from Ticket items, you need to disable these triggers.
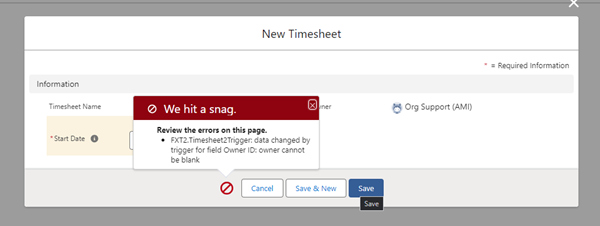
In the FX Timecard Settings Edit screen, unselect the Create Timecard for Ticket Item checkbox.
If not, when the user goes to create a adds or updates a timesheet or timecard, they still get this error:
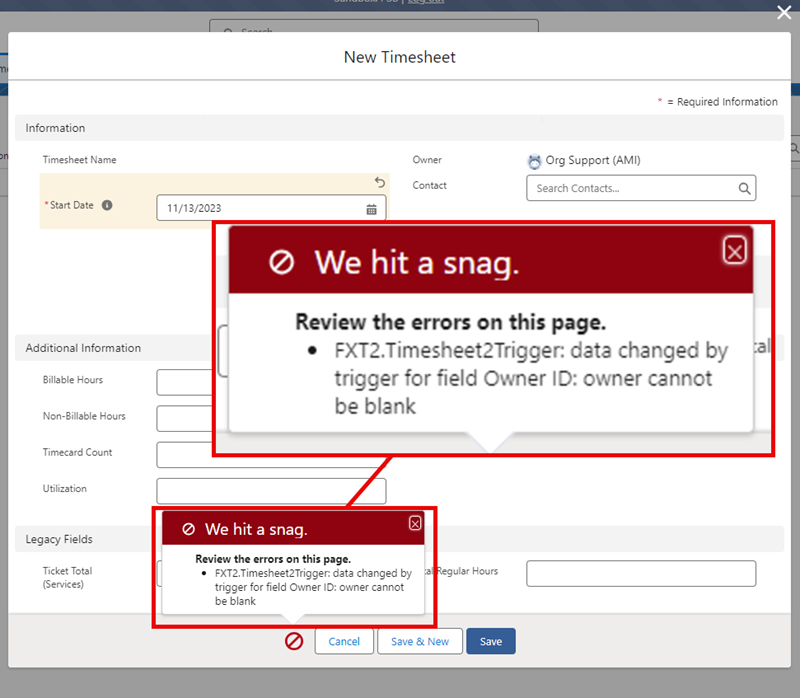
-
-
Click Save.
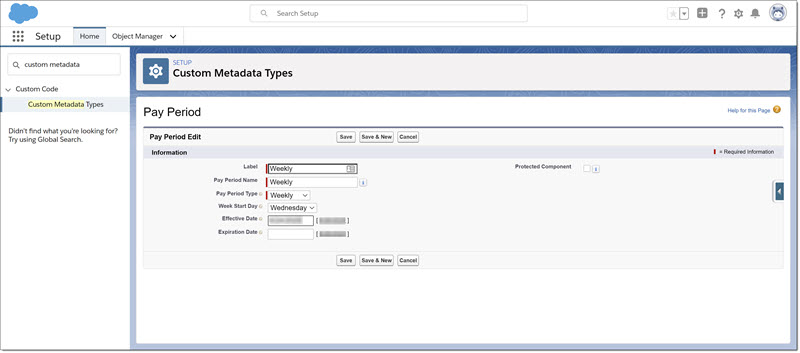
Configure Pay Periods
-
From Setup, enter
custom metadatain the Quick Find box, then select Custom Metadata Types. -
Select Manage Records next to Pay Period.
-
Click Edit next to an existing Label to modify it.
or
Click New to add a Pay Period frequency.
-
Make the following entries:
Label:
A name for the Pay Period.
For example: Weekly, CycleA, BiWeekly
Pay Period Name:
The API name, which automatically populates based on the Label, but can be changed.
Pay Period Type:
Select the pay frequency, either Weekly or Bi-Weekly.
Week Start Day:
Select the day of the week each pay period begins.
Effective Date:
Enter a calendar date that is the first date of a pay period for this frequency.
Expiration Date:
(Optional) Enter a calendar date after which the pay period is no longer valid.
-
Click Save.
or
Click Save and New to save the Metadata type and add another.
Set Up Tabs
Getting There
-
From Setup, enter
tabsin the Quick Find box, then select Tabs. -
Under Custom Object Tabs, click New.
Timecard tab
To add the Timecard tab:
-
In Object, select "Timecard".
-
In Tab Style, select a tab style.
-
Click Next.
-
Click Next.
-
Click Save.
Timesheet tab
To add the Timesheet tab:
-
In Object, select "Timesheet".
-
In Tab Style, select a tab style.
-
Click Next.
-
Click Next.
-
Click Save.
Time Off tab
To add the Time Off tab:
-
Under Custom Object Tabs, click New.
-
In Object, select "Time Off".
-
In Tab Style, select a tab style.
-
Click Next.
-
Click Next.
-
Click Save.
Add Charge Codes
|
Charge Codes are the cost categories used to assign time costs for accounting purposes. Common examples include Training, Sick, Bereavement, or Jury Duty. |
-
From Setup, select Object Manager.
-
Click Timecard.
You can search for the object using the Quick Find box in the top right
-
Complete the following:
-
Click Fields & Relationships, then click Charge Code.
-
Scroll down to the Values section, then click New in that section.
-
Enter the charge codes for labor, with each value on its own line.
-
Click Save.
-
Complete the following for every unused charge code:
-
In the Values, click Del next to each unused item.
-
Click OK.
Do not define a default picklist value. If you do, you could get a validation error whenever a Charge Code and a Job code is defined for the Timecard.
This causes the timecard to not be created.
If you select a default picklist value, you must also disable the TimecardSubjectRequired validation rule on the Timecard object.
-
-
Set Up Users
Add Permission Set
|
Use Permission Set Groups to more easily manage permissions for groups of users. Lean more about Permission Set Groups at help.salesforce.com. |
-
From Setup, enter
Usersin the Quick Find box, then select Users. -
Select the Full Name of a Timecard User.
-
From Permission Set Assignments, select Edit Assignments.
-
Add FX Timecards from the Available Permission Sets to the Enabled Permission Sets, then click Save.
-
Add the following additional permissions to either the user’s assigned user profile or an assigned permission set:
Object Name Field and Permission Type Timecard Object
-
Read permission to
Timecard Typefield -
Read permission to
UIDfield
Timesheets Object
-
Read permission to
UIDfield -
Read permission to
UniqueKeyfield
Custom Metadata Types
-
Read permission to
FXT2.Pay Period
These permissions will be added to the FX Timecards managed permission set in a future update. -
-
Repeat for other Users.
-
Have users download and install the FX Timecards app from their device’s app store.
The app is available for iOS and Android devices.
Assign FieldFX Timecards Licenses
-
From Setup, enter
Packagesin the Quick Find box, then select Installed Packages. -
Select the Manage Licenses link for FieldFX Timecards.
-
Click Add Users.
-
Mark the Action checkbox for Timecards users.
The checked users display in the Selected Users section. Users selected by mistake can be removed from the list if needed.
-
Click Add.
Troubleshooting
Timecard not generating
-
The following fields on the Ticket Item record must be populated for a timecard to generate:
-
Ticket Item must have a Record Type valid for Timecards as defined in the custom setting setup described above
-
The Ticket Item must have a Contact selected
-
The Contact selected for the Ticket Item must have a User defined
If any of the above are not selected or defined, a Timecard does not generate.
-
-
A timecard cannot have both a Charge Code and a Job code assigned. Do not assign a default picklist value for the Charge Code field. If a default is desired, disable the
TicketSubjectRequiredvalidation rule for the Timecard object.