Price Book Builder Setup (Deprecated)
|
FieldFX’s Price Book Builder functionality has been deprecated.
|
Prerequisites
To set up the Price Book Builder, you need to:
| Have these user licenses | Have these permissions | Complete these tasks and review these topics before continuing |
|---|---|---|
|
Set Up the Price Book Builder
-
From Setup, enter
staticin the Quick Find box, then select Static Resources. -
Complete one of the following:
-
If the en_US file displays in the list, complete Configure the Price Book Details fields.
-
If the en_US file doesn’t display in the list, download it in the next step.
-
-
Extract the file and save it to your local computer.
-
Move back to FieldFX Back Office.
-
Click New.
-
Complete the following:
-
In Name, enter
en_US. -
In Cache Control, select "Public".
-
Click Choose File.
-
Select the en_US file you downloaded.
-
-
Click Save.
Price Book Details
The Price Book Details section displays basic price book information.

Select the Fields to Display
-
From Setup, enter `object' in the Quick Find box, then select Objects.
-
Click Price Book.
-
Under Compact Layouts, click New.
-
Complete the following:
-
In Label, enter
Price Book Details. -
In Available Fields, select the fields to include.
-
Click Add.
-
In Selected Fields, change the order.
-
Click Save.
-
-
Click Compact Layout Assignment.
-
Complete the following:
-
Click Edit Assignment.
-
In Primary Compact Layout, select "Price Book Details".
-
Click Save.
-
Item Grid
For the item grid, you can configure fields and custom lookups.
Fields
The Item grid displays the price book items in a price book.
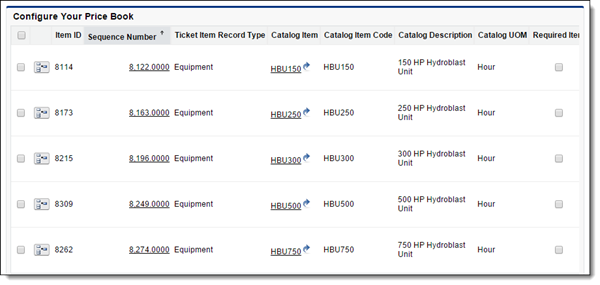
For the item grid, you can select which fields to display and configure a field to display as Read-Only.
Access the Price Book Item
-
From Setup, enter `object' in the Quick Find box, then select Objects.
-
Click Price Book Item.
-
Continue with Select the Fields to Display section, then move onto to [Configuring a Field to Display Read-Only].
Select the Fields to Display
-
Under Page Layouts, click Edit next to a page layout for FieldFX Back Office.
-
Change the fields.
To sort ticket items by sequence number, include the Sequence Number field on the Ticket Item Layout. -
Click Save
-
If needed for other page layouts, repeat the above steps.
Configure a Field to Display Read-Only
-
Under Custom Fields & Relationships, click the field name.
-
Click Set Field-Level Security.
-
Select Read-Only next to the user profiles on which to impose the read-only restriction.
-
Click Save.
|
Fields use a combination of page layout and field-level security settings and the most restrictive field setting always applies. For example, if you make a field required in the page layout security settings and read-only in the field-level security settings, the field displays read-only for the user profiles specified in the field-level security settings |
Custom Lookups
The Custom Lookups feature improves how lookups work on the Item grid.
You can:
Examples
Contact Lookup
Here’s an example of how you can configure a Contact lookup.
| Setting | Value | Impact |
|---|---|---|
QueryFilter |
|
Only contacts with a blank last name or a last name starting with the letter "S" display available for selection. |
QueryFields |
|
The listed fields display for contacts in search results. |
KeywordSearchFields |
|
Keyword searches analyze the last name of contacts. |
OrderBy |
|
Contacts sort in alphabetical order by last name. |
Equipment Lookup
Here’s an example of how you can configure an Equipment lookup.
| Setting | Value | Impact |
|---|---|---|
QueryFilter |
|
Only equipment linked to offices starting with the letter "H" displays available for selection. |
QueryFields |
|
The listed fields display for equipment in search results. |
KeywordSearchFields |
|
Keyword searches analyze the name and description of equipment. |
OrderBy |
|
Equipment sorts in alphabetical order by name. |
Configure Custom Lookups
As an example, we will show you how to configure a Contact lookup.
-
Add a CSF_Settings static resource:
-
Open a text editor
-
Enter the following to name the static resource:
window.csf_settings = { } -
Enter the identifying code for the Price Book Builder and Item grid:
window.csf_settings = { pbb: { maingrid: { }}}} -
Enter the API name of the lookup:
window.csf_settings = { pbb: { maingrid: { "Contact__c": { "Contact__c": { }}}}} -
Enter a SOQL query to restrict the records that display available for selection in the lookup:
window.csf_settings = {
  pbb: {
    maingrid: {
      "Contact__c": {
        "Contact__c": {
          "QueryFilter": "(LastName=NULL OR LastName LIKE 'S%')",
        }}}}}
Refer to the SOQL reference documentation for more information on how to write SOQL queries.
-
Enter the fields to display for records in search results:
window.csf_settings = {
  pbb: {
    maingrid: {
      "Contact__c": {
        "Contact__c": {
          "QueryFilter": "(LastName=NULL OR LastName LIKE 'S%')",
          "QueryFields": "FirstName, LastName, FX5__Office__r.Name",
        }}}}}
In this example, the First Name, Last Name, and Office fields display for records.
-
Enter the fields to analyze in keyword searches:
window.csf_settings = {
  pbb: {
    maingrid: {
      "Contact__c": {
        "Contact__c": {
          "QueryFilter": "(LastName=NULL OR LastName LIKE 'S%')",
          "QueryFields": "FirstName, LastName, FX5__Office__r.Name",
          "KeywordSearchFields": "LastName",
        }}}}}}
In this example, keyword searches analyze values in the Last Name field.
-
Enter the field by which to sort records:
window.csf_settings = {
  pbb: {
    maingrid: {
      "Contact__c": {
        "Contact__c": {
          "QueryFilter": "(LastName=NULL OR LastName LIKE 'S%')",
          "QueryFields": "FirstName, LastName, FX5__Office__r.Name",
          "KeywordSearchFields": "LastName",
          "OrderBy": "LastName"
        }}}}}
In this example, records sort in alphabetical order by last name.
-
Add braces
{ }to end the lookup configuration:window.csf_settings = { pbb: { maingrid: { "Contact__c": { "Contact__c": { "QueryFilter": "(LastName=NULL OR LastName LIKE 'S%')", "QueryFields": "FirstName, LastName, FX5__Office__r.Name", "KeywordSearchFields": "LastName", "OrderBy": "LastName" } } } } }Every left brace
{should have a matching right brace}. -
Save the file with "CSF_Settings" as the file name.
-
-
Upload the CSF_Settings file to FieldFX Back Office:
-
From Setup, enter
staticin the Quick Find box, then select Static Resources. -
Click New.
-
In Name, enter
CSF_Settings. -
In Cache Control, select "Public".
-
Click Choose File.
-
Select the CSF_Settings file.
When you upload a new CSF_Settings file, the lookup configurations in the new file replace any existing lookup configurations.
-
Test the Contact lookup.
Catalog Item Picker
When using the Catalog Item Picker, you can configure search results and set the picker width.
Search Results
Search results display at the bottom of the Catalog Item picker.
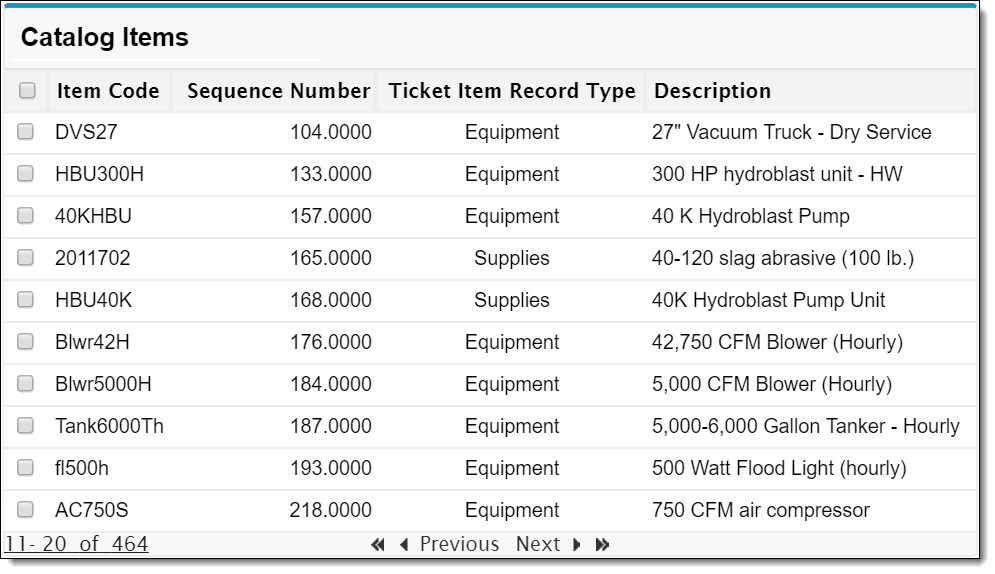
You can add catalog items in the search results to a price book.
Select the Fields for Search Results
-
From Setup, enter `object' in the Quick Find box, then select Objects.
-
Click Catalog Item.
-
Under Search Layouts, click Edit next to Search Results.
-
Complete the following:
-
In Available Fields, select the fields to include and click Add.
-
In Selected Fields, select the fields to remove and click Remove.
-
In Selected Fields, change the order.
-
Select Override the search result column customizations for all users and click Save.
-
Picker Width
You can set the width of the Catalog Item picker to control how far it displays across the page.
Set the Picker Width
-
From Setup, enter
custom settingin the Quick Find box, then select Custom Settings. -
Click Manage next to FX Settings and then click Edit.
-
In PBItem Bldr CatalogItem Max FlyoutWidth, specify the picker’s width when it flies across the page and click Save.
Use a width between 500-1000.
Price Book Builder Button
The Price Book Builder button displays at the top of a price book in FieldFX Back Office.

Change the Name of the Price Book Builder Button
-
From Setup, enter
translationin the Quick Find box, then select Override. -
In Package, select "FieldFX Base Package".
-
In Language, select "English".
-
In Setup Component, select "Button and Link Label".
-
In Object, select "Price Book".
-
Double-click the Button or Link Label Override column next to Price Book Builder.
-
Enter a new button name and click Save.