FieldFX Email Notifications Admin Tool

Introduction

The Email Notification Admin Tool in FieldFX allows a user to create an email notification whenever a change is made to an sObject. Once a specific change is made an email, using a predefined email template, is sent to the specified email addresses.

Admin Portal > Miscellaneous section

Prerequisites

Custom Permission Required
Optional
Steps

FX5 Admin Tool - Email Notification

Required

Check the permissions for the role that is currently logged in by Setup > Profiles > [User’s Role] > Custom Permissions.

How the Email Configuration Admin Tool Works

FieldFX has a new tool accessible in the Miscellaneous section of the Admin Dashboard. With this tool, an admin can create custom email configurations that will:

  • Automatically send email notifications when there is a change to the sObject

  • Specify the email addresses that receive the notifications using a admin chosen custom email template that already exists in your org

  • Configure the notification by sObject and defined criteria

Flow of Action:

  1. Existence of the Notification_Sent and Notification_Sent_To fields exist in the Content Version object.

  2. Configure the Custom Metadata for Email Address Update.

  3. Access the E-mail Notification Admin Tool and create an E-mail Configuration.

  4. The admin creates the email notification and defines the specifics of the email notification. They can also choose the email template to use in the emails.

  5. When there is a change to an sObject (specified in the email configuration), an email is triggered to those email addresses that were specified notifying them of the change to the sObject.

  6. An email is populated with the specifics from notification criteria and uses the selected email template to send out the email.
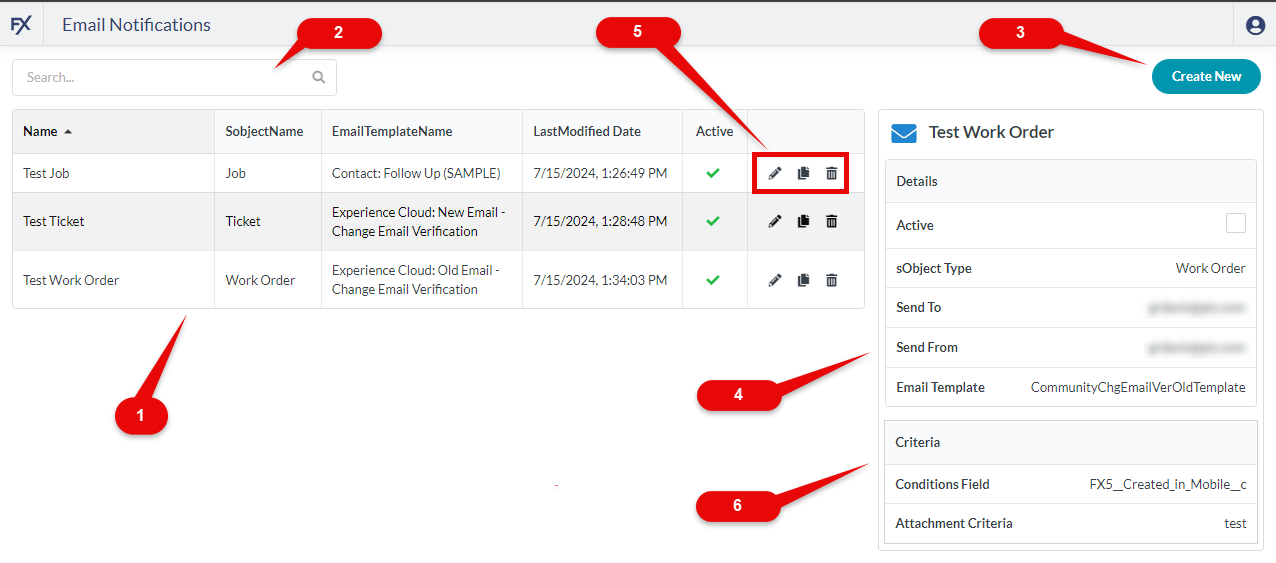
Layout

Email Configuration Admin Tool Main Interface
Callout Name Description

1

Email Configurations

List of email configurations already created. The configurations are shown and organized in these columns:

  • Name - Name of the saved email notifications

  • sObjectName - Determined during the creation stage

  • EmailTemplateName - Name of the chosen email template to use

  • LastModified Date - The date the email notification was last modified

  • Active - If the email notification is being used or not

2

Search field

Use this field to search and filter among the email configurations already created.

In the screenshot, the term "Job" is entered showing only those configurations that are using the Job Sobject.

3

Create New

Use this button to create a new email configuration.

4

Configuration detail

This panel shows the specifics of the email configuration.

The name of the configuration is at the top with these details below:

  • Active checkbox - if the email configuration is active or inactive

  • sObject Type - the sObject that used in this configuration

  • Send To - the email address or multiple addresses to send a notice to

  • Send From - the email address of who is sending the configuration

  • Email Template - the name of the email template to use

    See Access List of Email Templates for the email templates available in your org.

5

Action Buttons

Use this icons to:

  • Edit - Edit the configuration

  • Copy - Copy the configuration as a new configuration

  • Delete - Delete the configuration

6

Criteria

The fields in the email configuration criteria:

  • Conditions Field - The field is dependent on the sobject chosen for the email notifications

  • Attachment Criteria - The text the email configuration looks for to trigger the notification

Step-by-Step Guides

Before you can use the Email Notification Tool, you have to change the email addresses and ensure that the Notification Sent and Notification Sent To fields are present. You can then access the tool and create an Email configuration.

Ensure Notification Sent and Notification Sent To Fields are Present

  1. In Setup, type object in the Quick Find box and select Object Manager.

  2. In the Object Manager, enter content in the Quick Find box and select Content Version.

  3. In Content Version, select Fields & Relationships.

  4. In Fields & Relationships, look for Notification Sent and Notification Sent To fields.

    This Custom Field Definition is managed, meaning that you may only edit certain attributes. This is part of an upgradable package installed from the AppExchange.

    These items can be edited (if applicable):

    • Detail Write Requires Master Read Sharing

    • Latitude and Longitude Display Notation

    • Ignore Field during Lead Convert

    • Data Translation

    • Sort Alphabetically

    • Help Text

    • Mask Type

    • Mask Character

    • Data Owner

    • Field Usage

    • Data Sensitivity Level

    • Compliance Categorization

    These are the details you should see:

    Notification Sent Notification Sent To

    Field Information

    Field Label

    Notification Sent

    Notification Sent To

    Field Name

    Notification_Sent

    Notification_Sent_To

    Data Type

    Checkbox

    Email

    Namespace Prefix

    FX5

    API Name

    FX5__Notification_Sent__c

    FX5__Notification_Sent_To__c

    Description

    Used if the notification has been sent.

    This text can’t be edited and is locked.

    Blank

    Help Text

    Blank

    This text displays on detail and edit pages when users hover over the Info icon next to this field.

    Data Owner

    Choose between User or Public Groups.

    Click Lookup icon to open a Lookup window to search either for a specific user or public group.

    Field Usage

    Choose between --None--, Active, DeprecateCandidate, or Hidden.

    Data Sensitivity Level

    Choose between --None--, Public, Internal, Confidential, Restricted, or MissionCritical.

    Compliance Categorization

    Choose from PII, HIPAA, GDPR, PCI, COPPA, and CCPA

    General Options

    Required

    n/a

    Checkbox - Checked
    Always require a value in this field in order to save a record.

    Unique

    Checkbox
    Do not allow duplicate values.

    External ID

    Checkbox
    Set this field as the unique record identifier from an external system.

    Default Value

    Checked / Unchecked

    Blank

    Some settings have in Default Value section of the setting, a Show Formula Editor link. If you click this link, the link changes to Hide Formula Editor and the box expands so you can enter the formula. See Salesforce Documentation: Elements of a Formula for more information on constructing a valid formula.

    Use formula syntax:

    Enclose text and picklist value API names in double quotes : ("the_text"), include numbers without quotes : (25), show percentages as decimals: (0.10), and express date calculations in the standard format: (Today() + 7).

    To reference a field from a Custom Metadata type record use: $CustomMetadata.Type__mdt.RecordAPIName.Field__c.

Set Custom Metadata in Notification Config for Email Address Update

For more information on this custom metadata type, see
  1. In FieldFX Back Office, click Setup.

  2. In the Quick Find box, type Custom metadata.

  3. Select Custom Metadata Types.

  4. Click Manage next to Notification Configs.

  5. At the Notification Configs window, click New and enter the following details:

    Field Enter…​

    Label

    Account

    Notification Config Name

    Account

    Condition

    $Name == Test

    Send To

    The email addresses separated by commas

    Sobject Type

    Account

    Email Template

    The email template name that you have created for the Content Document Link.

    File Name matching Criteria

    The filename the notification configure should look for and trigger a notification.

  6. Click Save.

Access List of E-mail Templates

See Salesforce Help: Email Template Builder for more information.

  1. In Setup, use the Quick Find search box and type email tem.

  2. Select Classic Email Templates.

    The list of available Email Templates for use in your org are shown in a list.

    The Classic email templates you create here can be used with the following features, in both Salesforce Classic and Lightning Experience. The Salesforce Lightning Desktop offers a new email experience where admins and users can write email and create templates directly from records. Learn more about Email in Lightning Desktop.

    • Approvals

    • Big Deal Alert

    • Cases

    • Case Assignment Rules

    • Case Escalation Rules

    • Experience Cloud Sites

    • Email To Case

    • Lead Assignment Rules

    • Process Builder

    • Web To Lead

    • Workflow

    • Lightning Email Action (in Lightning Experience only)

    • Lightning List Email Action (in Lightning Experience only)

    • Salesforce Classic Email Author (in Salesforce Classic only)

Access E-mail Notifications Tool

  1. Access the FieldFX Admin Tool Dashboard.

  2. Under the Miscellaneous section, click Email Notification.

    Email Notifications tool
  3. Continue with Create E-mail Configuration.

Search for Email Configurations

If you have numerous email configurations, you can use the Search field to search by sObject type. The matching email configurations are shown in the list view.

Create E-mail Configuration

You can create email configurations to utilize different email templates and to meet different criteria.

  1. In the E-mail Notification tool, click Create Email Configuration.

    If there are no email notifications saved, the screen will display No email configurations found. and the Create Configuration button appears.
  2. Complete the New Email Configuration modal with this information:

    Field Description / Step

    Active / Inactive
    Toggle

    This toggle is defaulted on. If you don’t want to active the notification but still want it available in your list, slide the toggle to Inactive.

    Any event matching the inactive notification won’t trigger an email notification.

    Configuration Name
    (Required)

    Enter a name for the new configuration.

    sObject
    (Required)

    Type the name of the sObject to narrow the sObjects that can be used or use the dropdown menu to select the sObject:

    • Job

    • Quote

    • Ticket

    • Work Order

    Send to Email
    (Required)

    Enter the email address to send the completed email when the configuration is triggered.

    From Email
    (Required)

    Enter the email address that appears on the From filed of the completed email.

    File Name
    Matching Criteria

    Enter the text condition that the email notification searches for and triggers the notification if it is found.

    You can use the % wildcard character if you want any matching terms containing what you entered.

    Email Template
    (Required)

    Use the dropdown menu to select the email template to use.

    See Access Email Templates for more information.

  3. Save the email configuration.

    The new configuration appears in the list of previously saved notifications.