Edit a Sync Profile Manager Layout
You can edit and customize a Sync Profile Layout for Transaction Object Layouts or Lookup Layouts.
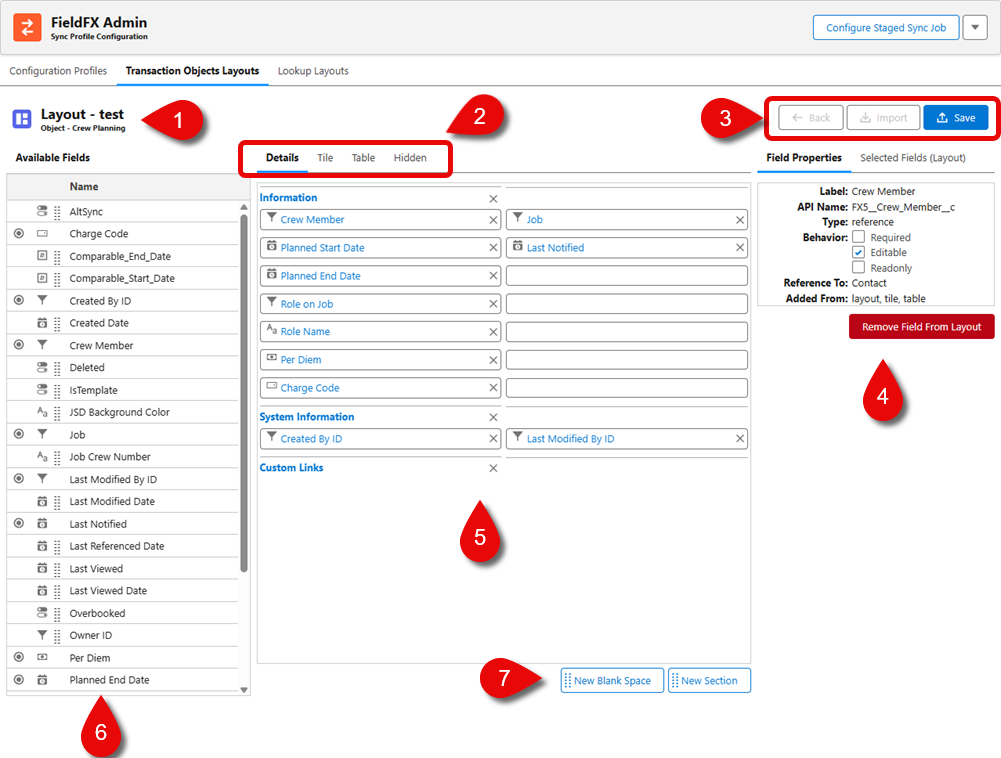
Transaction Objects Layout Editor Layout / Details tab
| Callout | Name | Description | ||||||||||
|---|---|---|---|---|---|---|---|---|---|---|---|---|
1 |
Layout Title |
The name of the layout plus the object that the layout is based on. |
||||||||||
2 |
Editor section |
These are tabs within the edit screen.
|
||||||||||
3 |
Action Buttons |
These buttons perform the following:
|
||||||||||
4 |
Field Detail Tabs |
You can see the details for the selected field or where else the fields used on the layout are used. Depending on the field selected, the properties shown may be different.
|
||||||||||
6 |
Available Fields |
The fields that can be dragged and dropped on the Details tab. |
||||||||||
7 |
New Blank Space & |
Drag one or both of these onto the details pane to insert a blank space between fields or to group fields in a new section. |
Editor Interface Layout
The interface when editing a Transaction Objects Layout has a drag-and-drop interface where you can build a layout by dragging fields over to a Details tab.
| Callout | Name | Description | ||||||||||
|---|---|---|---|---|---|---|---|---|---|---|---|---|
1 |
Layout name |
The name of the layout and the object its based on. |
||||||||||
2 |
Tabs |
The edit interface has the following tabs:
|
||||||||||
3 |
Action Buttons |
Use these action buttons:
|
||||||||||
4 |
You can see the details for the selected field or where else the fields used on the layout are used. Depending on the field selected, the properties shown may be different. For Transaction Object Layouts, there are four tabs:
|
|||||||||||
5 |
Layout Canvas |
This shows the order of the fields in the layout. |
||||||||||
6 |
Available Fields |
This is a list of the fields that can be used on the layout. Depending on the Object chosen, the list of fields can be different. |
||||||||||
7 |
New Blank Space |
Use these buttons to add blank space between fields or add a new section to group fields. |
Tile Tab
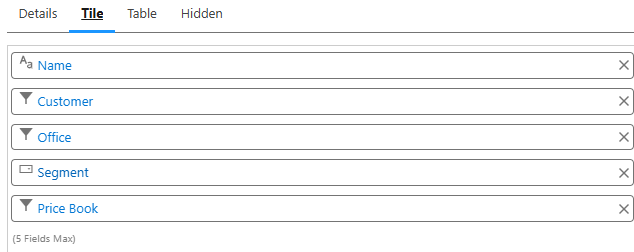
The layout of this tab, used when the layout is shown in a portrait orientation, is basically the same as the Details tab except for:
-
No New Blank Space button
-
No New Section button
Only a total of five fields can be displayed.
Pick key fields you want to appear on each tile (title, sub-lines, badges, etc.) so users can scan and identify items quickly.
Limit the tiles to essential information to optimize the scroll performance on mobile.
If you want quicker at-a-glance comprehension for Mobile users, use tiles. Tiles enable the user to see essential information without opening each record.
Table Tab
The layout of this tab, used to show items in a list view and grid view, is shown in a landscape orientation. This view allows the user to view and edit multiple records.
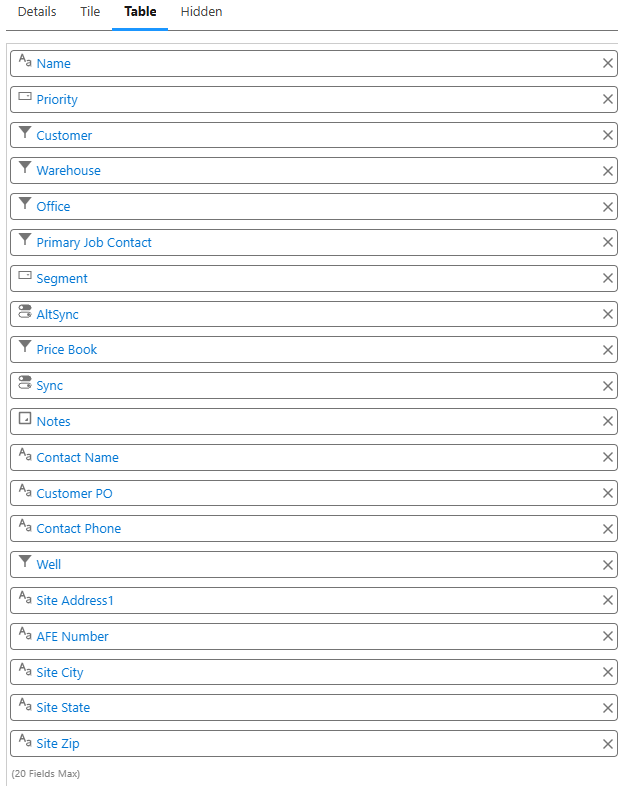
It is basically the same as the Details tab except for the:
-
No New Blank Space button
-
No New Section button
A maximum of 20 fields can be displayed.
You can choose which columns the mobile user sees and their order.
|
An improvement to the grid is a locked first column, alternating row colors, and a clearer active cell styling all for better user navigation during bulk edits. Geolocation fields won’t appear as columns in the mobile table/grid views for Jobs and Tickets when viewed in the FieldFX Mobile App, even if added to the layout. |
Hidden Tab
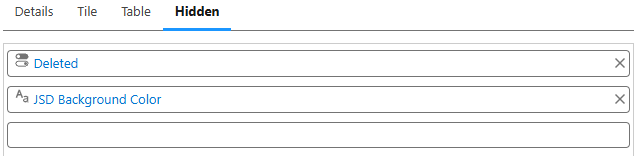
This tab includes fields in the sync payload that should not display in any UI (detail, tile, or table). They are required however for rules, filters, or automation.
Mark supporting fields (IDs, flags, derived values) as hidden so they sync for logic/filters while staying out of the UI.
Keep the visible UI clean while ensuring background SOQL filters and other conditions remain fully functional.
If a field is needed for sync logic, calculations, or back‑office processes but adds noise or confusion if shown to end users, use this view.
Field Details Tabs
These tabs give admins granular control over:
-
Data Visibility
-
Sync Efficiency
-
Dynamic data presentation
-
User experience in lookups
are comprised of:
| Tab Name | Purpose | Usage | ||||||||||||||||||||||
|---|---|---|---|---|---|---|---|---|---|---|---|---|---|---|---|---|---|---|---|---|---|---|---|---|
Field Properties |
Visibility and behavior of individual fields for transactional objects in the FieldFX Mobile App. |
The specifics of the highlighted field (from the details tab) can change depending on the field. They are:
|
||||||||||||||||||||||
Synced Fields |
The fields that are synced between Back Office and the mobile device. They are critical to ensure mobile user have the needed data and not overload the device. Example: You can sync "Job ID" and "Customer Name", but skip internal audit fields. Here is a sample table: |
This tab has two columns:
Reference for Synced Fields Tab in Transaction Objects Layout
This table shows typical examples of fields synced for a Transaction Object Layout. The Name column lists the API names of transactional fields, and the Added By column indicates how each field was introduced into the layout.
|
||||||||||||||||||||||
Cross Object Formula Fields |
Admins can create formula fields that pull data from related objects. |
|
||||||||||||||||||||||
Mobile Lookup Filter |
This tab controls which records appear in lookup dialogs on the FieldFX Mobile App. To see the filter, click on the lookup field. The lookup field must be editable to have a Mobile filter. |
|
Lookup Layouts Editor
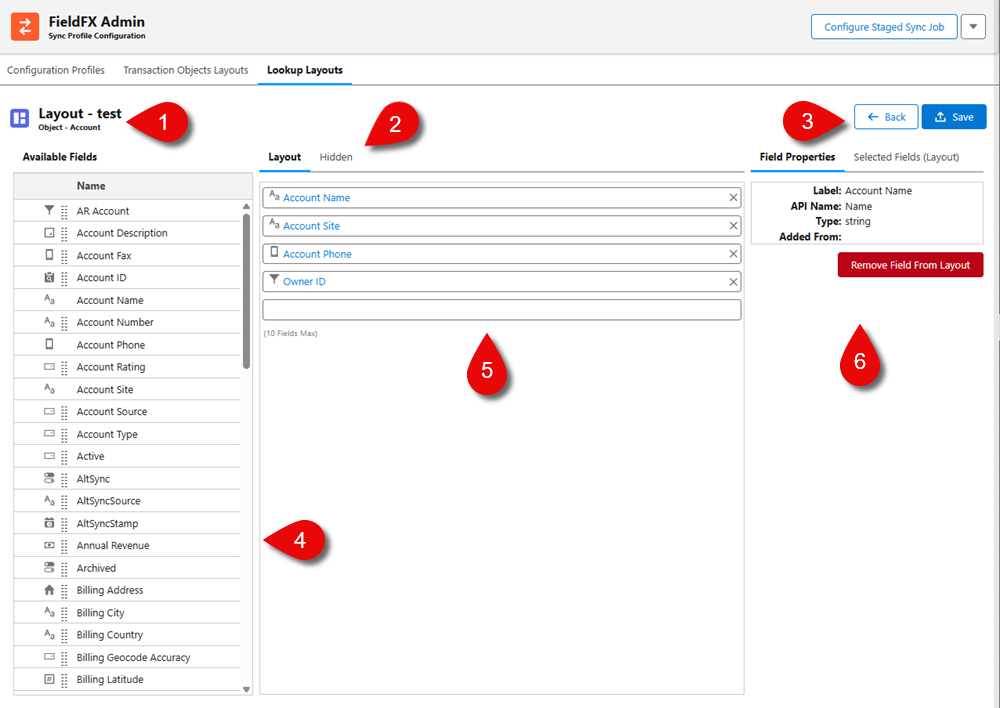
| Callout | Name | Description | ||||||
|---|---|---|---|---|---|---|---|---|
1 |
Layout Title |
The name of the layout plus the object that the layout is based on. |
||||||
2 |
Tabs |
There are 2 tabs in the Edit screen:
|
||||||
3 |
Action buttons |
The Back button returns to the list of lookup layouts while the Save button saves any changes to the open layout. |
||||||
4 |
Available Fields |
The list of available fields that can be used on a lookup layout are more extensive than for a transaction object layout and can vary depending on the object chosen at layout creation. |
||||||
5 |
Fields list |
You can drag up to 10 fields maximum and arrange them in any order. |
||||||
6 |
Field Properties |
They can vary depending on the field.
|
Layout Tab
This tab is the design canvas where you can configure how fields appear in the FieldFX Mobile App. Drag a field from the Available Fields list over to the canvas and arrange them for the lookup object. The defined layout determines what users see when interacting with lookup records such as Accounts and Equipment in the mobile app. Different orientations and views (landscape, tile, table) are supported. The primary purpose is a visible UI design for mobile users.
Hidden Tab
This tab defines which fields shouldn’t appear in the user interface but are important for business rules, filters, and automation logic. These fields remain part of the sync profile so calculations, workflows, or conditional logic can correctly run, even though the end user never sees them.
File Details Tabs
| Field Properties tab | Synced Fields tab |
|---|---|
|
|

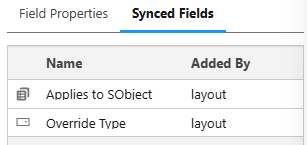
These tabs provide admins are comprised of:
| Tab Name | Purpose | Usage | ||||||||||||||||
|---|---|---|---|---|---|---|---|---|---|---|---|---|---|---|---|---|---|---|
Visibility and behavior of individual fields for transactional objects in the FieldFX Mobile App. |
The specifics of the highlighted field (from the details tab) can change depending on the field. They are:
|
|||||||||||||||||
The fields that are synced between Back Office and the mobile device. They are critical to ensure mobile user have the needed data and not overload the device. Example: You can sync "Job ID" and "Customer Name", but skip internal audit fields. |
This tab has two columns:
Synced Fields tab within a Sync Profile Manager Lookup Layout. The Name column lists the API names of synced fields, and the Added By column indicates how each field was introduced into the layout (Default, Manual, or Global):
|
Global Layouts
This is a reusable layout (for either Transaction Objects or Lookup Layouts) the admin creates once and can assign to multiple sync profiles. The key benefit is when the admin edits the global layout (field positions in Layout, or rule-only fields in Hidden), the changes propagate to every sync profiles using it. There is no rework per sync profile.
Transaction Object Layouts
When you edit a global layout (such as rearranging fields on the Details tab or add rule-only fields to Hidden), those changes propagate automatically to every sync profile using that layout. This eliminates repetitive edits and ensures consistency across teams.
Global layout take precedence: If a sync profile references a global layout, any updates to that global layout apply immediately.
Profile-specific layout overrides global: If you assign a custom layout to a profile, that layout takes precedence for that profile. Best practice: Use global layouts for standardization and minimize profile-specific layouts to reduce maintenance overhead.
Lookup Layouts
Each sync profile has sections for Transaction Objects and Lookup Objects. For each object, you select which layout it will use—either:
-
a global layout (shared across profiles), or
-
a profile‑specific layout (unique to that profile, if you decide to diverge)
Once assigned, the Layout tab determines the fields and arrangement the mobile user will see; the Hidden tab carries non‑UI fields your rules, filters, and automations depend on. Both tabs are honored by the mobile app runtime.
The FieldFX Mobile App renders these lookup layouts directly, ensuring consistency between Back Office and Mobile.
Global vs Profile-specific
Global layout ➜ many profiles: Any edit to a global layout (on Layout or Hidden) is centralized and automatically reflected everywhere that layout is assigned. This is the fastest way to keep multiple teams aligned.
Profile‑specific layout: If a profile needs a different arrangement or set of hidden fields, you can create (or clone) a layout and assign that variant to just that profile. That profile then follows its assigned layout rather than the global one.
Assignment determines precedence. The layout assigned to the profile/object combination is the one the mobile user sees; a global layout only applies where it is assigned.
Best Practices: |
|
Refresh the Description File After Field Deletions
When you delete a field from a sync profile’s page layout (transaction or lookup object) and save the profile, the static resource (description) file used by Mobile is not automatically updated by the scheduled Stage Data Apex job. The scheduled job syncs data changes but does not detect field deletions from layouts.
To ensure the deletion takes effect on Mobile devices, you must manually refresh the description file:
-
In Back Office, open Sync Profile Manager.
-
Navigate to the sync profile that contained the deleted field (e.g.,
ASPE_206). -
Open each page layout on the profile that was affected by the field deletion.
-
Click Save on the profile.
This forces the static resource file to regenerate without the deleted field.
-
On the next Mobile sync, the field will no longer appear on the page layout.
|
Simply saving the profile at the top level is not sufficient. You must open and re-save each individual layout that referenced the deleted field. |
Edit a Transaction Objects Layout
You can edit a Transaction Objects layout once its open.
These objects are used to store operational data that users interact with on a daily basis and users make use of them when they need to view, edit, or create that specific type of data on mobile.
-
On the Transaction Objects Layout tab, open a layout to begin editing it.
-
Drag new fields onto the Details tab.
-
You can also drag and move fields on the Details canvas to a new location.
-
If you want to add space between fields, drag the New Blank Space button onto the canvas and position it before or after the desired field.
-
If you want to group fields in a new section,
-
Drag it to a blank space on canvas.
-
Enter the name of the section in the New Section modal under the Section Name.
-
Click Confirm to save the section name.
-
Click and drag the desired field block underneath the new section.
You will see a green line indicating a valid location.
-
-
Click
 .
. -
To configure the Tile Tab:
You can have up to 5 fields maximum. Only fields with a  can be dragged to the canvas.
-
Drag the field from the Available Fields section to a blank space on canvas.
-
-
To configure the Table Tab:
You can have up to 20 fields maximum. Only fields with a can be dragged to the canvas.
-
Drag the field from the Available Fields section to a blank space on canvas.
-
-
To configure the Hidden Tab:
Only fields with a can be dragged to the canvas.
-
Drag the field from the Available Fields section to a blank space on canvas.
-
Edit a Lookup Layout
-
On the Lookup Layouts tab, click on the layout you want to edit.
-
Use the Move icon next to the field in the Available Fields over to the Layout canvas.
You can add up to the 10 fields. -
Click on the field to see the field’s properties in the Field Properties tab.
-
To remove the field from the layout,
-
Click the X next to the field or
-
In the Field Properties, click the red Remove Field From Layout.
-
-
Click
.
Import a Layout
You can import an existing layout into a new transaction object or lookup layout. Unless you want to overwrite an existing layout, you should create a blank layout then import an existing layout.
Key Benefits
-
There is a faster setup with reusing existing layouts
-
The UI and rules are consistent across multiple profiles
-
There is reduced admin overhead when global layouts are updated
Potential Issues
| Issue | Description |
|---|---|
Permission-Related Problems |
|
Layout Refresh and Field Behavior Issues |
|
eForms and UI Display Problems |
Imported layouts sometimes do not display correctly in both the main page and mobile app, especially when linked to eForms. This can disrupt workflows that rely on those forms. |
Global Layout Propagation Risks |
There could be unintended changes across profiles if the imported layout is set as a global layout, where any subsequent edits propagate across all profiles using that layout. Without careful planning, this can introduce unintended changes to multiple user profiles. |
Dependency on Back-Office Configuration |
Imported layouts rely on back-office configurations (field requirements, read-only settings). If these configurations are incorrect or outdated, the imported layout will carry those issues forward. |
Best Practices
-
You should verify admin permissions before importing.
-
Confirm field behaviors and refresh the layout after import.
-
Validate back-office configurations prior to import.
-
Test your eForms and UI display in both desktop and mobile environments.
-
Use global layouts cautiously and document changes before propagation.
Process
-
Open a Transaction Object Layout.
-
Once opened, click Import to open the Import modal.
Only when an existing layout is opened is the Import button available. The available layouts depend on the object type selected when you opened the layout.
-
At the Import modal, select the layout to import.
This will bring in another record of the same type into the current layout.
-
Verify the field properties of the layout.
-
Save changes.
Recommended Reading
For more information, see:
| FieldFX Documentation | Salesforce Documentation |
|---|---|
|