FXL Data Grid Setup v1 (Deprecated)
|
This document is for the deprecated version of the original Data Grid. To see documentation for the current version please click here. |
Prerequisites
-
Complete the Salesforce Lightning AppBuilder training before setting up and configuring the FXL Data Grid for the first time.
-
To set up the FXL Data Grid, you need the following licenses:
-
To set up the FXL Data Grid, you must:
-
Activate Lightning Experience for FieldFX Back Office
-
-
To set up the FXL Data Grid, you need:
-
System Administrator permissions
-
Basics
-
The FXL Data Grid is a versatile record management tool in FieldFX Back Office when using Lightning Experience.
-
You can set up an FXL Data Grid for use with any record type in FieldFX.
-
You can also set up FXL Bulk Editing, [FXL Stage Pricing, and the FXL Bundle Maker for use with an FXL Data Grid after you have already added and configured it.
Setting Up FXL Data Grid
-
Switch to the Lightning Experience
-
Access the applicable record page
Example 1. Managing price book item records with a data gridYou want to use the FXL Data Grid to manage price book item records.
-
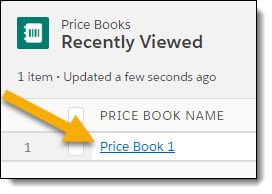
From your Home page, click Price Books

-
Click the price book for which you want to use the FXL Data Grid to manage price book items
-
Configure FXL Data Grid Details
-
Set up Bulk Editing to be used with the FXL Data Grid
-
Set up Stage Pricing to be used with the FXL Data Grid
-
Configuring FXL Data Grid Details
Basics
-
The API names of Salesforce objects and object fields are required to configure any of the FXL Data Grid fields.
-
The most accurate way to enter the API names is to obtain them from the Object Manager.
| The FXL Data Grid supports the use of and displays image fields as read-only. |
Step-by-Step Guide
-
Click the gear icon and select Edit Page
-
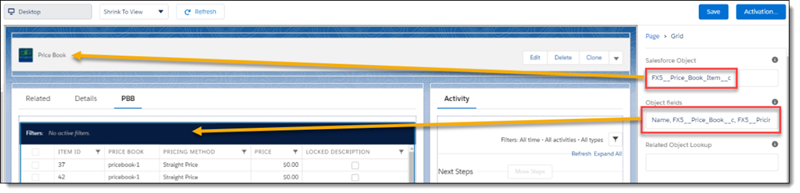
Select the FXL Data Grid where it is placed on the page to display the configurable fields to the right
-
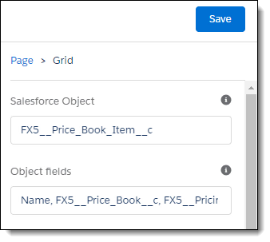
Obtain the API name of the records' object and enter it in Salesforce Object
-
Obtain the API names of the object’s fields you want to display in the FXL Data Grid and enter them separated by commas in Object fields
The FXL Data Grid supports the DateTime data type, but is not currently compatible with fields of the Time data type.
Specifically, the controls will not display for users during field update. For updates about SFDC resolution of this issue, please see this article.
-
Optionally complete one or more of the following:
-
To limit the items displayed in the FXL Data Grid to a specific master object record, Obtain the API name of the master object and enter it in Related Object Lookup.
-
To freeze columns on the left of the FXL Data Grid when horizontally scrolling, enter the number of columns to freeze in Number of sticky columns.
-
To enable users to save a filter configuration of the data grid so that it displays each time they access the page, enter a unique name for this data grid in Unique name for data grid.
-
To remove the defaulted compact display format for the FXL Data Grid, click Compact.
-
To unfreeze the header row of the FXL Data Grid when vertically scrolling, click Sticky columns.
-
To remove the column with a link to the record at the beginning of each row, click Display link to view record.
-
To override the default and activate the ability to add records in the FXL Data Grid, click Disable Adding.
-
To override the default and activate the ability to copy records, click Disable Copying.
-
-
Configure any other optional setting available that benefits your company
-
Click Save
-
If this is the first time the FXL Data Grid has been set up on the page, activate the configuration of the page as the Org default
-
Click Back

-
Verify the FXL Data Grid is displaying the object and fields you have entered where you expected them to display
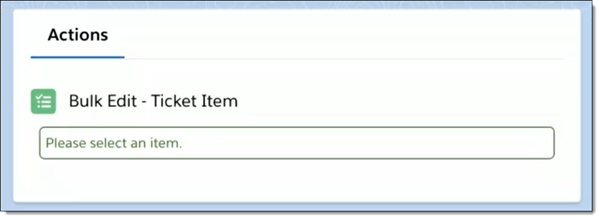
Setting Up FXL Bulk Edit
Basics
-
The API names of Salesforce objects and object fields are required to configure the FXL Bulk Edit fields for the FXL Data Grid.
-
The most accurate way to enter the API names is to obtain them from the Object Manager.
-
The object for FXL Bulk Edit must match the object for the FXL Data Grid you have already added and configured.
Step-by-Step Guide
-
Drop FXL Bulk Edit to the record page with the FXL Data Grid already added and configured
-
Select FXL Bulk Edit where it is placed on the page to display the configurable fields to the right
-
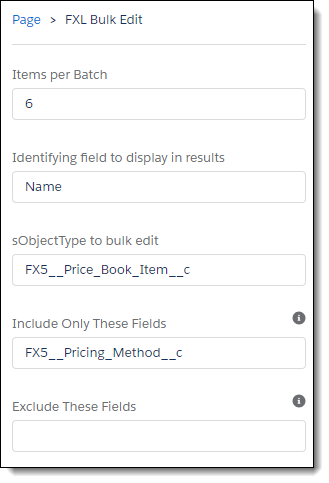
Obtain the API name of the records' object and enter it in sObjectType to bulk edit
-
Obtain the API names of any additional objects you want to display in FXL Bulk Edit and enter them separated by commas in Identifying fields to display in results
-
Optionally choose only one of the following:
-
Obtain the API names of the specific fields you want to limit bulk editing to and enter them separated by commas in Include Only These Fields.
-
Obtain the API names of the specific fields you want to exclude from bulk editing and enter them separated by commas in Exclude These Fields.
-
-
Click Save
-
If this is the first time FXL Bulk Edit has been set up on the page, activate the configuration of the page as the Org default
-
Click Back
-
Verify FXL Bulk Edit is displaying the object you selected
Setting up Bulk Edit for Dependent Lookup Fields
Basics
For most fields, the default Salesforce Lookup Control functions as expected.
The default lookup control does not work for dependent fields.
A custom search popup provides a filtered lookup for dependent fields.
Step-By-Step Guide
-
Obtain the API names of objects for the dependent fields
-
Obtain the API names of the dependent fields you want to filter for bulk editing
-
Add a
bulkEditfunction to the fxl_searchSettings Static Resource file -
Verify the Bulk Edit Control is added to the object’s lightning page
-
Verify the fields have been added to the grid columns on the lightning page
Example 1 - Bulk Edit Contacts Should Match the 'First Letter of Contact' Field
Scenario
On Quote Items, we have a verification that the entry in Contact field starts with the character entered in a first_letter_of_contact field.
When doing a bulk edit on the Contact field, only valid entries that match the entry in first_letter_of_contact for the controlling record should display.
| For this example, we assume the objects, fields, and verification rule already exist. |
To accomplish this lookup with verification for a bulk edit, the following code is added to the fxl_searchSettings.js Static Resource file.
bulkEdit: {
  "FX5__Quote_Item__c": {
    "Contact__c": {
      "QueryFilter": "(LastName=NULL OR LastName LIKE '@@first_letter_of_contact__c@@%')",
      "QueryFields": "Name,LastName,FirstName",
      "KeywordSearchFields": "LastName",
      "OrderBy": "LastName"
    }
  }
}
Example 2 - Bulk Edit Wells for Selected Quote
Scenario
We have an object that tracks well sections.
The Quotes object has a reference field to the well sections object.
We also have a lookup from the Quote Items to the well section object.
When we are looking at Quote Items, we want to be able to bulk edit the well section, but the bulk edit should only allow well sections for the displayed quote.
| For this example, we assume that the objects and fields already exist. |
To accomplish this, we add the following code to the fxl_searchSettings.js Static Resource file.
bulkEdit: {
  "FX5__Quote_Item__c": {
    "well_section__c": {
      "QueryFilter": "(Quote__c='@@FX5__Quote__c@@')",
      "QueryFields": "Name",
      "KeywordSearchFields": "Name",
      "OrderBy": "Name"
    }
  }
}
Setting Up FXL Stage Pricing
Basics
Stage pricing can be set up on Tickets and Quotes.
The object for FXL Stage Pricing must match the object for the FXL Data Grid you have already added and configured.
Step-by-Step Guide
-
Drop FXL Stage Pricing to the record page with the FXL Data Grid already added and configured
-
Click Save
-
If this is the first time FXL Stage Pricing has been set up on the page, activate the configuration of the page as the Org default
-
Click Back
-
Verify FXL Stage Pricing is displaying where you expected
Setting Up the FXL Bundle Maker
Step-by-Step Guide
-
Drop FXL Bundle Maker to the record page with the FXL Data Grid already added and configured
-
Click Save
-
If this is the first time the FXL Bundle Maker has been set up on the page, activate the configuration of the page as the Org default
-
Click Back
-
Verify FXL Bundle Maker is displaying where you expected