Price Book Builder Setup
Prerequisites
-
To set up the Price Book Builder, you need the following licenses:
-
To set up the Price Book Builder, you must:
-
To set up the Price Book Builder, you need:
-
System permissions:
-
Customize Application
-
View Setup and Configuration
-
Setting Up the Price Book Builder
-
From Setup, enter "static" in the Quick Find box, then select Static Resources
-
Complete one of the following:
-
If the en_US file displays in the list, proceed to step 11.
-
If the en_US file doesn’t display in the list, proceed to step 5.
-
-
Extract the file and save it to your local computer
-
Move back to FieldFX Back Office
-
Click New
-
Complete the following:
-
In Name, enter "en_US"
-
In Cache Control, select "Public"
-
Click Choose File
-
Select the en_US file you downloaded
-
-
Click Save
Price Book Details

Selecting the Fields to Display
-
From Setup, enter "object" in the Quick Find box, then select Objects
-
Click Price Book
-
Under Compact Layouts, click New
-
Complete the following:
-
In Label, enter "Price Book Details"
-
In Available Fields, select the fields to include
-
Click Add
-
In Selected Fields, change the order
-
Click Save
-
-
Click Compact Layout Assignment
-
Complete the following:
-
Click Edit Assignment
-
In Primary Compact Layout, select "Price Book Details"
-
Click Save
-
Item Grid
Fields
Selecting the Fields to Display
-
From Setup, enter "object" in the Quick Find box, then select Objects
-
Click Price Book Item
-
Under Page Layouts, click Edit next to a page layout for FieldFX Back Office
-
Change the fields
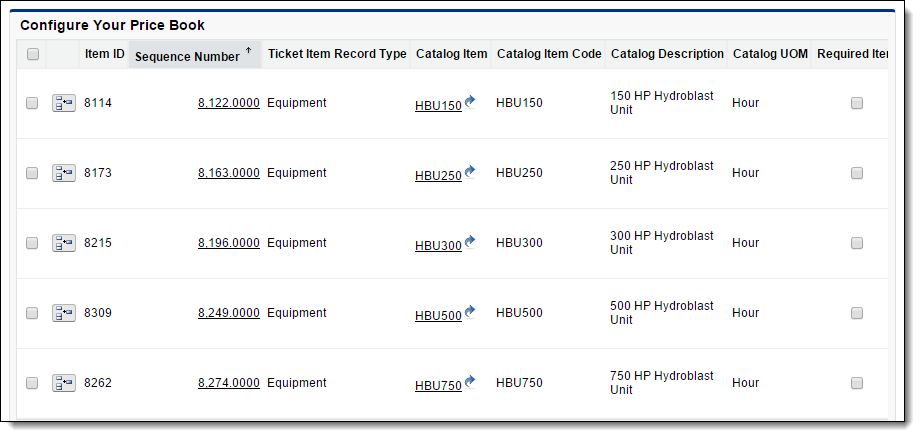
To sort ticket items by sequence number, include the Sequence Number field on the Ticket Item Layout. -
Click Save
-
Repeat steps 5 to 7 for other page layouts as needed
Configuring a Field to Display Read-Only
-
From Setup, enter "object" in the Quick Find box, then select Objects
-
Click Price Book Item
-
Under Custom Fields & Relationships, click the field name
-
Click Set Field-Level Security
-
Select Read-Only next to the user profiles on which to impose the read-only restriction
-
Click Save
|
Fields use a combination of page layout and field-level security settings and the most restrictive field setting always applies. For example, if you make a field required in the page layout security settings and read-only in the field-level security settings, the field displays read-only for the user profiles specified in the field-level security settings |
Custom Lookups
Examples
Contact Lookup
Here’s an example of how you can configure a Contact lookup.
| Setting | Value | Impact |
|---|---|---|
QueryFilter |
|
Only contacts with a blank last name or a last name starting with the letter "S" display available for selection. |
QueryFields |
|
The listed fields display for contacts in search results. |
KeywordSearchFields |
|
Keyword searches analyze the last name of contacts. |
OrderBy |
|
Contacts sort in alphabetical order by last name. |
Equipment Lookup
Here’s an example of how you can configure an Equipment lookup.
| Setting | Value | Impact |
|---|---|---|
QueryFilter |
|
Only equipment linked to offices starting with the letter "H" displays available for selection. |
QueryFields |
|
The listed fields display for equipment in search results. |
KeywordSearchFields |
|
Keyword searches analyze the name and description of equipment. |
OrderBy |
|
Equipment sorts in alphabetical order by name. |
Configuring Custom Lookups
As an example, we will show you how to configure a Contact lookup.
-
Add a CSF_Settings static resource:
-
Open a text editor
-
Enter the following to name the static resource:
window.csf_settings = { -
Enter the identifying code for the Price Book Builder and Item grid:
window.csf_settings = { pbb: { maingrid: { -
Enter the API name of the lookup:
window.csf_settings = { pbb: { maingrid: { "Contact__c": { "Contact__c": { -
Enter a SOQL query to restrict the records that display available for selection in the lookup:
window.csf_settings = {
  pbb: {
    maingrid: {
      "Contact__c": {
        "Contact__c": {
          "QueryFilter": "(LastName=NULL OR LastName LIKE 'S%')",
Refer to the SOQL reference documentation for more information on how to write SOQL queries.
-
Enter the fields to display for records in search results:
window.csf_settings = {
  pbb: {
    maingrid: {
      "Contact__c": {
        "Contact__c": {
          "QueryFilter": "(LastName=NULL OR LastName LIKE 'S%')",
          "QueryFields": "FirstName, LastName, FX5__Office__r.Name",
In this example, the First Name, Last Name, and Office fields display for records.
-
Enter the fields to analyze in keyword searches:
window.csf_settings = {
  pbb: {
    maingrid: {
      "Contact__c": {
        "Contact__c": {
          "QueryFilter": "(LastName=NULL OR LastName LIKE 'S%')",
          "QueryFields": "FirstName, LastName, FX5__Office__r.Name",
          "KeywordSearchFields": "LastName",
In this example, keyword searches analyze values in the Last Name field.
-
Enter the field by which to sort records:
window.csf_settings = {
  pbb: {
    maingrid: {
      "Contact__c": {
        "Contact__c": {
          "QueryFilter": "(LastName=NULL OR LastName LIKE 'S%')",
          "QueryFields": "FirstName, LastName, FX5__Office__r.Name",
          "KeywordSearchFields": "LastName",
          "OrderBy": "LastName"
In this example, records sort in alphabetical order by last name.
-
Add braces
{ }to end the lookup configuration:window.csf_settings = { pbb: { maingrid: { "Contact__c": { "Contact__c": { "QueryFilter": "(LastName=NULL OR LastName LIKE 'S%')", "QueryFields": "FirstName, LastName, FX5__Office__r.Name", "KeywordSearchFields": "LastName", "OrderBy": "LastName" } } } } };Every left brace
{should have a matching right brace}. -
Save the file with "CSF_Settings" as the file name
-
-
Upload the CSF_Settings file to FieldFX Back Office:
-
From Setup, enter "static" in the Quick Find box, then select Static Resources
-
Click New
-
In Name, enter "CSF_Settings"
-
In Cache Control, select "Public"
-
Click Choose File
-
Select the CSF_Settings file
When you upload a new CSF_Settings file, the lookup configurations in the new file replace any existing lookup configurations.
-
Test the Contact lookup
Catalog Item Picker
Search Results
Basics
-
Search results display at the bottom of the Catalog Item picker.
-
You can add catalog items in the search results to a price book.
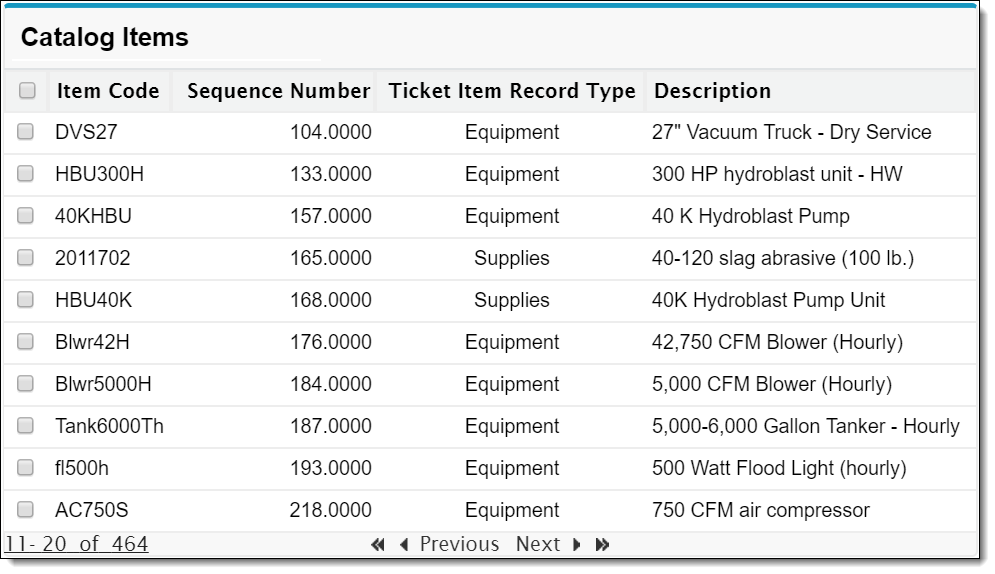
Selecting the Fields for Search Results
-
From Setup, enter "object" in the Quick Find box, then select Objects
-
Click Catalog Item
-
Under Search Layouts, click Edit next to Search Results
-
Complete the following:
-
In Available Fields, select the fields to include
-
Click Add
-
In Selected Fields, select the fields to remove
-
Click Remove
-
In Selected Fields, change the order
-
Select Override the search result column customizations for all users
-
Click Save
-
Picker Width
Basics
You can set the width of the Catalog Item picker to control how far it displays across the page.
Setting the Picker Width
-
From Setup, enter "custom setting" in the Quick Find box, then select Custom Settings
-
Click Manage next to FX Settings
-
Click Edit
-
In PBItem Bldr CatalogItem Max FlyoutWidth, specify the picker’s width when it flies across the page
Use a width between 500-1000. -
Click Save
Price Book Builder Button

Changing the Name of the Price Book Builder Button
-
From Setup, enter "translation" in the Quick Find box, then select Override
-
In Package, select "FieldFX Base Package"
-
In Language, select "English"
-
In Setup Component, select "Button and Link Label"
-
In Object, select "Price Book"
-
Double-click the Button or Link Label Override column next to Price Book Builder
-
Enter a new button name
-
Click Save