Quote Item Builder Setup
Prerequisites
-
To set up the Quote Item Builder, you need the following licenses:
-
To set up the Quote Item Builder, you must:
-
To set up the Quote Item Builder, you need:
-
System permissions:
-
Customize Application
-
View Setup and Configuration
-
Setting Up the Quote Item Builder
-
From Setup, enter "static" in the Quick Find box, then select Static Resources
-
Complete one of the following:
-
If the en_US file displays in the list, proceed to step 11.
-
If the en_US file doesn’t display in the list, proceed to step 5.
-
-
Extract the file and save it to your local computer
-
Move back to FieldFX Back Office
-
Click New
-
Complete the following:
-
In Name, enter "en_US"
-
In Cache Control, select "Public"
-
Click Choose File
-
Select the en_US file you downloaded
-
-
Click Save
Quote Details

Selecting the Fields to Display
-
From Setup, enter "object" in the Quick Find box, then select Objects
-
Click Quote
-
Under Compact Layouts, click New
-
Complete the following:
-
In Label, enter "Quote Details"
-
In Available Fields, select the fields to include
-
Click Add
-
In Selected Fields, change the order
-
Click Save
-
-
Click Compact Layout Assignment
-
Complete the following:
-
Click Edit Assignment
-
Under Record Type Overrides, select Quote
-
In Compact Layout to Use, select "Quote Details"
-
Click Save
-
Item Grid
Fields
Basics
The Item grid displays the quote items on a quote.
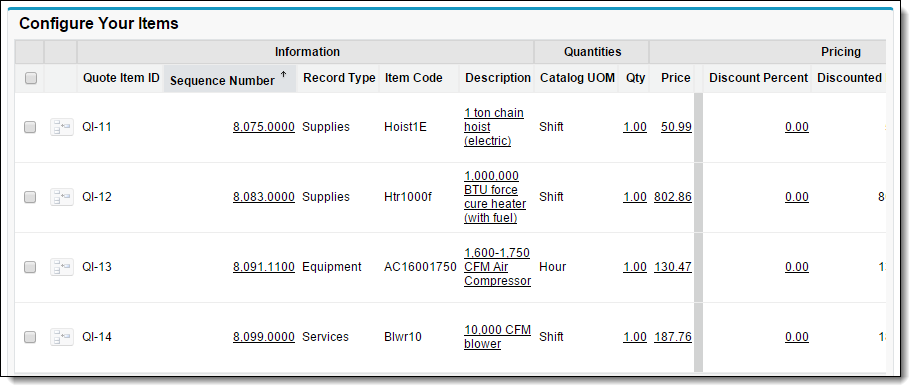
Page layouts control the fields and header that display on the Item grid, as follows:
| Layout | Result | Note |
|---|---|---|
Master Layout |
Controls the fields that display on the Item Grid when you are viewing All items. |
The fields on this layout must also display on record type layouts before they will display data. |
Equipment Layout |
Controls the fields that display on the Item Grid when you select the Equipment filter. |
The fields on these layouts must also display on the Master layout before they any display data. |
Labor Layout |
Controls the fields that display on the Item Grid when you select the Labor filter. |
|
Service Layout |
Controls the fields that display on the Item Grid when you select the Service filter. |
|
Supplies Layout |
Controls the fields that display on the Item Grid when you select the Supply filter. |
Selecting the Fields to Display
-
From Setup, enter "object" in the Quick Find box, then select Objects
-
Click Quote Item
-
Under Page Layouts, click Edit next to Quote Item Layout
-
Change the fields
To sort quote items by sequence number, include the Sequence Number field on the Quote Item Layout. -
Click Save
Configuring a Field to Display Read-Only
-
From Setup, enter "object" in the Quick Find box, then select Objects
-
Click Quote Item
-
Under Custom Fields & Relationships, click the field name
-
Click Set Field-Level Security
-
Select Read-Only next to the user profiles on which to impose the read-only restriction
-
Click Save
|
Fields use a combination of page layout and field-level security settings and the most restrictive field setting always applies. For example, if you make a field required in the page layout security settings and read-only in the field-level security settings, the field displays read-only for the user profiles specified in the field-level security settings. |
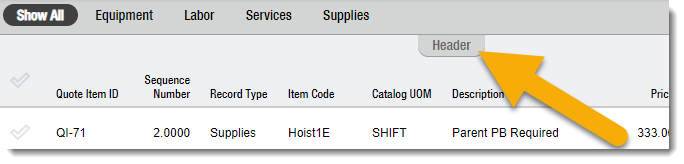
FX Header
Basics
The expandable and collapsible FX Header displays at the top of the Item grid for quotes, defaulting to collapsed when first accessed.
Adding the FX Header to the Quote Item Grid
-
From Setup, enter "object" in the Quick Find box, then select Objects
-
Click Quote
-
Click Edit next to the applicable page layout
-
Drag Section below Standard Buttons on the Quote Detail
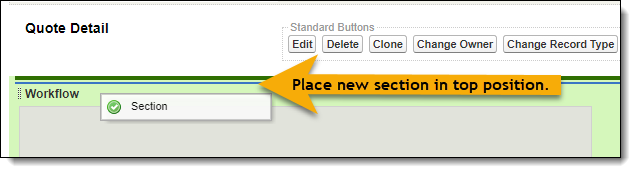
The Section Properties window displays.
-
In Section Name, enter "FX Header"
The Section Name must be entered precisely as shown to meet script requirements.
Section Name is case-sensitive.
-
In Layout, select 2-Column
-
Click OK
-
Drag fields into the FX Header section
-
Click Save
Validation Rules
Basics
You can add validation rules to prevent users from updating specific fields when editing quote items.
Adding a Validation Rule for the Description Field
Complete the following to add a validation rule that prevents users from updating the Description field for quote items
-
From Setup, enter "object" in the Quick Find box, then select Objects
-
Click Quote Item
-
Under Validation Rules, click New
-
In Rule Name, enter "Locked Description"
-
Under Error Condition Formula, enter the following formula:
AND(FX5__PBI_Locked_Description__c, ISCHANGED(FX5__Description__c))
-
In Error Message, enter the following:
You cannot change the description because it is locked.
-
In Error Location, complete one of the following:
-
Select Top of Page to display validation error messages at the top of the page.
-
Select Field and "Description" to display validation error messages inline next to the Description field.
-
-
Click Save
Adding a Validation Rule for the Discount Percent Field
Complete the following to add a validation rule that prevents users from updating the Discount Percent field for quote items.
-
From Setup, enter "object" in the Quick Find box, then select Objects
-
Click Quote Item
-
Under Validation Rules, click New
-
In Rule Name, enter "Locked Discount"
-
Under Error Condition Formula, enter the following formula:
AND(FX5__PBI_Locked_Discount__c, ISCHANGED(FX5__Discount_Percent__c))
-
In Error Message, enter the following:
You cannot change the discount percentage because it is locked.
-
In Error Location, complete one of the following:
-
Select Top of Page to display validation error messages at the top of the page.
-
Select Field and "Discount Percent" to display validation error messages inline next to the Discount Percent field.
-
-
Click Save
Adding a Validation Rule for the Price Field
Complete the following to add a validation rule that prevents users from updating the Price field for quote items.
-
From Setup, enter "object" in the Quick Find box, then select Objects
-
Click Quote Item
-
Under Validation Rules, click New
-
In Rule Name, enter "Locked Price"
-
Under Error Condition Formula, enter the following formula:
AND(FX5__PBI_Locked_Price_Markup__c, ISCHANGED(FX5__Price__c))
-
In Error Message, enter the following:
You cannot change the price because it is locked.
-
In Error Location, complete one of the following:
-
Select Top of Page to display validation error messages at the top of the page.
-
Select Field and "Price" to display validation error messages inline next to the Price field.
-
-
Click Save
Item Picker
Search Results
Basics
Search results display at the bottom of the Item picker.
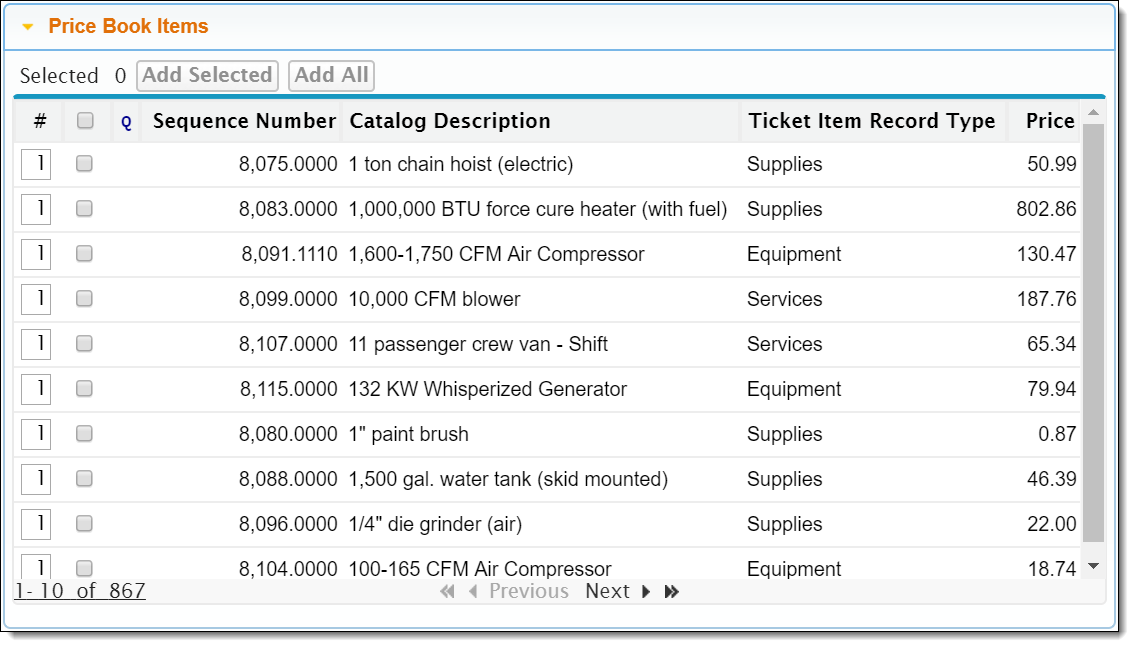
You can add price book items in the search results to a quote.
Selecting the Fields for Search Results
-
From Setup, enter "object" in the Quick Find box, then select Objects
-
Click Price Book Item
-
Under Search Layouts, click Edit next to Search Results
-
Complete the following:
-
In Available Fields, select the fields to include
-
Click Add
-
In Selected Fields, select the fields to remove
-
Click Remove
-
In Selected Fields, change the order
-
Select Override the search result column customizations for all users
-
Click Save
-
Picker Width
Setting the Picker Width
-
From Setup, enter "custom setting" in the Quick Find box, then select Custom Settings
-
Click Manage next to FX Settings
-
Click Edit
-
In TktItemBldr PBI MaxFlyoutWidth, specify the picker’s width when it flies across the page
Use a width between 500-1000. -
Click Save
Custom Lookups
Basics
The Custom Lookups feature improves how lookups work on the Item grid.
This powerful feature gives you the ability to:
Examples
Contact Lookup
Here’s an example of how you can configure a Contact lookup.
| Setting | Value | Impact |
|---|---|---|
QueryFilter |
|
Only contacts with a blank last name or a last name starting with the letter "S" display available for selection. |
QueryFields |
|
The listed fields display for contacts in search results. |
KeywordSearchFields |
|
Keyword searches analyze the last name of contacts. |
OrderBy |
|
Contacts sort in alphabetical order by last name. |
Equipment Lookup
Here’s an example of how you can configure an Equipment lookup.
| Setting | Value | Impact |
|---|---|---|
QueryFilter |
|
Only equipment linked to offices starting with the letter "H" displays available for selection. |
QueryFields |
|
The listed fields display for equipment in search results. |
KeywordSearchFields |
|
Keyword searches analyze the name and description of equipment. |
OrderBy |
|
Equipment sorts in alphabetical order by name. |
Configuring Custom Lookups
Scenario
As an example, we will show you how to configure a Contact lookup.
-
Add a CSF_Settings static resource:
-
Open a text editor
-
Enter the following to name the static resource:
window.csf_settings = { -
Enter the identifying code for the Quote Item Builder and Item grid:
window.csf_settings = { qib: { maingrid: { -
Enter the API name of the lookup:
window.csf_settings = { qib: { maingrid: { "Contact__c": { "Contact__c": { -
Enter a SOQL query to restrict the records that display available for selection in the lookup:
window.csf_settings = {
  qib: {
    maingrid: {
      "Contact__c": {
        "Contact__c": {
          "QueryFilter": "(LastName=NULL OR LastName LIKE 'S%')",
Refer to the SOQL reference documentation for more information on how to write SOQL queries. -
Enter the fields to display for records in search results:
window.csf_settings = {
  qib: {
    maingrid: {
      "Contact__c": {
        "Contact__c": {
          "QueryFilter": "(LastName=NULL OR LastName LIKE 'S%')",
          "QueryFields": "FirstName, LastName, FX5__Office__r.Name",
In this example, the First Name, Last Name, and Office fields display for records. -
Enter the fields to analyze in keyword searches:
window.csf_settings = {
  qib: {
    maingrid: {
      "Contact__c": {
        "Contact__c": {
          "QueryFilter": "(LastName=NULL OR LastName LIKE 'S%')",
          "QueryFields": "FirstName, LastName, FX5__Office__r.Name",
          "KeywordSearchFields": "LastName",
In this example, keyword searches analyze values in the Last Name field. -
Enter the field by which to sort records:
window.csf_settings = {
  qib: {
    maingrid: {
      "Contact__c": {
        "Contact__c": {
          "QueryFilter": "(LastName=NULL OR LastName LIKE 'S%')",
          "QueryFields": "FirstName, LastName, FX5__Office__r.Name",
          "KeywordSearchFields": "LastName",
          "OrderBy": "LastName"
In this example, records sort in alphabetical order by last name. -
Add braces
{ }to end the lookup configuration:window.csf_settings = { qib: { maingrid: { "Contact__c": { "Contact__c": { "QueryFilter": "(LastName=NULL OR LastName LIKE 'S%')", "QueryFields": "FirstName, LastName, FX5__Office__r.Name", "KeywordSearchFields": "LastName", "OrderBy": "LastName" } } } } };Every left brace {should have a matching right brace}. -
Save the file with "CSF_Settings" as the file name.
-
-
Upload the CSF_Settings file to FieldFX Back Office:
-
From Setup, enter "static" in the Quick Find box, then select Static Resources
-
Click New
-
In Name, enter "CSF_Settings"
-
In Cache Control, select "Public"
-
Click Choose File
-
Select the CSF_Settings file
When you upload a new CSF_Settings file, the lookup configurations in the new file replace any existing lookup configurations.
-
Test the Contact lookup.
Classification Filters
Basics
Classification filters give you the ability to sort items by classification on the Item grid and Item picker.
Setting Up Classification Filters
-
Add a Catalog Classification field to the Quote Item object:
-
From Setup, enter "object" in the Quick Find box, then select Objects
-
Click Quote Item
-
Under Custom Fields & Relationships, click New
-
Select Lookup Relationship
-
Click Next
-
In Related To, select "Classification"
-
Click Next
-
In Field Label, select "Catalog Classification"
-
Click Next
-
Click Visible twice
-
Click Next
-
Select the page layouts on which to include the field
-
Click Next
-
Click Save
-
-
Grant field permissions:
-
Grant users Read and Edit permission for the Catalog Classification field on the Quote Item object
-
-
Run a script for the Catalog Classification field:
-
Select Utilities → Apex Execute
-
Enter the following script:
System.debug(FX5.FXWorkerLauncher.DoWork('FX5.CustomFieldInfoHandler', null)); -
Click Execute
Barcode Scanning Feature
Basics
The Barcode Scanning feature gives you the ability to scan barcodes on items to add them to quotes.
This feature is ideal when you need to add large numbers of parts and/or supplies to quotes.
Setting Up the Barcode Scanning Feature
-
Add a Barcode field to the Price Book Item object:
-
From Setup, enter "object" in the Quick Find box, then select Objects
-
Click Price Book Item
-
Under Custom Fields & Relationships, click New
-
Select Text
-
Click Next
-
In Field Label, enter "Barcode"
-
In Length, enter "255"
-
Click Next
-
Click Visible twice
-
Click Next
-
Select the page layouts on which to include the field
-
Click Save
-
-
Update page layouts for the Equipment object:
-
From Setup, enter "object" in the Quick Find box, then select Objects
-
Click Equipment
-
Under Page Layouts, click Edit next to a page layout for FieldFX Back Office
-
Add the Barcode field to the layout
-
Click Save
-
Repeat steps b to e for other page layouts as needed
-
-
Configure FX Settings:
-
From Setup, enter "custom setting" in the Quick Find box, then select Custom Settings
-
Click Manage next to FX Settings
-
Click Edit
-
In Equipment exact match search field, enter "FX5__Barcode__c"
-
In PriceBookItem exact match search field, enter "Barcode__c"
-
Click Save
-
-
Grant field permissions:
-
Grant users Read and Edit permission for the Barcode field on the Equipment object
-
Grant users Read and Edit permission for the Barcode field on the Price Book Item object
-
-
Run a script for the Barcode field:
-
Select Utilities → Apex Execute
-
Enter the following script:
System.debug(FX5.FXWorkerLauncher.DoWork('FX5.CustomFieldInfoHandler', null)); -
Click Execute
-
Add barcodes to equipment:
-
Open the Equipment tab
-
Open the Equipment item
-
Click Edit
-
Click in the Barcode field
-
Scan the barcode on the equipment
-
Repeat steps b to e for other Equipment items as needed
-
-
Add barcodes to price book items:
-
Open the Price Book Items tab
-
Open the price book item
-
Click Edit
-
Click in the Barcode field
-
Scan the barcode on the item
-
Repeat steps b to e for other Price Book Items as needed
-

Quote Item Builder Button

Changing the Name of the Quote Item Builder Button
-
From Setup, enter "translation" in the Quick Find box, then select Override
-
In Package, select "FieldFX Base Package"
-
In Language, select "English"
-
In Setup Component, select "Button and Link Label"
-
In Object, select "Quote"
-
Double-click the Button or Link Label Override column next to Quote Item Builder
-
Enter a new button name
-
Click Save
Hiding Quote Item Builder Components
Basics
To make things easier for users, you can hide unused components on the Quote Item Builder.
Hiding Components on the Quote Item Builder
-
Add the pageSettings_QIB FX Setting:
-
From Setup, enter "custom setting" in the Quick Find box, then select Custom Settings
-
Click FX Settings
-
Under Custom Fields, click New
-
Select the Text data type
-
Click Next
-
In Field Label, enter "pageSettings_QIB"
-
In Length, enter "255"
-
Click Next
-
Click Save
-
Select the components to hide:
-
Click Manage at the top of the page
-
Click Edit
-
In pageSettings_QIB, enter the names of the components to hide (use commas to separate the values):
-
Enter "HideBarCodeReader" to hide the Barcode field
-
Enter "HideBulkEdit" to hide the Bulk Update button
-
Enter "HideCopy" to hide the Copy Selected button
-
Enter "HideDelete" to hide the Delete Selected button
-
Enter "HideHeader" to hide the Quote Details section
-
Enter "HideItemSearch" to hide the Keyword Search field above the Item grid
-
Enter "HidePicker" to hide the Item picker
-
Enter "HideSelectChildren" to hide the Add Child Items button for dynamic parent items
-
Enter "HideSortByMostRecent" to hide the Sort by Most Recent option above the Item grid
-
Enter "HideStagePricing" to hide the Apply Stage Pricing button
-
-
Click Save
-