Manage FX DataGuide Forms
Introduction
FieldFX Field users can select a DataGuide Form on their device. They complete the requested information and then submit the completed form.
The user sees a selection of active Form Versions of Forms that are applicable to the user’s purpose for using the form.
If they are in a Job record, they see only active versions of forms for a Job.
If they are in a Ticket record, they see only active versions of forms for tickets.
DataGuide uses a Form Manager which adds and maintains the Forms and Form Versions which the FieldFX Mobile User can use.
DataGuide Forms can have a Form Version which can be specific input types for a Form.
|
Multiple Form Versions may exist for a Form, but only one Form Version can be active for a Form at a time. |
| Status | Description |
|---|---|
In-progress |
A created Form Version still in progress of being created or modified |
Active |
The current Form Version displayed to users when they select the Form to add |
Archived |
A previous Form Version that can be reactivated or cloned, but cannot be modified |
Deleted |
A previous Form Version that can no longer be reactivated or cloned |
Prerequisites
To FX DataGuide, you need to:
| Have these user licenses | Have these permissions | Complete these tasks and review these topics before continuing |
|---|---|---|
Considerations
Keep in mind:
-
A Form must have an Active Form Version to be available for users to complete.
-
A Form may have many Form Versions, but only one Form Version can be Active at a time.
-
Forms can be completed in either FieldFX Back Office or FieldFX Mobile.
DataGuide Layout
-
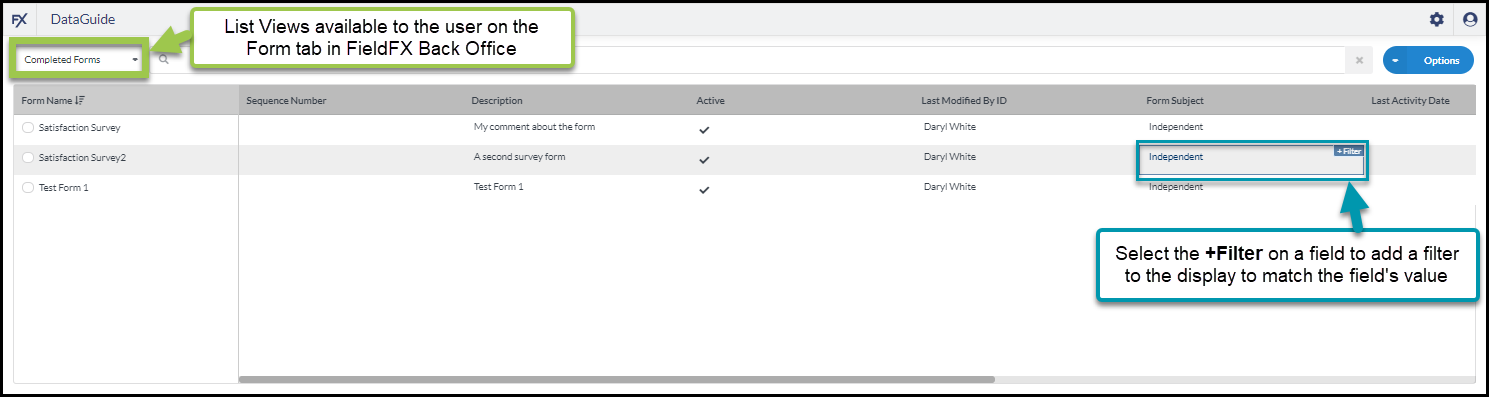
The columns that display on the forms list depend on the List View for the user for the Form tab in FieldFX Back Office
-
The user can switch to a different List View, if available, using the dropdown to the left of the search box at the top of the screen
-
Add a filter to limit which forms display in the list by clicking in any field with the desired value to filter by, then click the blue +Filter button that displays.
-
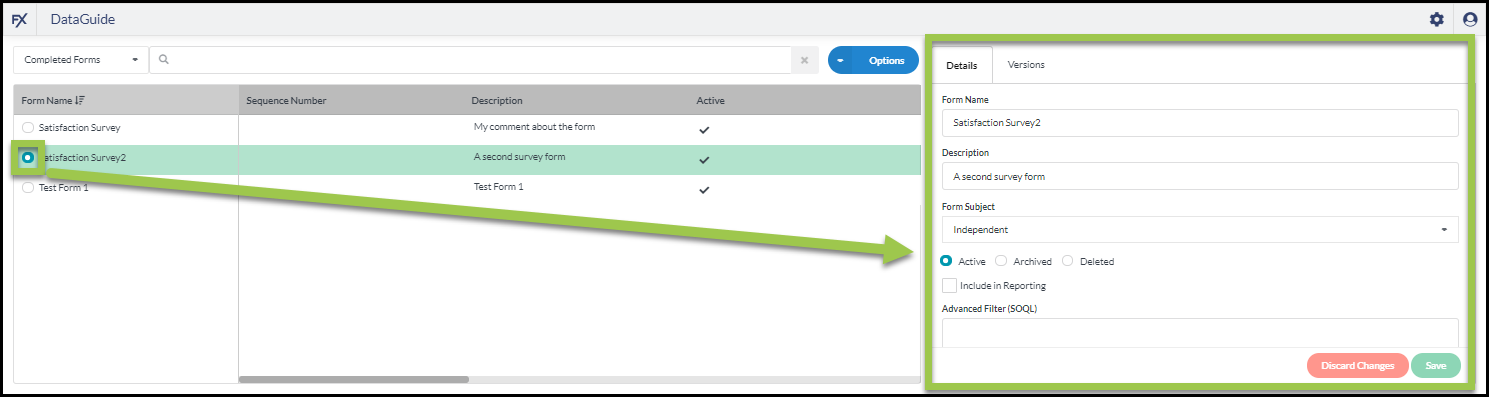
When the user selects a Form’s radio button, a panel displays on the right side of the screen with details about the form and access to the form’s Form Versions.
How DataGuide Works
When using FX DataGuide, you must start by creating form for the FX Mobile User to use. The Form Designer uses the DataGuide Form Designer to add a Form Version containing specific inputs that are collected. They build the form version and either questions or other input types. The Form Version is activated, making it available to end users. Other Form Versions can be archived, preventing the form from being available for use. A Form Version can also be deleted so it can’t be reactivated.
Step-by-Step Guides
-
Create a Form, which contains the basic, header-level information of a type of Form. You can also copy a form.
-
Add a Form Version to the Form that will contain a specific set of inputs to collect.
-
Modify a Form Version to edit the Form Version’s contents.
-
Use the Form Designer to Build the Form Version by adding questions or other types of input for the FieldFX Mobile user to collect on the Form.
-
Activate the Form Version to make it available to end users
-
Archive Form Versions to prevent the form from being available to end users
-
Delete a Form Version to prevent it from ever being reactivated.
Access FX DataGuide
You can create, modify, and archive Forms and Form Versions in the Admin Portal.
-
Select whether to create forms in a Sandbox or Production org
-
Enter the appropriate Salesforce credentials for the org
-
Select DataGuide from the Miscellaneous section of tools
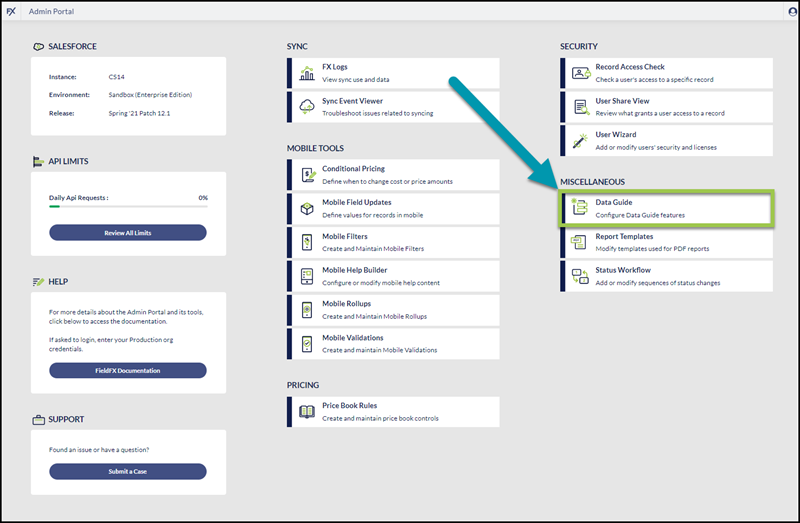
The Admin Portal’s Dashboard is responsive, so the DataGuide button may appear in a different location on your screen.
-
The DataGuide Dashboard displays a list of forms.
Create a Form
-
Access the DataGuide tool in the Admin Portal as described in the Access FX DataGuide section above
-
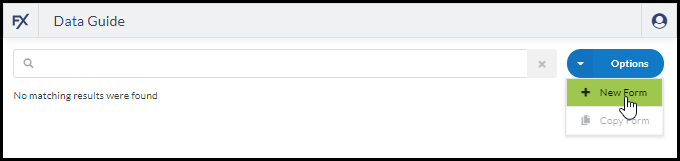
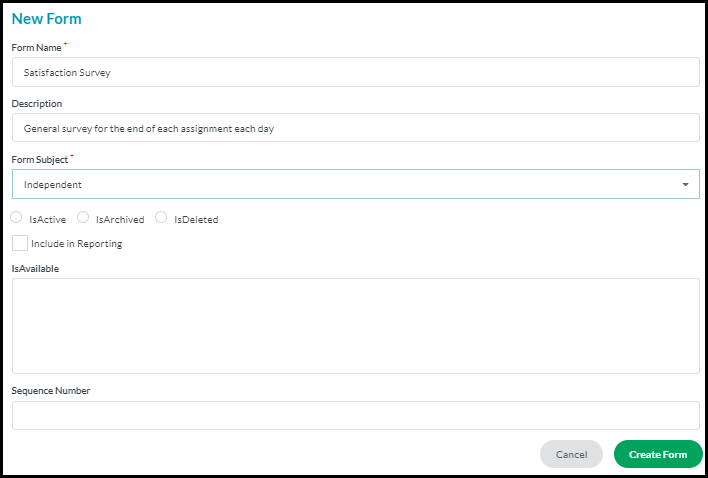
Click the Options button, then select + New Form
-
Make the following entries:
Option Optional  or
or
Required ?
?Description Form Name
80-character label for the form that displays to FieldFX users.
Description
255-character field for additional form information
Form Subject
Select where the form should display to a FieldFX Mobile users.
Choose:
Independent
The form is not tagged to a particular object type.
These forms are accessible for FieldFX Mobile’s Home Page.
-
FX5__Job__c: The form displays to the user from a Job record
-
FX5__Ticket__c: The form displays to the user from a Ticket record
Form’s Status
Select one of the following for the Form’s Status:
Status Description IsActive
(defaults as selected)Indicates that the form is available to create a Form Version and display to users
There must be an active Form Version for the form to display to a FieldFX Mobile user.
IsArchived
Indicates that the form is no longer in active use
IsDeleted
Indicates that the form is not to be made available in the future
Include in Reporting
Select this option to include answers from completed forms populate to the Form Results object
IsAvailable
a SOQL filter to limit when the form displays to a user
For example, add a filter that displays the form only for a certain type of Job or customer.
Sequence Number
An optional integer to define the order in which the form displays to a FieldFX Mobile user
-
-
Click Create Form
A Form Version is automatically generated for new forms.
Copy a Form
-
Copy a Form to create a new Form with the similar settings as an existing Form
-
A Form’s Form Versions do not copy to the new Form
-
Access the DataGuide tool in the Admin Portal as described in the Access FX DataGuide section above
-
Click the Options button, then select Copy Form
-
Make the following entries:
-
-
Form Name (required): 80-character label for the form that displays to FieldFX users
-
Description: 255-character field for additional form information
-
Form Subject (required): Select where the form should display to a FieldFX Mobile users
Choose one of: * *Independent: The form is not tagged to a particular object type
+ These forms are not tied to an object and are available in Field FX Mobile’s Home Page.
-
FX5__Job__c: The form ties to the Job object and displays to the user from a Job record
-
FX5__Ticket__c: The form ties to the Ticket object displays to the user from a Ticket record
-
-
Select one of the following for the Form’s Status:
-
IsActive: Indicates that the form is available to create a Form Version and display to users
There must be an active Form Version for the form to display to a FieldFX Mobile user.
-
IsArchived: Indicates that the form is no longer in active use
-
IsDeleted: Indicates that the form is not to be made available in the future
-
-
Include in Reporting: Select to send the individual responses of each form’s question to the Form Response option to make the responses available to analytics
-
IsAvailable: a SOQL filter to limit when the form displays to a user
For example, add a filter that displays the form only for a certain type of Job or customer.
-
Sequence Number: An optional integer to define the order in which the form displays to a FieldFX Mobile user
-
Click Copy Form
A new Form is created with the entered settings.
Form Versions are not created when copying a Form.
-
Modify a Form
-
Modify a Form to change any other values in the Form’s Details tab.
For example, mark the Form as archived or deleted, or add a filter to change when the Form displays to FieldFX Mobile users.
-
Access the DataGuide tool in the Admin Portal as described in the Access FX DataGuide section above
-
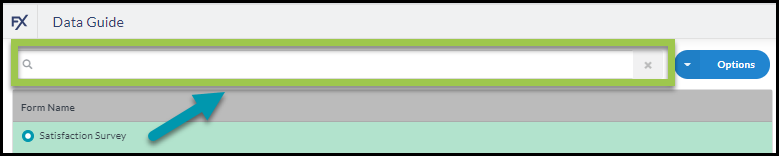
Select the radio button next to the form to modify
Use the search box to filter the list to make it easier to locate the desired form.
-
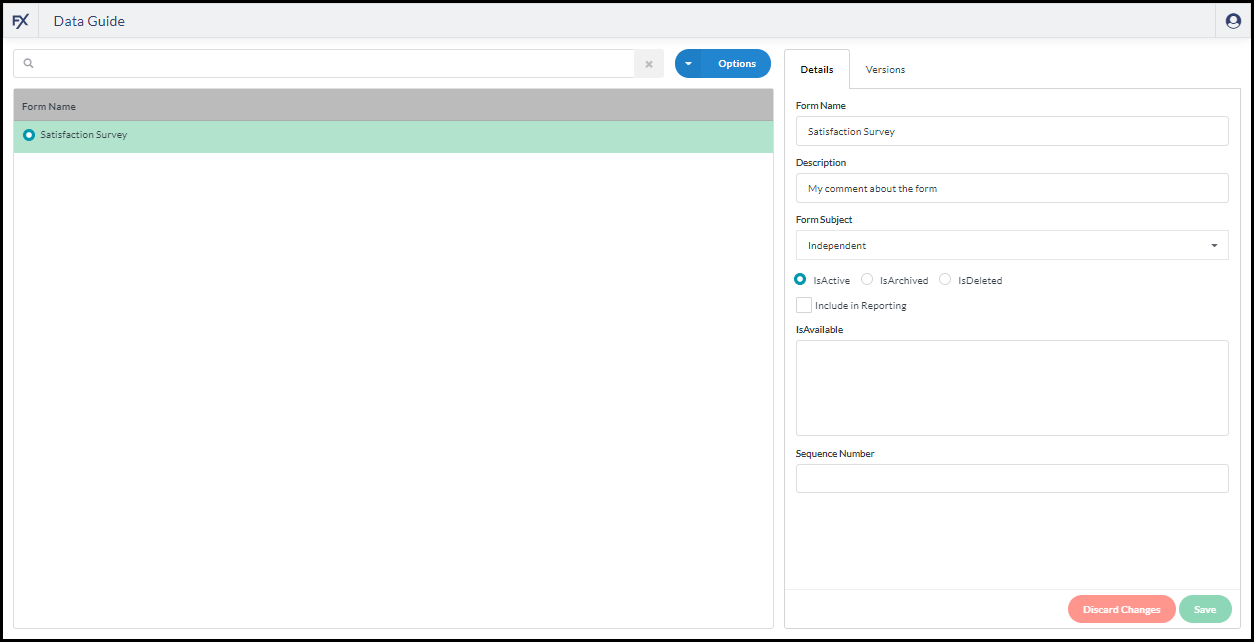
Use the Details tab on the right side of the screen to make changes to the Form
For what to include in each field, refer to the Create a Form instructions.
-
Click Save to apply the changes to the Form
or
Click Discard Changes to revert to the original form Details without making any changes
-
Add a Form Version
-
A Form Version is a particular iteration of a Form.
-
A Form Version contains the questions or points of data to collect for the Form.
-
A Form can have many Form Versions, but only one Form Version can be active for a Form at a time.
For example, after a few months of use, the organization may decide to add an additional question or rephrase a question on a Form.
Rather than adding an entirely new Form, add a new Form Version for the existing Form with the updated question(s).
Once the new Form Version is ready, activate it to replace the previous iteration. When FieldFX Mobile users select the Form, they see whatever is the current active version of the Form.
-
Access the DataGuide tool in the Admin Portal as described in the Access FX DataGuide section above
-
Select the radio button next to the form to which to add the form version
Use the search box to filter the list to make it easier to locate the desired form.
-
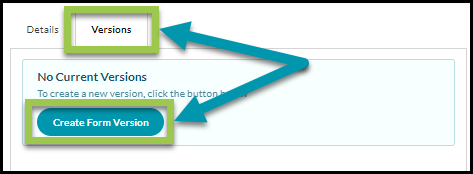
Select the Versions tab on the right side of the screen
-
For a brand-new form with no existing Form Versions, click Create Form Version in the No Current Versions box
-
If the Form has existing Form Versions, select the radio button for a Form Version to clone, then click + Create Form Version
This creates a new Form Version that contains the questions, pages, filters, and logic of the selected Form Version.
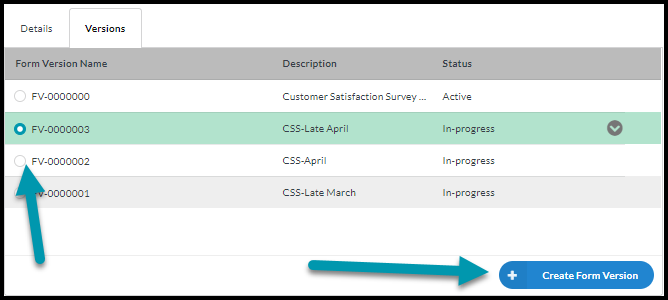
-
Enter a Description for the new version of the Form, then click Create Form Version
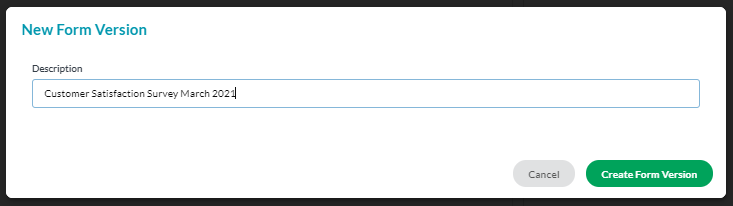
FX DataGuide adds the new Form Version with a Status of In-progress.
-
Continue to Modify a Form Version to continue creating the Form Version
-
Modify a Form Version
|
Only Form Versions in In-progress Status can be modified. |
-
Access the DataGuide tool in the Admin Portal as described in the Access FX DataGuide section above
-
Select the radio button next to the Form for which you need to modify a Form Version
Use the search box to filter the list to make it easier to locate the desired Form.
-
Select the Versions tab on the right side of the screen
-
Select the radio button for the Form Version in In-progress Status to modify
-
Click the arrow to the right of the selected Form Version, then click Edit in the menu that displays
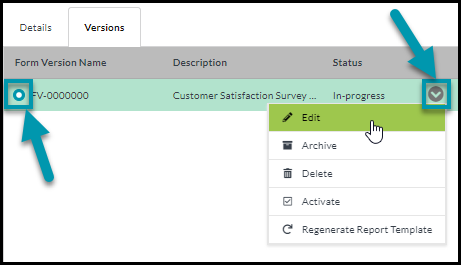
The Survey Designer Displays.
-
Continue to Build the Form Version to add questions and continue designing the Form Version
Build the Form Version
-
Refer to the Form Designer document for detailed instructions on how to use the screen to build the form.
-
Follow the instructions to Modify a Form Version to get to the Form Designer screen.
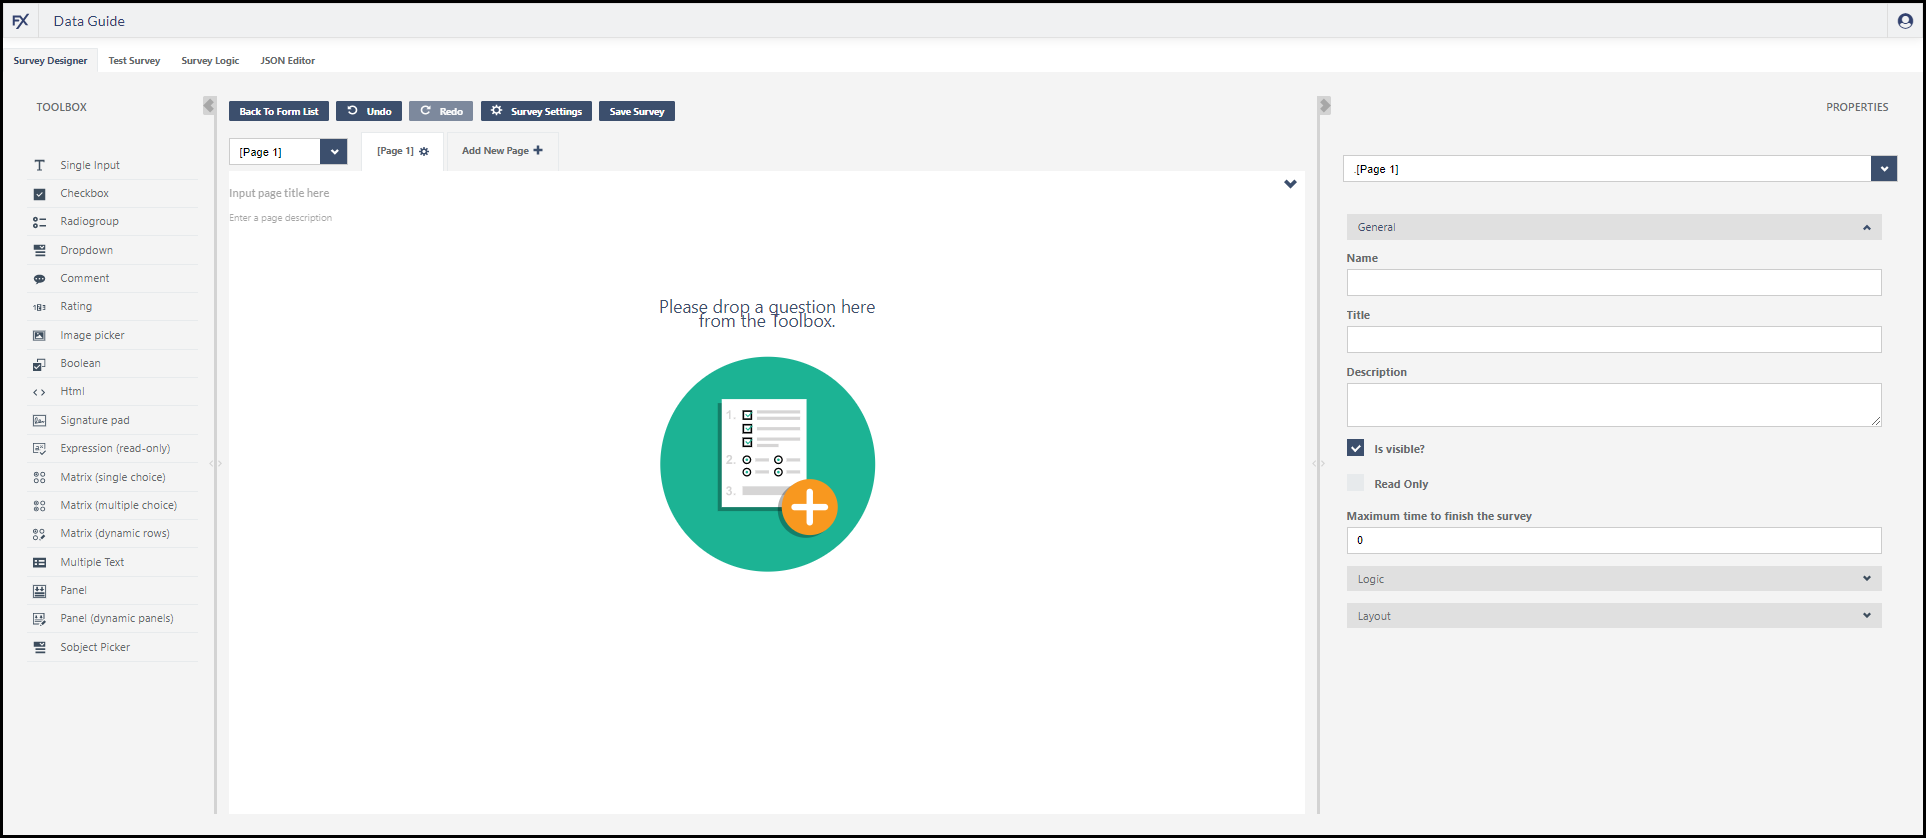
-
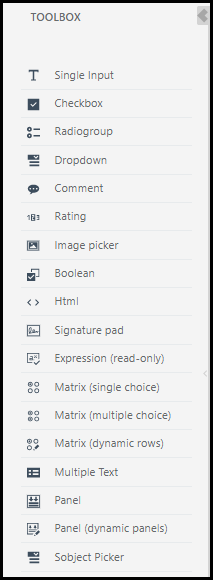
Click and drag a question or input type from the Toolbox on the left side of the screen onto the survey
-
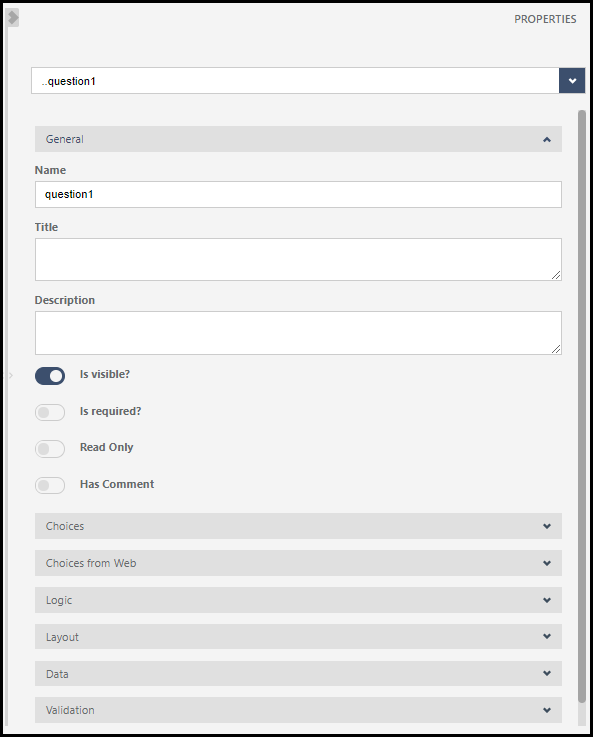
Edit the question directly on the survey designer or use the Properties panel on the right side of the screen for greater control on the input
Do not use a space in a Question’s Name field.
The options in the Properties panel vary based on the element of the Form that is selected. Different input types have different Properties options.
-
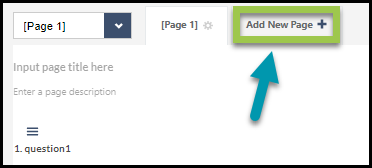
(Optional) Group questions into pages by clicking Add New Page +
-
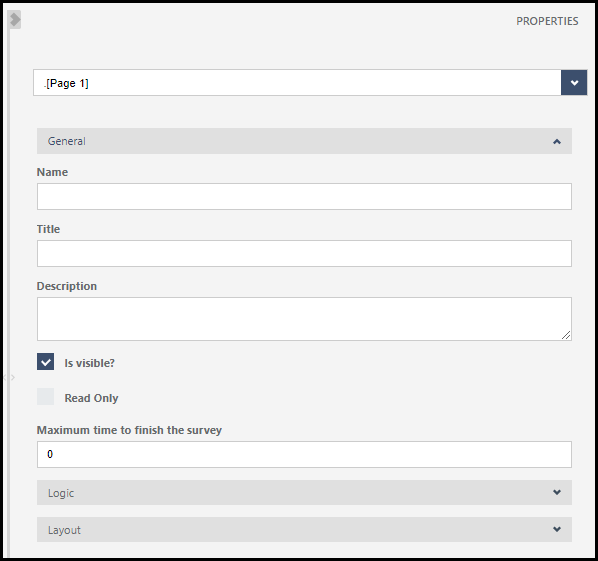
(Optional) Click on the Page # tab to define page options, such as Title and Description
Use the dropdown at the top of the Properties panel to work with a different element’s properties.
-
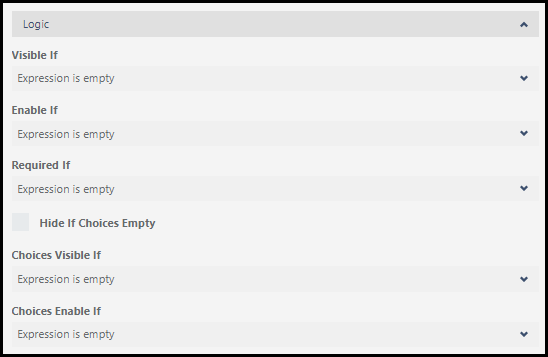
(Optional) Use an question or page’s Properties options to add Logic controls
-
Limit when a page or question is visible
-
Limit when a page or question is enabled
-
Make a question required based on criteria, such as the answer to another question
-
Limit the choices available on a question
-
-
(Optional) Setup controls for Data, such as a Default Value or Correct Answer
A Single Input question on a form for a Job or Ticket also includes a Default Formula option to default a value from the related Job or Ticket to the Form. This is not available for Independent forms.
-
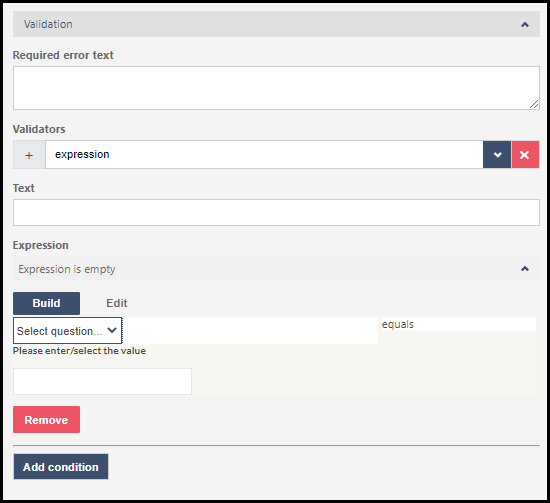
(Optional) Use a question’s Properties to add Validation to the input and customize error message text
-
Click Survey Settings to add a Title, Description, logo, navigation, and other Properties for the entire form version

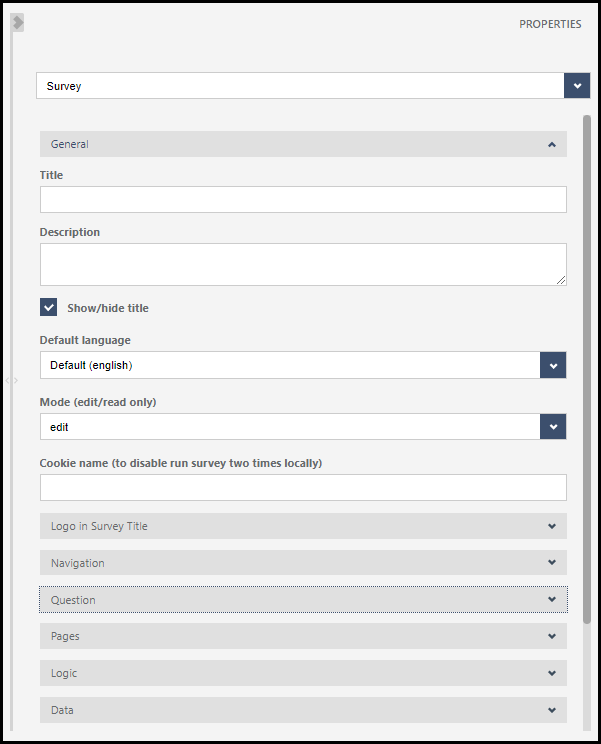
You can add a logo to the form using the Logo in Survey Title section.
If you do, you must also add a Title to the form, otherwise the form fails to load in FieldFX Mobile.
-
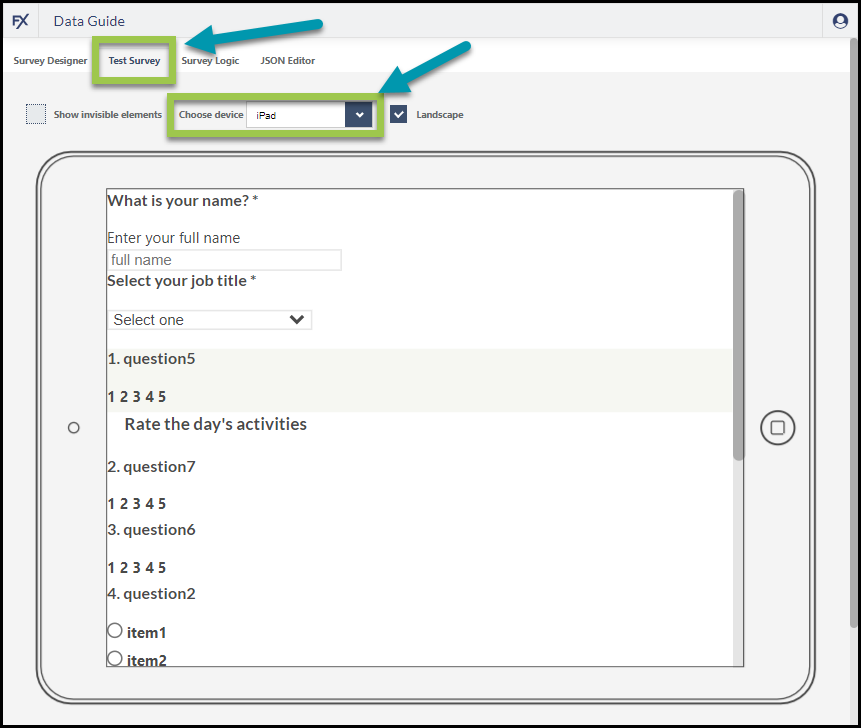
Click Test Survey to see how the form displays to end users on various device types
-
Click Survey Logic to add criteria to affect how the form flows, such as skipping questions or customizing the Thank You page a user sees at the end of the form
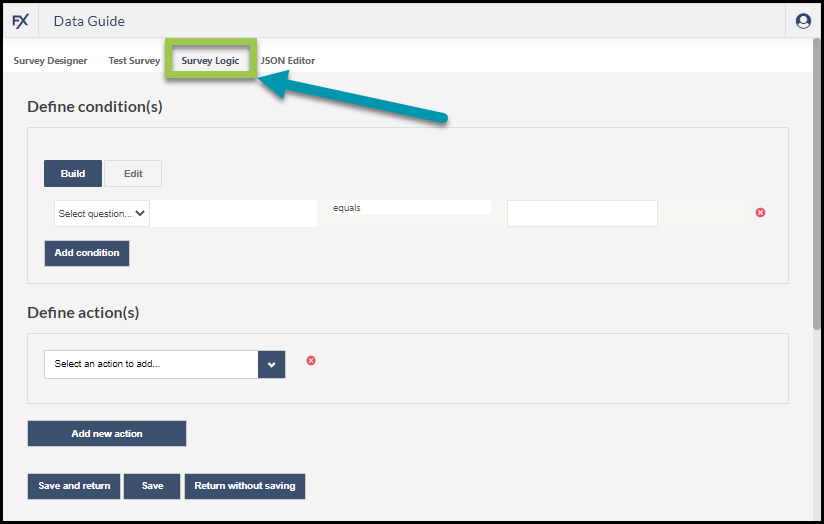
A Form Version is stored as a JSON object. Advanced users can click on the Form Designer’s JSON Editor to modify the Form Version’s JSON object directly.
-
Click the Survey Designer tab, then click Save Survey
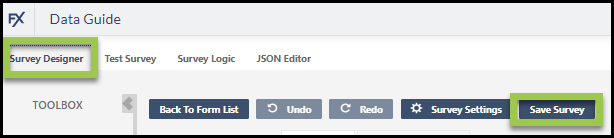
-
Click Back To Form List to return to the FX DataGuide Dashboard
-
To display the Form Version when users select the FX DataGuide Form, you must Activate it.
-
Modify a Form’s Report Template
|
A Form Version must first have a Survey.json file before a Report Template can be created or modified. This file is automatically created if missing by selecting the Edit option for a Form Version (that is, Build the Form Version as described above first). |
-
When a user views or prints a form, FX DataGuide generates a PDF of the form data to use.
-
Modify the template used to create the form’s PDF to have the form generate as desired.
-
Access the DataGuide tool in the Admin Portal as described in the Access FX DataGuide section above
-
Select the radio button next to the Form for which you need to modify the template.
Use the search box to filter the list to make it easier to locate the desired Form.
-
Select the Versions tab on the right side of the screen
-
Select the radio button for an In-progress Form Versionto work with
-
Click the arrow to the right of the selected Form Version, then click Edit Report Template in the menu that displays

-
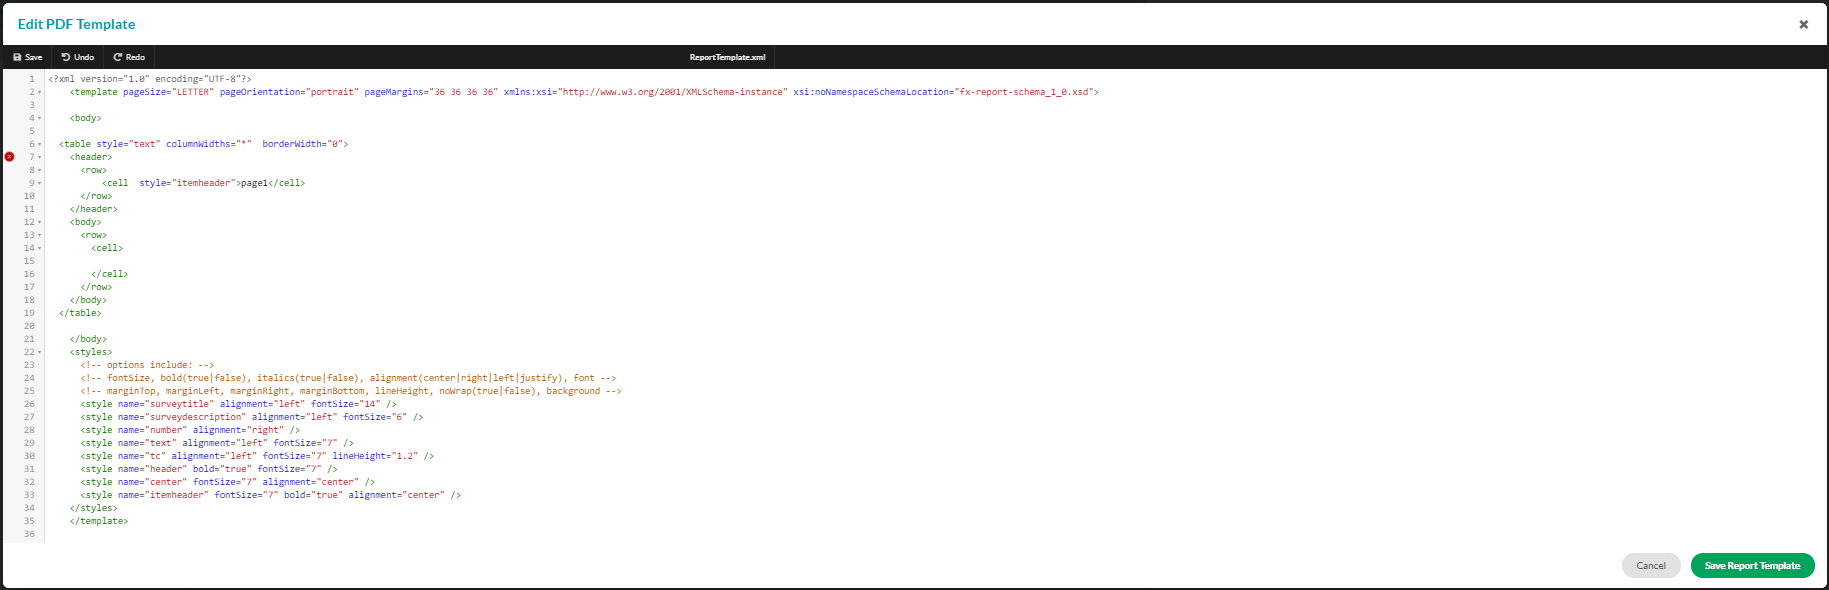
If a report template does not yet exist for the Form Version, click Generate Report Template.xml in the window that displays

-
Use the Edit PDF Template window to modify the PDF.
Refer to the PDF Reports and linked articles for information about working with PDF Report Templates.
-
Click Save in the top left to save changes you have made and continue working.
Click Undo in the top left to undo the last change you made to the report template.
Click Redo in the top left to redo the last change you made to the report template.
Click Cancel in the bottom right to discard changes and return to the DataGuide Dashboard.
Click the Save Report Template when finished to save the template and return to the DataGuide Dashboard
-
Activate a Form Version
|
A Form Version must first have a Survey.json file before a the Form Version can be activated. This file is automatically created if missing by selecting the Edit option for a Form Version (that is, Build the Form Version as described above first). |
-
Users can only select the Form Version of a form in the Active Status.
-
Only one Form Version can be active at a time for a Form.
-
Once activated, a Form Version cannot be modified. Clone it and create a new Form Version instead.
-
Access the DataGuide tool in the Admin Portal as described in the Access FX DataGuide section above
-
Select the radio button next to the Form for which you need to modify a Form Version
Use the search box to filter the list to make it easier to locate the desired Form.
-
Select the Versions tab on the right side of the screen
-
Select the radio button for the Form Version in In-progress or Archived Status to activate
-
Click the arrow to the right of the selected Form Version, then click Activate in the menu that displays
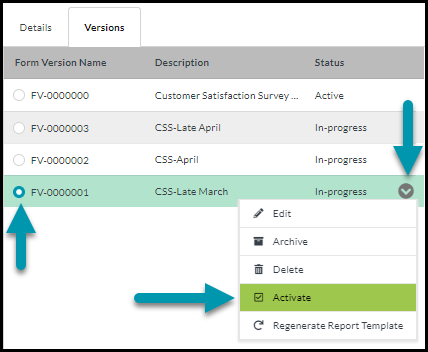
-
Click Change Status to confirm
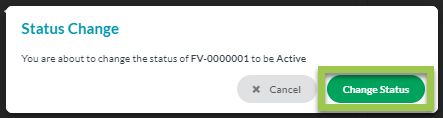
The Form Version is changed to Active Status.
If another Form Version was Active, it is set to Archived Status.
-
Archive a Form Version
-
An Active Form Version is archived automatically if another Form Version is set as Active.
-
Archived Form Versions can be restored to the Active Form Version by following the steps to activate a Form Version.
-
Archived forms cannot be modified. Clone it and make a new Form Version instead.
-
Access the DataGuide tool in the Admin Portal as described in the Access FX DataGuide section above
-
Select the radio button next to the Form for which you need to archive a Form Version
Use the search box to filter the list to make it easier to locate the desired Form.
-
Select the Versions tab on the right side of the screen
-
Select the radio button for the Form Version to archive
-
Click the arrow to the right of the selected Form Version, then click Archive in the menu that displays
-
Click Change Status to confirm
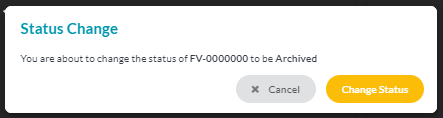
The Form Version is changed to Archived Status.
It is important to set another Form Version as Active, otherwise the Form is not available for users.
-
Delete a Form Version
-
Delete a Form Version when it should no longer be used.
-
Deleted forms can be restored by marking them as Archived or Activating them.
-
Access the DataGuide tool in the Admin Portal as described in the Access FX DataGuide section above
-
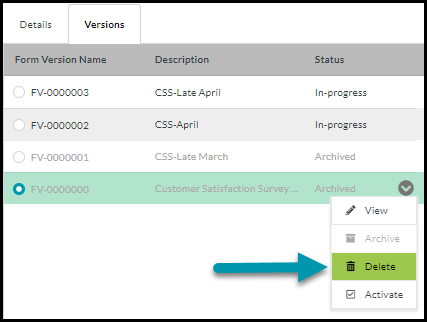
Select the radio button next to the Form for which you need to delete a Form Version
Use the search box to filter the list to make it easier to locate the desired Form.
-
Select the Versions tab on the right side of the screen
-
Select the radio button for the Form Versionto delete
-
Click the arrow to the right of the selected Form Version, then click Delete in the menu that displays
-
Click Change Status to confirm
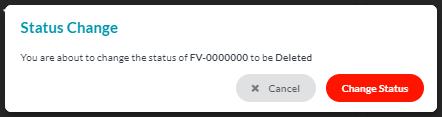
The Form Version is changed to Archived Status.
It is important to set another Form Version as Active, otherwise the Form is not available for users.
-
View a Form Version
-
Only Form Versions in In-progress Status can be modified.
-
Display any Form Version as it would display to end users by viewing it.
-
Access the DataGuide tool in the Admin Portal as described in the Access FX DataGuide section above
-
Select the radio button next to the Form for which you need to view a Form Version
Use the search box to filter the list to make it easier to locate the desired Form.
-
Select the Versions tab on the right side of the screen
-
Select the radio button for the Form Versionto view
-
Click the arrow to the right of the selected Form Version, then click View in the menu that displays
-
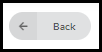
Click the Back button when finished to return to the DataGuide Dashboard
-
Copy Forms from One Environment to Another
-
Design and test a form in your Sandbox environment, then copy the form from the Sandbox to Production when you are ready to deploy.
-
Make sure the Form Version you wish to migrate is the Active Form Version for the Form.
-
Access the DataGuide tool in the Admin Portal as described in the Access FX DataGuide section above
-
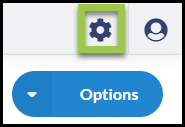
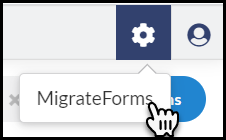
Click the Gear icon in the top right to access DataGuide settings
-
Select Migrate Forms
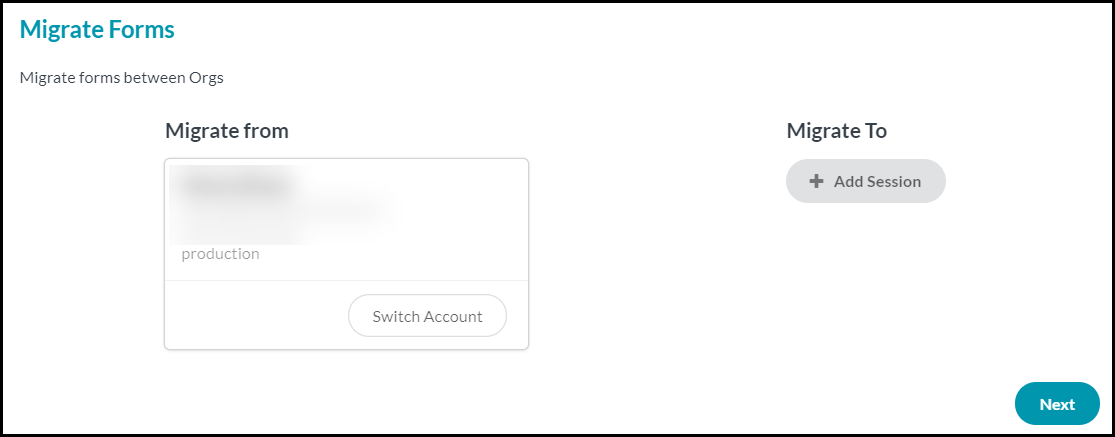
The Migrate Forms window displays with the current session defaulted as the Migrate from environment
-
To change the environment where to migrate forms from, click the Switch Account button, then follow the prompts to login to Salesforce with the desired Production or Sandbox credentials
-
Specify the environment to migrate forms to by clicking the + Add Session button
-
Follow the prompts to login to Salesforce with the desired Production or Sandbox credentials
-
Click Next
-
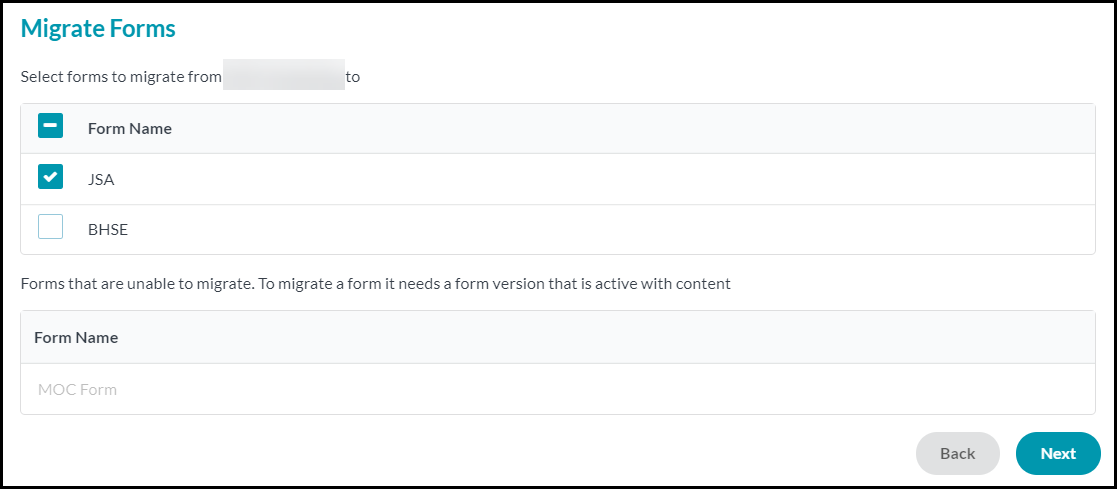
Select the form(s) to migrate, then click Next
Use the checkbox next to the Form Name column heading to select all available forms.
Only forms with an Active Form Version are able to migrate.
Forms that do not have an Active Form Version are listed in the second grid.
-
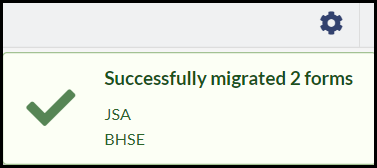
The forms migrate, the FX DataGuide Dashboard screen displays, and a message confirms the results of the migration
-
Recommended Reading
-
FX DataGuide Overview - Learn the basics about FX DataGuide
-
Use FX DataGuide Forms - Learn how to input data into FX DataGuide forms
-
FX DataGuide Setup - Learn how to setup FX DataGuide.
-
FX DataGuide Minimum Permissions - Learn about the minimum permissions required to use FX DataGuide.