Use DataGuide Forms as an Admin
|
For a user to use DataGuide Forms, their Salesforce sync profile that they use in the FieldFX Mobile App must have View All Records and View All Fields access in the Object Permissions section to the Form Data ( 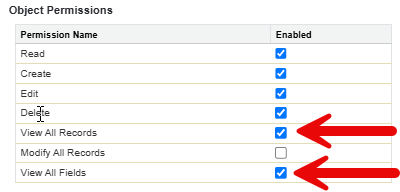
|
Step-by-Step Guides
As an admin, you can:
View Forms List

You can use the Forms Manager screen to see a list of Forms that you or another admin has created.
The Forms Manager shows these columns:
| Column | Description |
|---|---|
Form Name |
Name of the form |
Description |
Form Description |
Object |
Object name in the form creation |
Latest Version |
Latest version the version status for Draft and Published forms |
Last Edited By |
User name of the last form editor |
Last Edited On |
Data and time the form was last edited. |
Published Version |
Latest published version of the form |
Action Menu |
You can:
|
You can also sort the form list view or search for a form if you have many forms.
Create and Configure a Form
When you create a new form, you will have to complete the following tabs.
Complete the following:
|
|
Select one or more fields to be used across Form Designer and Form Actions. This tab is only accessible once you have selected an object on the Properties tab. |
|
Use this drag-and-drop interface to design your form. |
|
You can create up to 5 form actions per forms to assist in the form processing. |
To start the form creation:
-
Access DataGuide Form in ServiceMax DataGuide.
-
At the list of forms in Forms Manager, click New Form.
-
Click on the Properties tab if not already selected.
-
Continue with defining the form’s properties.
-
Once the form’s properties are set, continue with designing the form.
Publish a Form
-
When the form is ready, click Publish.
-
Click Publish to publish the form.
Your changes to the form are save and the form is published. After the form is published, create a new version to make changes. The Forms Manager list of forms is updated to show the new version in the Published Version column.
Configure the DG Forms for Lightning Web Components
You can configure the DataGuide Forms Lightning Web Components (LWC) to place them in a tab on a any record for FieldFX. The DG Forms components are typically added to Job and Ticket pages.
With the tab configured, you can easily create new form submissions, complete previously saved forms, and view submitted forms on an object all through the web interface.
-
In ServiceMax DataGuide, navigate to the Jobs tab and access the job that you want to access DataGuide Forms.
-
At the Job page, click
 and then Edit Page.
The Job page layout opens in the Lightning Record Page Editor.
-
Click the window where you want to add the new tab.
-
In the Page > Tabs sidebar, click the Add Tab to add a new tab.
-
Click in the new tab and change the Tab Label from the duplication of the last tab to
Custom. -
Click in the Custom Label field and change it to
DataGuide Forms. -
Confirm the name change by pressing Enter.
-
Click Done.
The new DataGuide Forms appears as a tab.
-
-
Click on the DataGuide Forms tab.
-
From the Components / Fields list, click the Components tab.
-
Find Tabs and drag it over to under DataGuide Forms where it says
Add Components Here.Two tabs are added called: Related and Details.
Rename these two tabs and add a new tab.
-
-
At the Page > Tabs window, click on Related under Tabs.
-
Change the Tab Label from "Related" to "Custom".
-
Change the Custom Label to
New Forms. -
Click Done.
The Related tab now appears as New Forms.
-
-
Repeat the step above to change the Details tab to
in Progress Forms. -
Click the Add tab to add a new tab in the DataGuide Forms tab.
-
Change the Tab Label from Details to Custom.
-
Enter
Completed Formsin the Custom Label field. -
Click Done.
-
-
Highlight the New Forms tab and drag the SVMX DG Form Template List component over.
-
At Page > SVMX DG Form Template List, change the Allow to set page title from
DataGuide FormstoNew Forms.
-
-
Highlight the In Progress Forms tab and drag the SVMX DG in Progress Forms List component over.
-
At Page > SVMX DG in Progress Forms List, change the Allow to set page title from
New FormstoIn Progress Forms.
-
-
Highlight the Completed Forms tab and drag the SVMX DG Submitted Form component over.
-
At Page > SVMX DG Submitted For, change the Allow to set page title from
In Progress FormstoCompleted Forms.
-
-
Save the changes to the layout.
-
Click Activate and at the Activation: <Record Page Layout>,
-
Click the App, Record Types, and Profile tab to start customizing where this new tab appears.
-
Click Assign to Apps, Record Types, and Profiles button.
-
Use the checkbox next to the Lightning app that should be able to access the new record page and click Next.
If incorrect, click Back to return to the selection and change them.
-
Review the form factor for these apps and click Next.
-
Select the record types to display on the record page and click Next.
-
Select the profiles that can see the record page and click Next.
If incorrect, click Back to return to the selection and change them.
-
Review the app, record type, profile and form factor combination and click Save.
If incorrect, click Back to return to the selection and change them.
-
-
Navigate back to a job.
These changes are applied to all jobs. The profiles selected above to see the DG Forms tab may have to log out and then back in to see the changes.
You can now access the New, In Progress, and Complete Forms tabs on the Job page. It will display any form related to the Job record you open. You can easily submit, edit, and view forms on an object using the web interface.
-
Repeat these steps for the other record pages you wish to use DG Forms.
View Submitted Forms
-
To view a submitted form by going to the job where the form was submitted.
-
Click on the Completed Forms tab.
You see a list of all the forms that have been submitted for that specific job.
-
Click on the specific for to view its questions and responses without creating output documents.
A submitted form on the LWC might not have a DataGuide Document Template polished. This provides a quick way to view form data. You have the option to download and send the form if needed.
Even though this component doesn’t format the submitted for as with a Document Template, its advantage is its permanent on the Job. It is accessible across different versions of the form.
If an output document has already been generated, users can still review the data on the Completed Forms tab.