Ticket Item Grid
Prerequisites
-
To use the Ticket Item grid, you need the following licenses:
-
To use the Ticket Item grid, you must:
-
To use the Ticket Item grid, you need:
Basics
Use the Ticket Item grid to manage ticket items in FieldFX Mobile.
Getting There
Open a ticket in FieldFX Mobile and select Items on the sidebar.
Record Type Filters
Use the Record Type filters to filter the Ticket Item grid by record type.

FX Header
Basics
-
When the FX Header is configured, the fields selected to display on it are identified on the Ticket Details of a ticket.

-
The expandable and collapsible FX Header displays at the top of the Ticket Item grid of a ticket.
-
To expand the FX Header when it is collapsed, click the Header tab.
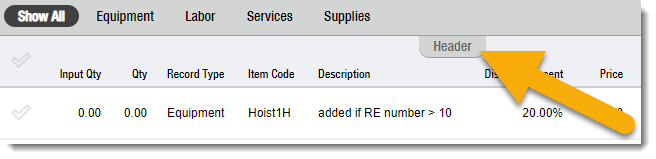
The FX Header displays the same preselected fields across all Record Type filters.
-
To collapse the FX Header when it is expanded, click the Header tab.

Items List

Required Items
-
A red triangle displays next to required items.
Example 1. The 20 ton flatbed sandblast truck shown in this screenshot is required.
-
An item is required if the linked price book item has Required Item selected or the item is required by a rule.
-
Required items get added automatically and can’t be deleted.
Parent & Child Items
The Items list groups parent and child items together, with child items indented under the parent.
| Child items get added automatically when you add their parent item. |

Sorting Items
-
The Items list changes based on the Record Type filter you select.
-
The default sort order is by sequence number.
-
Use the Sort control to change the sort order:

-
Select a field on the control to sort items based on entries in that field.
-
Select the arrow on the control to toggle between ascending/descending order.
-
Action Buttons
Use the action buttons to add, edit, and delete ticket items:
| Button | Description |
|---|---|
|
Select to add items |
|
Select to make grid fields editable |
|
Select to make grid fields read-only |
|
Select to edit, copy, add child items, apply stage pricing, or delete the selected item(s) |

include::fxmobile:fxmobile:partial$walkthrough.adoc
Step-by-Step Guides
Copying Ticket Items
Prerequisite
-
Select Tickets on the sidebar
-
Select the ticket
-
Select Items on the sidebar
-
Select the items
-
Select Update

-
Select Copy
Filtering Ticket Items
-
Select Tickets on the sidebar
-
Select the ticket
-
Select Items on the sidebar
-
Select a Record Type filter
Sorting Ticket Items
-
Select Tickets on the sidebar
-
Select the ticket
-
Select Items on the sidebar
-
Select the Sort control
-
Select the field by which to sort the items
Select the arrow on the control to toggle between ascending/descending order.
Editing Data on the Ticket Item Grid
-
Select Tickets on the sidebar
-
Select the ticket
-
Select Items on the sidebar
-
Select Grid Edit

Edit mode is now enabled.

-
Select the field to edit.
-
You will be notified which fields cannot be edited (because they are locked).
-
You can’t edit the discount for items that have Locked Discount selected.
-
You can’t edit the price for items that have Locked Price/Markup selected.
-
-
Enter new information
-
Select Grid Edit
Edit mode is now disabled.
Editing A Ticket Item
-
Select Tickets on the sidebar
-
Select the ticket
-
Select Items on the sidebar
-
Select the item
-
Make edits
-
You can’t edit the discount for items that have Locked Discount selected.
-
You can’t edit the price of items that have Locked Price/Markup selected.
-
-
Select Save

Editing Multiple Ticket Items
-
Select Tickets on the sidebar
-
Select the ticket
-
Select Items on the sidebar
-
Select the items to edit
-
Select Update
-
Select Bulk Edit
-
Select the field to edit.
-
You can’t edit the discount for items that have Locked Discount selected.
-
You can’t edit the price of items that have Locked Price/Markup selected.
-
-
Enter new information
-
Select Save

Applying Stage Pricing to Ticket Items
Prerequisite
-
Select Tickets on the sidebar
-
Select the ticket
-
Select Items on the sidebar
-
Select items
You can’t apply stage pricing to items that have Locked Discount selected. -
Select Update
-
Select Stage Price

-
In Total Stage Pricing, enter the price to charge for the items
-
Select Save
|
Charging The Standby Price for a Ticket Item
-
Select Tickets on the sidebar
-
Select the ticket
-
Select Items on the sidebar
-
Select the item
-
Select On Standby
-
(Optional) In Standby Price, set the standby price to charge
You can’t change the price for items that have Locked Price/Markup selected. -
Select Save
Deleting Ticket Items
-
Select Tickets on the sidebar
-
Select the ticket
-
Select Items on the sidebar
-
Select the items to delete
You can’t delete a ticket item if:
-
The linked price book item is required by a rule.
-
The linked price book item has Required Item selected.
Child items get deleted automatically when you delete their parent item.
-
-
Select Update
-
Select Delete
-
Select DELETE
Recommended Reading
-
Learn how to set up the Ticket Item Grid
-
FX E-Ticketing Minimum Permissions
Learn the minimum permissions required to use the Ticket Item Grid.