Ticket Item Grid Setup
Prerequisites
-
To set up the Ticket Item grid, you need the following licenses:
-
To set up the Ticket Item grid, you must:
-
To set up the Ticket Item grid, you need:
-
System permissions:
-
Customize Application
-
View Setup and Configuration
-
Fields
Basics
Page layouts control the fields that display on the Ticket Item grid, as follows:
| Layout | Result | Note |
|---|---|---|
Master Layout |
Controls the fields that display on the Item Grid when you are viewing All items. |
The fields on this layout must also display on record type layouts before they will display data. |
Equipment Layout |
Controls the fields that display on the Item Grid when you select the Equipment filter. |
The fields on these layouts must also display on the Master layout before they will display data. |
Labor Layout |
Controls the fields that display on the Item Grid when you select the Labor filter. |
|
Service Layout |
Controls the fields that display on the Item Grid when you select the Service filter. |
|
Supplies Layout |
Controls the fields that display on the Item Grid when you select the Supply filter. |
|
To sort ticket items by sequence number, include the Sequence Number field on FieldFX Mobile page layouts for the Ticket Item object. Page layouts for the Ticket Item object also control other features. Refer to the Layouts article for details. |
Selecting the Fields to Display
-
From Setup, enter "object" in the Quick Find box, then select Objects
-
Click Ticket Item
-
Configure the Ticket Item Layout:
-
Under Page Layouts, click Edit next to Ticket Item Layout
-
Change the fields
Don’t add the following:
-
Text Area (Long) fields
-
Text Area (Rich) fields
-
Text Area (Encrypted) fields
To sort ticket items by sequence number, include the Sequence Number field on FieldFX Mobile page layouts for the Ticket Item object.
-
-
Click Save
-
-
Add every new field you added to the Ticket Item Layout to the relevant ticket item record type layout:
-
Under Page Layouts, click Edit next to the layout
-
Drag the field(s) onto the layout
-
Click Save
-
Repeat steps a to c for other page layouts as needed
-
-
Remove every field you removed from the Ticket Item Layout from the relevant ticket item record type layout:
-
Under Page Layouts, click Edit next to the layout
-
Click the Remove button next to the field
-
Click Save
-
Repeat steps a to c for other page layouts as needed
-
FX Header
Basics
The expandable and collapsible FX Header displays at the top of the Ticket Item grid, defaulting to collapsed when first accessed.

Configuring the FX Header in the Ticket Item Grid
-
From Setup, enter "object" in the Quick Find box, then select Objects
-
Click Ticket
-
Click Edit next to the applicable page layout
-
Drag Section below Standard Buttons on the Ticket Detail
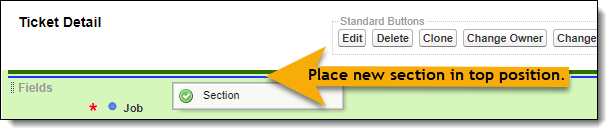 Figure 2. Dragging a new Section into the Fields area of a Ticket Detail page layout
The Section Properties window displays.
-
In Section Name, enter
FX HeaderThe Section Name must be entered precisely as shown to meet script requirements.
Section Name is case-sensitive.
-
In Layout, select 2-Column
-
Click OK
-
Drag fields into the FX Header section
-
Click Save