Sharing Settings
Setup
To manage sharing settings, you must:
Permissions
To manage sharing settings, you need:
-
System permissions:
-
Assign Permission Sets
-
Manage Internal Users
-
Manage IP Addresses
-
Manage Login Access Policies
-
Manage Password Policies
-
Manage Profiles and Permission Sets
-
Manage Roles
-
Manage Sharing
-
Manage Users
-
Reset User Passwords and Unlock Users
-
View All Users
-
View Setup and Configuration
-
Basics
Sharing settings control record access.
-
Use organization-wide sharing defaults to lock down record access to the most restrictive level.
-
Use the role hierarchy, sharing rules, and manual sharing to expand record access.
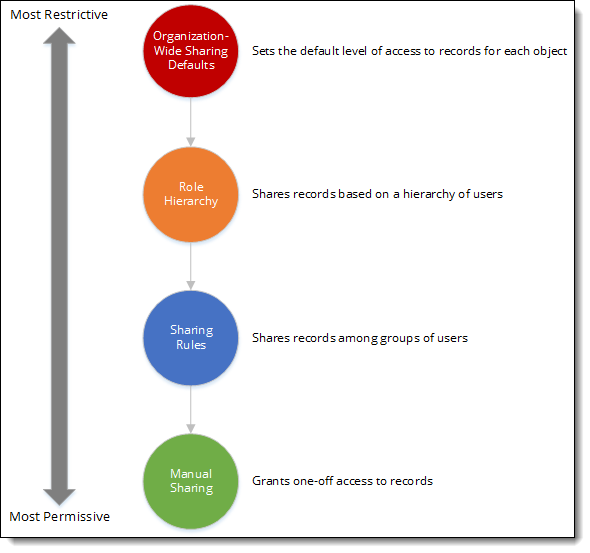
There are four main ways of controlling who has access to records with Salesforce tools. The levels progress from most restrictive to most permissive.
-
Organization-Wide Sharing Defaults
-
These are the most restrictive rules.
-
Define the default settings for records for each object.
-
-
Role Hierarchy
-
Records are shared based on the organization’s defined Salesforce hierarchy
-
-
Sharing Rules
-
Shares records among groups of users
-
-
Manual Sharing
-
One-off access granted on a record-by-record basis.
-
Most permissive record access.
-
Data Access Basics
-
When working with object access, the most permissive access wins.
-
When working with record access, the most permissive access wins.
-
When working with field access, the most restrictive access wins.
Organization-Wide Sharing Defaults
Basics
Organization-wide sharing defaults set the base level of access that users have to records they don’t own.
| You can’t restrict access beyond the organization-wide sharing defaults. |
For most objects, you can set the default level of record access to:
-
Private: restricts access to all records.
-
Public Read Only: grants users access to view all records.
-
Public Read/Write: grants users access to view and edit all records.
|
When you select Private:
|
Child Objects
Child objects inherit their default level of access from their parent object.
| You can’t change the default level of access for child objects. |
Configuring Organization-Wide Sharing Defaults
-
From Setup, enter "sharing" in the Quick Find box, then select Sharing Settings
-
Under Organization-Wide Defaults, click Edit
-
Complete the following for each object:
-
Under Default Internal Access, select the default level of access:
-
Select Private to restrict access to records
-
Select Public Read Only to give users access to view but not edit records
-
Select Public Read/Write to give users access to view and edit records
-
-
(Optional) Deselect Grant Access Using Hierarchies to prevent automatic record access using the role hierarchy
If you leave this option selected, records shared with a user are also shared with users above them in the role hierarchy.
You can only deselect this option for custom objects that don’t have a parent object (e.g. Job).
-
-
Click Save
-
Click OK
|
If you select Private as the Default Internal Access:
|
| You will receive an email confirmation once your sharing settings recalculate. |
Role Hierarchy
Basics
A role hierarchy features a series of roles ranked one above the other according to authority.
Roles control the level of access that users have to records for each object:
-
Users can access records owned by or shared with users below them in the hierarchy, unless specified otherwise in the organization-wide sharing defaults.
-
Users inherit the same data access as their subordinates for records not owned by their subordinates.
-
Users in the same role level can’t access each other’s records.
Tips
-
Define a role hierarchy that represents data access needs, not your company’s organization chart.
-
Take time to set up the role hierarchy, as it’s the foundation for your sharing settings.
-
Simplify a role hierarchy as much as possible and don’t use more than 10 levels.
-
Always assign users to roles in the role hierarchy.
Adding a Role Hierarchy
-
From Setup, enter "manage users" in the Quick Find box, then select Roles
-
Click Set Up Roles
-
Add roles to the hierarchy:
-
Click Add Role
-
In Label, enter a role name
-
In This role reports to, select the role under which to place the role
-
Click Save & New
-
Repeat steps b to d. Click Save to finish.
-
-
From Setup, enter "manage users" in the Quick Find box, then select Roles
-
Click Expand All
-
Assign users to the roles:
-
Click Assign next to the role
-
In Available Users, select users
-
Click Add
-
Click Save
-
Repeat steps a to d
-
Sharing Rules
Basics
Sharing rules grant users record access on an object-by-object basis.
| Sharing rules grant wider record access but can’t restrict record access. |
There are two types of sharing rule:
-
Based on record owner: shares records owned by specific users.
-
Based on criteria: shares records based on criteria that analyzes values in the records.
Adding a Sharing Rule Based on Record Owner
Prerequisite
Add a role hierarchy or add public groups
-
From Setup, enter "sharing" in the Quick Find box, then select Sharing Settings
-
In Manage sharing settings for, select the object for which to add the sharing rule
-
Under Sharing Rules, click New
-
Under Step 1, enter a name for the rule
-
Under Step 2, select Based on record owner
-
Under Step 3, select the public group or role that owns the records
-
Under Step 4, select the public group or role with whom to share the records
-
Under Step 5, select:
-
Click Save
-
Click OK
Adding a Sharing Rule Based on Criteria
Prerequisite
Add a role hierarchy or add public groups
-
From Setup, enter "sharing" in the Quick Find box, then select Sharing Settings
-
In Manage sharing settings for, select the object for which to add the sharing rule
-
Under Sharing Rules, click New
-
Under Step 1, enter a name for the rule
-
Under Step 2, select Based on criteria
-
Under Step 3, select the records to share by defining criteria analyzing field values
-
Under Step 4, select the public group or role with whom to share the records
-
Under Step 5, select:
-
Click Save
-
Click OK
Public Groups
Basics
A public group is collection of users to whom a sharing rule applies.
| Adding public groups reduces the number of sharing rules required. |
Public groups can consist any combination of:
-
Individual users
-
Other public groups
-
Roles
-
Roles and subordinates
There are two ways to use public groups in sharing rules:
-
Share records with group members.
-
Share records owned by group members with other users.
Adding a Public Group
-
From Setup, enter "public group" in the Quick Find box, then select Public Groups
-
Click New
-
In Label, enter a group name
-
(Optional) Deselect Grant Access Using Hierarchies to prevent automatic access to the public group’s records using the role hierarchy
-
In Search, select the type of users to include in the public group
-
In Available Members, select users
-
Click Add
-
Click Save
Manual Sharing
Basics
Manual sharing grants
-
account access to roles or public groups on a record-by-record basis.
-
wider account access but can’t restrict account access.
Sharing an Account
Prerequisite
You must be the record owner, in a role above the record owner, or have the permissions to share an account.
-
Open the Accounts tab
-
Open the account
-
Click Sharing
-
Click Add
-
In Search, select the type of users with whom to share the account
-
In Available, select users
-
Click Add
-
In Account Access, select:
-
Click Save