PDF Report Setup
Prerequisites
-
Read the following articles before you set up PDF reports for the first time:
-
To set up PDF reports, you need the following licenses:
-
To set up PDF reports, you must:
-
To set up PDF reports, you need:
-
System permissions:
-
Customize Application
-
Manage Profiles and Permission Sets
-
View Setup and Configuration
-
-
To use PDF reports in FieldFX Mobile, you must use one of the following release channels:
-
Sync V4 Beta
-
Sync V4
-
V4 Quarterly Beta
-
V4 Quarterly
-
|
Use the Report Template Editor in the Admin Tools. |
Basics
-
A PDF report is a type of FX Report.
-
PDF reports attach to records as PDFs, making it easier to print and email reports.
-
PDF reports also give you the ability to use repeating headers and footers, pagination, and many other advanced formatting options.
-
Report Templates are managed in the Report Template Editor in Admin Tools.
XML Templates
-
An XML template is a file containing XML markup that controls the design and content of a PDF report.
-
XML templates use:
-
XML elements to define the report’s layout.
-
XML attributes to define appearance of XML elements.
-
Expressions and report helpers to define the report’s content.
-
-
Report Templates are created, edited, and managed in the Report Template Editor in Admin Tools.
|
The below steps are deprecated. |
|
Use the Report Template Admin Tool at admin.fieldfx.com instead. |
Setting Up the PDF Reports Feature
|
Use the Report Template Admin Tool at admin.fieldfx.com instead. |
Configure FieldFX Back Office
-
Upload the en_US file:
-
From Setup, enter "static" in the Quick Find box, then select Static Resources
-
Complete one of the following:
-
If the en_US file displays in the list, proceed to step 4.
-
If the en_US file doesn’t display in the list, proceed to step c.
-
-
Unzip the file and extract it to your local computer
-
Move back to FieldFX Back Office
-
Click New
-
Complete the following:
-
In Name, enter "en_US"
-
In Cache Control, select "Public"
-
Click Choose File
-
Select the en_US file you downloaded
-
-
Click Save
-
-
Configure static resources:
-
From Setup, enter "file upload" in the Quick Find box, then select File Upload and Download Security
-
Click Edit
-
For ".html, .acgi, .htm, .htx, .shtm, .shtml", select "Hybrid" in Download Behavior
-
Click Save
-
-
Configure Salesforce Files settings:
-
From Setup, enter "general" in the Quick Find box, then select General Settings
-
Click Edit
-
If available, select Enable Files Sync
-
If selected, deselect Files uploaded to the Attachments related list on records are uploaded as Salesforce Files, not as attachments
-
Click Save
-
Set Up the Report Editor
|
Use the Report Template Admin Tool at admin.fieldfx.com instead. |
Add the Report Editor Visualforce page
-
From Setup, enter "pages" in the Quick Find box, then select Visualforce Pages
-
Click New
-
In Label, enter "Report Editor"
-
In Name, enter "Report_Editor"
-
Copy the following code:
<apex:page standardcontroller="FX5__Report_Template__c" extensions="FX5.UtilityGetNamespace" docType="html-5.0" applyHtmlTag="false" applyBodyTag="false" showChat="false" showHeader="false" showQuickActionVfHeader="false" sidebar="false" standardStylesheets="false"> <html> <head> <title>FX - PDF Report Template Editor</title> <link rel="stylesheet" href="https://cdnjs.cloudflare.com/ajax/libs/semantic-ui/2.2.13/semantic.min.css"/> <script src="https://cdn.fieldfx.com/{!$Api.Session_ID}/{!namespaceWithoutUnderscores}/pte/build/xmllint.js"></script> <script type="text/javascript"> var salesforce = { accessToken: '{!$Api.Session_ID}', organizationId: '{!$Organization.Id}', userId: '{!$User.Id}', resource_path: 'https://cdn.fieldfx.com/{!$Api.Session_ID}/{!namespaceWithoutUnderscores}/pte/build/' }; var script = document.createElement('script'); script.src = salesforce.resource_path + 'loader.js'; script.async = false; document.head.appendChild(script); </script> </head> <body> <div id="fx"></div> </body> </html> </apex:page> -
Replace the code on the Visualforce Markup tab by pasting over it with the code you copied
-
Click the Version Settings tab
-
Click -- Select to Add Installed Pacakge -- and select "FieldFX Base Package"
-
Click Save
Add the Report Editor button
-
From Setup, enter "object" in the Quick Find box, then select Objects
-
Click Report Template
-
Under Buttons, Links, and Actions, click New Button or Link
-
In Label, enter "Report Editor"
-
In Display Type, select Detail Page Button
-
In Behavior, select "Display in existing window without sidebar"
-
In Content Source, select "Visualforce Page"
-
In Content, select the Visualforce page used for the report
-
Click Save
-
Click OK
-
Click Back to Custom Object at the top of the page
-
Add the Report Editor button to page layouts:
-
Under Page Layouts, click Edit next to a page layout for FieldFX Back Office
-
On the toolbar, click Buttons
-
Drag the button into the Custom Buttons section.
-
Click Save.
-
Repeat steps a to d.
-
-
Grant permission to use the Report Editor Visualforce page:
-
From Setup, enter "permission" in the Quick Find box, then select Permission Sets
-
Open a permission set for Visualforce pages
-
Under Apps, click Visualforce Page Access
-
Click Edit
-
Add "Report Editor" to Enabled Visualforce Pages
-
Click Save
-
Repeat steps a to f
-
Adding a PDF Report
Basics
-
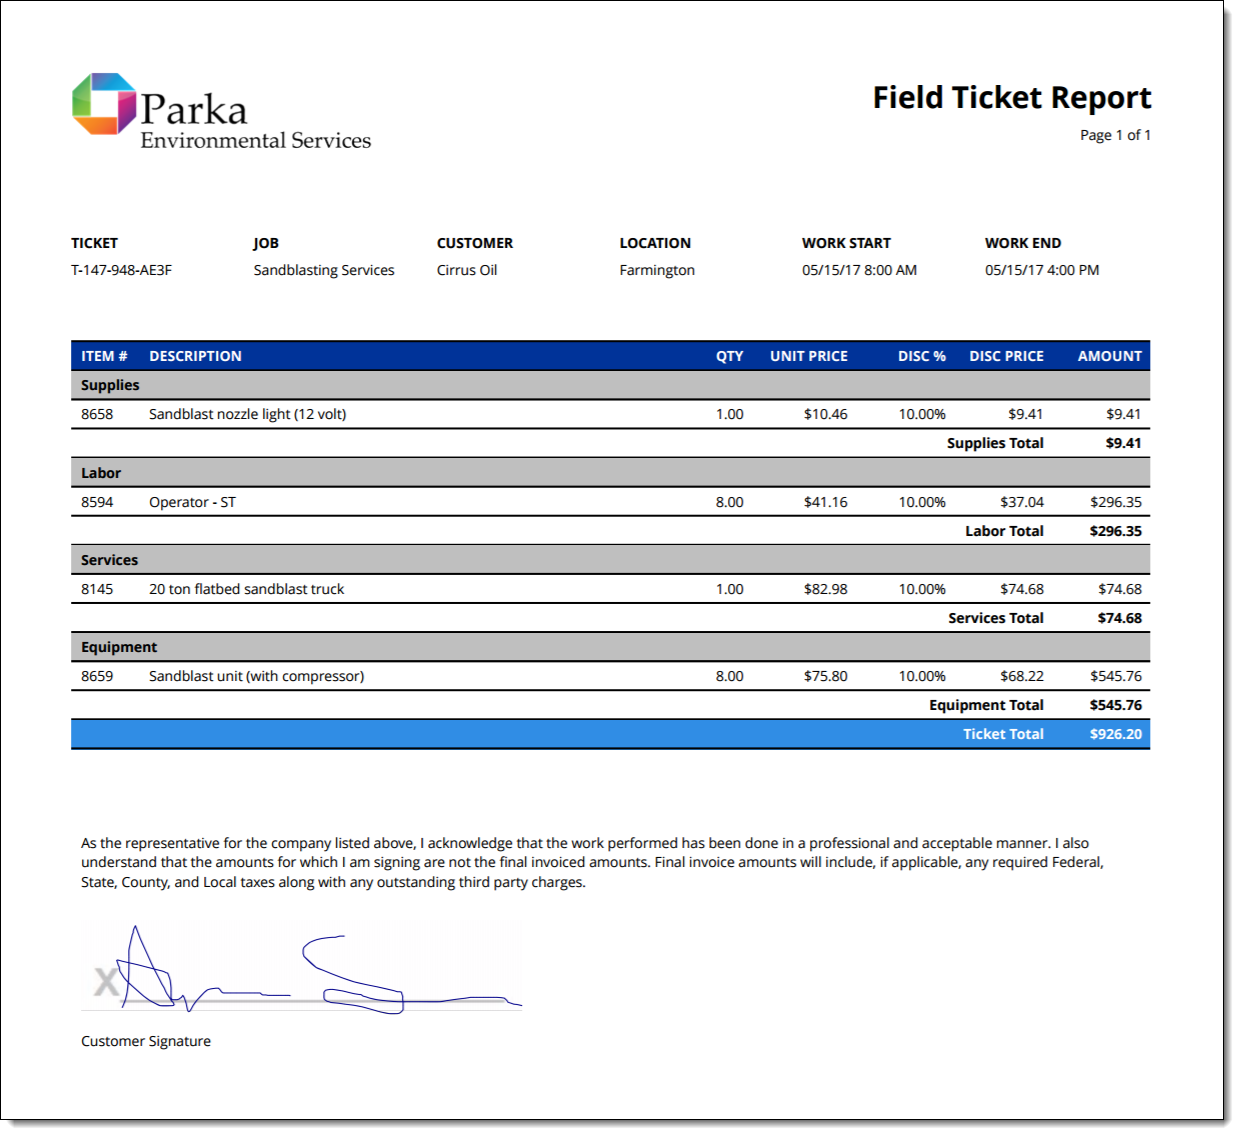
This guide explains how to add a PDF report for the Ticket object.
-
This report displays basic ticket details and lists ticket items in a table, as shown below.
-
Go to the Sample PDF Report section to download the XML template for the PDF report created in this example.
Create an XML Template
|
Use the Report Template Admin Tool at admin.fieldfx.com instead. |
-
Open a text editor
-
Add a new file
-
Set the
xml version:<?xml version="1.0" encoding="UTF-8"?>
-
Add a
<template>element:<?xml version="1.0" encoding="UTF-8"?> <template pageSize="LETTER" pageOrientation="portrait" pageMargins="36 170 36 36" xmlns:xsi="http://www.w3.org/2001/XMLSchema-instance" xsi:noNamespaceSchemaLocation="fx-report-schema_1_0.xsd"> </template> -
Inside the
<template>element, add a<styles>element and define attributes for styles you want to use on the report:<styles> <style name="center" fontSize="7" alignment="center"/> <style name="header" bold="true" fontSize="7"/> <style name="number" alignment="right"/> <style name="tablefooter" fontSize="7" bold="true" color="#ffffff" fillColor="#308DE5"/> <style name="tableheader" fontSize="7" bold="true" color="#ffffff" fillColor="#003399"/> <style name="tablesubhead" fontSize="7" bold="true" fillColor="#bfbfbf"/> <style name="text" alignment="left" fontSize="7"/> </styles>The styles in this example are basic text and table styles.
-
Inside the
<template>element, add a<header>element to insert a report header:<header> </header>The
<header>repeats and displays at the top of every page. -
Inside the
<header>element, add a<columns>element:<header> <columns margin="36 36 36 0" style="text"> </columns>The
<columns>element splits the<header>into columns. -
Inside the
<columns>element, add an<image>element to insert a logo into the top left corner of the<header>:<header> <columns margin="36 36 36 0" style="text"> <image width="144">data:image/png;base64,`+ENTERBASE64STRINGHERE+`</image>-
Replace
ENTERBASE64STRINGHEREwith the base64 string for your logo. -
You can only insert
jpegorpngimages.
-
-
Add a
<table>element to insert a title and page number into the top right corner of the<header>:<table columnWidths="*" borderWidth="0"> <tableBody> <row><cell style="header" alignment="right">Field Ticket Report</cell></row> <row><cell style="text" alignment="right">Page $currentPage of $pageCount</cell></row> </tableBody> </table> </columns>Replace "Field Ticket Report" with the name of your report.
-
Add
<table>,<tableBody>,<row>, and<cell>elements to insert ticket information fields into the bottom of the<header>:<table style="text" margin="36 40 36 40" columnWidths="* * * * * *" borderWidth="0"> <tableBody> <row> <cell bold="true">TICKET</cell> <cell bold="true">JOB</cell> <cell bold="true">CUSTOMER</cell> <cell bold="true">LOCATION</cell> <cell bold="true">WORK START</cell> <cell bold="true">WORK END</cell> </row> <row> <cell>{{FX5__Tracking_Number__c}}</cell> <cell>{{FX5__Job__r.Name}}</cell> <cell>{{FX5__Job__r.FX5__CustomerAccount__r.Name}}</cell> <cell>{{FX5__Job__r.FX5__Office__r.Name}}</cell> <cell>{{formatDateTime FX5__Work_Start_Date__c format="MM/DD/YY h:mm A"}}</cell> <cell>{{formatDateTime FX5__Work_End_Date__c format="MM/DD/YY h:mm A"}}</cell> </row> </tableBody> </table>The ticket information fields display in six columns across the
<header>. -
Inside the
<template>element, add a<body>element:<body> </body> </template>The
<body>element inserts a non-repeating section into the<template>element. -
Inside the
<body>element, add<table>,<tableHeader>,<tableBody>,<row>, and<cell>elements to insert a ticket item table:<table style="text" marginTop="20" columnWidths="25 * 20 40 40 40 40"> <tableHeader> <row> <cell style="tableheader" alignment="left" border="false true false true">ITEM #</cell> <cell style="tableheader" alignment="left" border="false true false true">DESCRIPTION</cell> <cell style="tableheader" alignment="center" border="false true false true">QTY</cell> <cell style="tableheader" alignment="right" border="false true false true">UNIT PRICE</cell> <cell style="tableheader" alignment="right" border="false true false true">DISC %</cell> <cell style="tableheader" alignment="right" border="false true false true">DISC PRICE</cell> <cell style="tableheader" alignment="right" border="false true false true">AMOUNT</cell> </row> </tableHeader> <tableBody> {{#group FX5__Ticket_Items__r "RecordType.DeveloperName"}} {{#if items.length}} <row> <cell style="tablesubhead" bold="true" alignment="left" border="false true false true" colSpan="7">{{RecordType_DeveloperName}}</cell> <emptyCell /> <emptyCell /> <emptyCell /> <emptyCell /> <emptyCell /> <emptyCell /> </row> {{#sort items "FX5__Sequence_Number__c" desc=false}} <row> <cell style="text" border="false true false true" >{{FX5__Sequence_Number__c}}</cell> <cell style="text" border="false true false true" >{{FX5__Description__c}}</cell> <cell style="center" border="false true false true" >{{formatCurrency Qty__c symbol="" precision="2" separator="," decimal="."}}</cell> <cell style="number" border="false true false true" >{{formatCurrency FX5__Price__c symbol="$" precision="2" separator="," decimal="."}}</cell> <cell style="number" border="false true false true" >{{formatPercent FX5__Discount_Percent__c decimalPlaces="2"}}</cell> <cell style="number" border="false true false true" >{{formatCurrency Discounted_Price__c symbol="$" precision="2" separator="," decimal="."}}</cell> <cell style="number" border="false true false true" >{{formatCurrency Extended_Amount__c symbol="$" precision="2" separator="," decimal="."}}</cell> </row> {{/sort}} <row> <cell style="text" alignment="right" bold="true" border="false true false true" colSpan="6">{{RecordType_DeveloperName}} Total</cell> <emptyCell /> <emptyCell /> <emptyCell /> <emptyCell /> <emptyCell /> <cell style="number" bold="true" border="false true false true">$\{\{sum items "Extended_Amount__c"}}</cell> </row> {{/if}} {{/group}} <row> <cell style="tablefooter" bold="true" alignment="right" border="false true false true" colSpan="6">Ticket Total</cell> <emptyCell /> <emptyCell /> <emptyCell /> <emptyCell /> <emptyCell /> <cell style="tablefooter" bold="true" alignment="right" border="false true false true">${{sum FX5__Ticket_Items__r "Extended_Amount__c"}}</cell> </row>-
The table displays information separately for each ticket item record type.
-
The table uses the following report helpers:
-
The
grouphelper groups the ticket items by record type. -
The
ifhelper inserts a table for each record type only if there are items of that type on the ticket. -
The
sorthelper sorts the ticket items by sequence number. -
The
sumhelper inserts the total Extended Amount for each record type and all ticket items.
-
-
-
Add
<row>,<cell>,<stack>, and<text>elements to insert terms and conditions text:<row> <cell colSpan="7" border="false false false false"> <stack> <text style="text" marginTop="20">As the representative for the company listed above, I acknowledge that the work performed has been done in a professional and acceptable manner. I also understand that the amounts for which I am signing are not the final invoiced amounts. Final invoice amounts will include, if applicable, any required Federal, State, County, and Local taxes along with any outstanding third party charges.</text>By adding the text inside a cell in the table, this prevents the text from displaying across page breaks.
-
Add
<signatureBlock>,<watermark>, and<text>elements to insert a signature line:<signatureBlock id="customerSignature" width="216" height="50"> <watermark>data:image/png;base64,/9j/4AAQSkZJRgABAQEAYABgAAD/ 2wBDAAIBAQIBAQICAgICAgICAwUDAwMDAwYEBAMFBwYHBwcGBwcICQsJCAgKCAcHCg0KCgsMDAwMBwkODw0MDgsMDAz/2wBDAQICAgMDAwYDAwYMCAcIDAwMDAwMDAwMDAwMDAwMDAwMDAwMDAwMDAwMDAwMDAwMDAwMDAwMDAwMDAwMDAwMDAz/wAARCABCASUDASIAAhEBAxEB/8QAHwAAAQUBAQEBAQEAAAAAAAAAAAECAwQFBgcICQoL/8QAtRAAAgEDAwIEAwUFBAQAAAF9AQIDAAQRBRIhMUEGE1FhByJxFDKBkaEII0KxwRVS0fAkM2JyggkKFhcYGRolJicoKSo0NTY3ODk6Q0RFRkdISUpTVFVWV1hZWmNkZWZnaGlqc3R1dnd4eXqDhIWGh4iJipKTlJWWl5iZmqKjpKWmp6ipqrKztLW2t7i5usLDxMXGx8jJytLT1NXW19jZ2uHi4+Tl5ufo6erx8vP09fb3+Pn6/8QAHwEAAwEBAQEBAQEBAQAAAAAAAAECAwQFBgcICQoL/8QAtREAAgECBAQDBAcFBAQAAQJ3AAECAxEEBSExBhJBUQdhcRMiMoEIFEKRobHBCSMzUvAVYnLRChYkNOEl8RcYGRomJygpKjU2Nzg5OkNERUZHSElKU1RVVldYWVpjZGVmZ2hpanN0dXZ3eHl6goOEhYaHiImKkpOUlZaXmJmaoqOkpaanqKmqsrO0tba3uLm6wsPExcbHyMnK0tPU1dbX2Nna4uPk5ebn6Onq8vP09fb3+Pn6/9oADAMBAAIRAxEAPwD9/KKKKACiiigAooooAKKKKACiiigAooooAKKKKACiiigAooooAKKKKACiiigAooooAKKKKACiiigAooooAKKKKACiiigAooooAKKKKACiiigAooooAKKKKACiiigAooooAKKKKACiiigAooooAKKKKACiiigAooooAKKKKACiiigAooooAKKKKACiiigAooooAKKKKACiiigABzXlfir40av8Pviza6VrNvp66Bft/o93GjrIFPALEsRlW4bgcc8Zr1Pd0968y/ao0/Srj4Zyy6gxS5glX7CyrlzKf4f90qDn6Z5IAqW7NMEr3Qnxb+Nl/wCG/GumeHfDttZ3+qXRHnCdWdY92No+VgQcZY56DBr0eyWeO1jFw8bzhR5jRqVQtjkgEkgZ9Sa8B/ZDSw1PxXqV5eTyXGtxxAQiU7iI+jMCeSfur7A+5x9DVbVkkSndhRRRSKCiiigAooooAKKKKACiiigAooooAKKKKACiiigAooooAKKKKACiiigAooooAKKKKACiiigAooooAKKKKACiiigBByAfSvC/FfhrWvjf8Zre1u9O1Sy8M6Wx2vcW7wpMqkbiCw5ZzgDvt57GvdQMUUl8SfYXRrueI/Gv4dan4R8eaZ4r8LWE88qOqXFtaws+CowDtXnayDacDHHqa9g8Pakdb0a1vDBcWjTxh2gnjKSxEjlWB5BBq9XHeIvB/izUtYuJ9P8AGf8AZto5zHbf2TDN5Q2gY3sQTzzz60J6WBpN3Oxorg/+EA8cf9FBP/git/8A4qj/AIQDxx/0UE/+CK3/APiqYzvKK4P/AIQDxx/0UE/+CK3/APiqP+EA8cf9FBP/AIIrf/4qgDvKK4P/AIQDxx/0UE/+CK3/APiqP+EA8cf9FBP/AIIrf/4qgDvKK4P/AIQDxx/0UE/+CK3/APiqP+EA8cf9FBP/AIIrf/4qgDvKK4P/AIQDxx/0UE/+CK3/APiqP+EA8cf9FBP/AIIrf/4qgDvKK4P/AIQDxx/0UE/+CK3/APiqP+EA8cf9FBP/AIIrf/4qgDvKK4P/AIQDxx/0UE/+CK3/APiqP+EA8cf9FBP/AIIrf/4qgDvKK4P/AIQDxx/0UE/+CK3/APiqP+EA8cf9FBP/AIIrf/4qgDvKK4P/AIQDxx/0UE/+CK3/APiqP+EA8cf9FBP/AIIrf/4qgDvKK4P/AIQDxx/0UE/+CK3/APiqP+EA8cf9FBP/AIIrf/4qgDvKK4P/AIQDxx/0UE/+CK3/APiqP+EA8cf9FBP/AIIrf/4qgDvKK4P/AIQDxx/0UE/+CK3/APiqP+EA8cf9FBP/AIIrf/4qgDvKK4P/AIQDxx/0UE/+CK3/APiqP+EA8cf9FBP/AIIrf/4qgDvKK4P/AIQDxx/0UE/+CK3/APiqP+EA8cf9FBP/AIIrf/4qgDvKK4P/AIQDxx/0UE/+CK3/APiqP+EA8cf9FBP/AIIrf/4qgDvKK4P/AIQDxx/0UE/+CK3/APiq6/RbS6sdKt4b27+33USAS3HlCLzmH8W0cD6CgXUu0UUUDCiiigAooooAKKKKACiiigAooooAKKKKACiiigAooooAKKKKACiiigAooooAKKKKACiiigAooooAKKKKACiiigAooooAKKKKACiiigD/2Q==</watermark> </signatureBlock> <text style="text">Customer Signature</text>By adding the signature line inside the same cell as the terms and conditions text, this keeps it together with the text and prevents the signature line from displaying across page breaks.
-
Add
<emptyCell>elements and closing tags to complete the table:<emptyCell /> <emptyCell /> <emptyCell /> <emptyCell /> <emptyCell /> <emptyCell /> </row> </tableBody> </table> -
Save the template as an .xml file
Configure the Report in FieldFX Back Office
|
Use the Report Template Admin Tool at admin.fieldfx.com instead. |
-
Add a report template for the report:
-
Open the Report Templates tab
-
Click New
-
In Report Template Name, enter a name for the report template
-
In SObject, enter the API name of the object for which you are adding the report
For example, enter
FX5__Ticket__cif the report is for the Ticket object. -
Specify when to use the report:
-
In Account, select the customer for the report
-
In Office, select an office for the report
-
In SObject Record Type, enter a record type to use the report for that record type
-
In Segment, select a business segment for the report
-
-
In Sequence Number, enter a sequence number to use for the report
Sequence numbers control the order of reports in lists. Refer to the Sequence Numbers article for more infomation.
-
Click Save
-
Click Attach File
-
Click Choose File
-
Select the XML template you created in step 1
-
Click Attach File
-
Click Done
-
Add a Visualforce page:
-
From Setup, enter "pages" in the Quick Find box, then select Visualforce Pages
-
Click New
-
In Label, enter a name that corresponds to the object for which you are adding the report
For example, enter "Ticker Report" if you are adding a report for the Ticket object.
-
In Name, enter the report’s name with underscores for spaces
-
Copy the following code:
<apex:page standardController="ObjectName" extensions="FX5.ReportTemplateExtension"> <apex:includeScript value="{!$Resource.FX5__jquery1102minjs}"/> <style type="text/css"> div.apexp { margin-left:-10px; } body { margin-left:0px !important; } a { text-decoration:none; } </style> <script type="text/javascript"> $('td.labelCol.empty').remove(); $('td.dataCol.empty').css('width','50%'); $('td.labelCol.first').css('vertical-align', 'bottom'); $('td.dataCol.first').css('vertical-align', 'bottom'); $('input[type=submit]').appendTo('td.dataCol.empty'); function jsOpenReport(entityId, templateId, objectTypeId, namespace) { var pagePath ='apex'; var ctrl = document.querySelectorAll("[id$='reportPagePath']")[0]; var customUrl=''; if(ctrl!=null) { pagePath = ctrl.innerText; if(pagePath && pagePath.toLowerCase()!='apex') { customUrl='&customUrl=' + pagePath; } } var href = '/' + pagePath + '/' + namespace + 'Reporting?templateId='+ templateId + '&objectId=' + entityId + '&objectType=' + objectTypeId + customUrl; window.open(href, '_blank'); window.top.location=window.top.location; } </script> <div style="display:none;"> <apex:outputText id="reportPagePath" value="{!PagePath}" /> </div> <apex:dynamicComponent componentValue="{!form}" id="dynamic"/> </apex:page> -
Replace the code on the Visualforce Markup tab by pasting over it with the code you copied
-
In the first line of the code, replace "ObjectName" with the API name of the object for which you are adding the report
For example, enter
+FX5Ticketcif the report is for the Ticket object.<apex:page standardController="FX5__Ticket__c" extensions="FX5.ReportTemplateExtension">
-
Click the Version Settings tab
-
Click -- Select to Add Installed Package -- and select "FieldFX Base Package"
-
Click Save
-
-
Update page layouts:
-
From Setup, enter "object" in the Quick Find box, then select Objects
-
Open the object for which you are adding the report
-
Under Page Layouts, click Edit next to a page layout for FieldFX Back Office
-
On the toolbar, click Visualforce Pages
-
Drag Section from the toolbar to a suitable location on the layout
-
In Section Name, enter "Reports"
-
Under Layout, select 1-Column
-
Click OK
-
Drag the Visualforce page for the report into the Reports section
-
Click Save on the toolbar
-
Repeat steps c to j for other page layouts as needed
-
-
Grant permission to use the Visualforce page for the report:
-
From Setup, enter "permission" in the Quick Find box, then select Permission Sets
-
Open a permission set
-
Under Apps, click Visualforce Page Access
-
Click Edit
-
Add the Visualforce page for the report to Enabled Visualforce Pages
-
Click Save
-
Repeat steps a to f for other permission sets as needed
-
-
Test the report:
-
Open a record
-
Move down to the Reports section
-
Click the button for the report
A print preview of the report displays.
-
Troubleshooting
To display forms in the browser, you must disable the Google Chrome setting that determines whether the browser displays or downloads PDF files.
| Google Chrome is a 3rd party application, and the instructions for how to disable this option may change at any time without warning. |
-
In Google Chrome, go to
chrome://settings/content/pdfDocuments(Enter that path directly in the browser’s address bar.)
-
Verify the toggle for Download PDF files instead of automatically opening them in Chrome is disabled
Alternatively:
-
Access Google Chrome’s settings
There are several ways to do this, but one is to select the vertical dot Customize and Control button in the top right corner of the browser, then select Settings. -
Select Privacy and security in the left navigation bar
-
Select Site Settings
-
Select PDF documents
You may need to expand the Additional content settings group of options first. -
Verify the toggle for Download PDF files instead of automatically opening them in Chrome is disabled