Ticket Page
Use the Ticket page to add and update tickets in FieldFX Mobile.
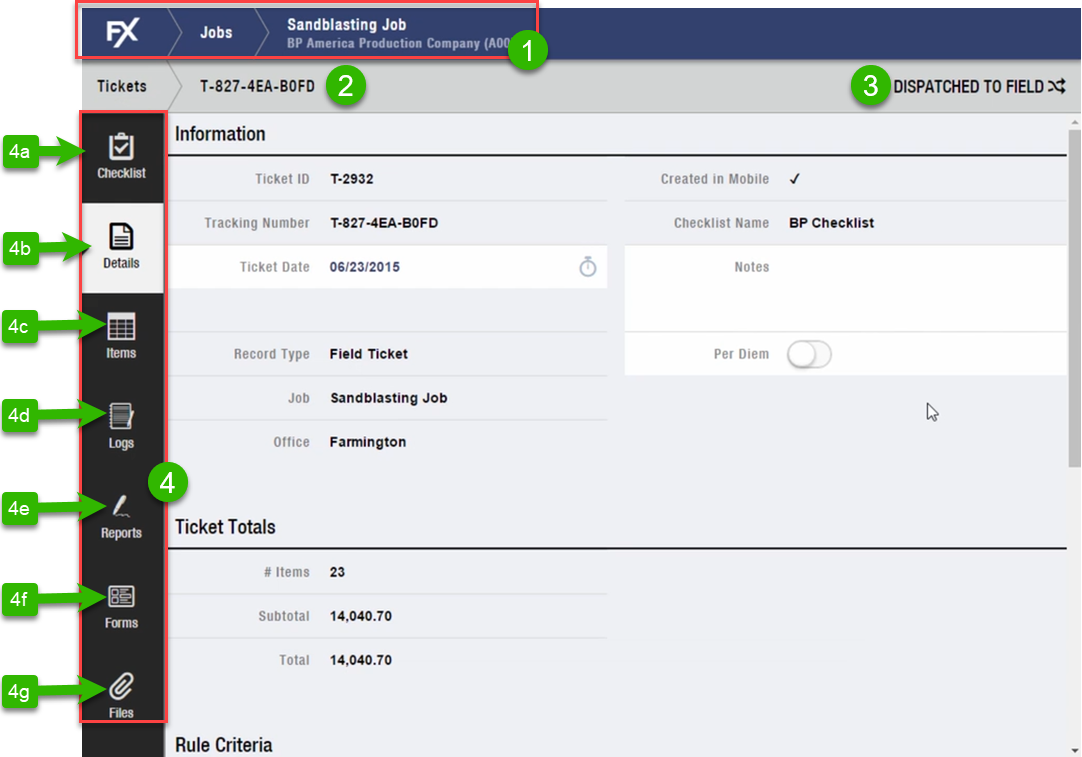
Ticket Page Layout
| Callout | Name | Description | |||||||||||||||||||||||||||
|---|---|---|---|---|---|---|---|---|---|---|---|---|---|---|---|---|---|---|---|---|---|---|---|---|---|---|---|---|---|
1 |
Ticket Breadcrumbs |
The Ticket breadcrumbs display at the top of the page. 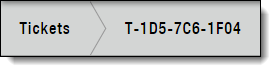
|
|||||||||||||||||||||||||||
2 |
Ticket Number |
This is the number of the displayed ticket. |
|||||||||||||||||||||||||||
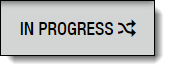
3 |
Ticket Status Indicator |
|
|||||||||||||||||||||||||||
4 |
Select the sidebar buttons to do the following:
|
||||||||||||||||||||||||||||
Walkthrough
Basics
Use the walkthrough to view explanations of buttons and controls available on the current screen.
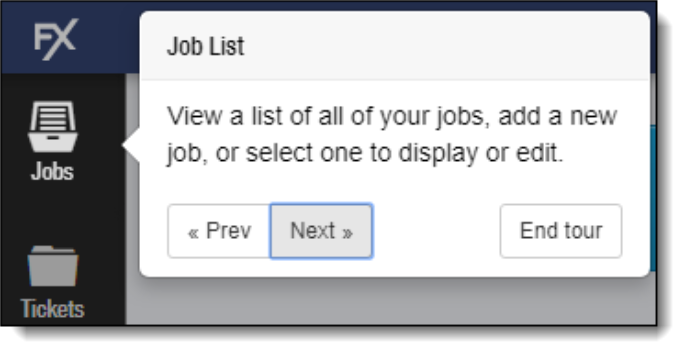
Using the Walkthrough
To display the walkthrough, select the help question mark button on the sidebar.

To move through the explanations of each feature, select Prev or Next.
To close the walkthrough, select End tour.
Customizing Walkthrough Text
Administrators can customize the text that displays in the walkthrough messages to conform to your processes and language.
In addition to text, the walkthrough can display images, PDFs, and videos available from a static URL.
Each stop can display multiple slides.
For details on customizing the help text, see FX Mobile Tour Builder.
Step-by-Step Guides
With tickets in FX Mobile, you can add, copy, add ticket items, change status, attach a report, attach an FX Form, and attach a file to a ticket.
Getting There
In FX Mobile,
-
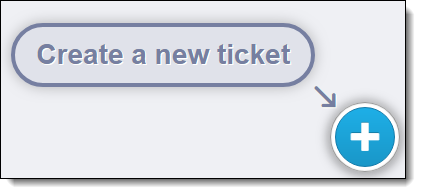
Select Create a new ticket on the Tickets tab of the Job page.
 .
. -
Select a ticket on the Ticket Search page.
-
You can:
Add a Ticket
In FX Mobile, you can add a new ticket.
-
Select Jobs on the sidebar.
-
At the list of jobs, select a job and open it.
-
Once the job is open, select Tickets and select
 .
.If the job has no tickets, No Ticketsappears. -
Select a ticket type.
Ticket types vary on how they were set up in the Org’s Back Office.
-
Enter the ticket details and select
 .Example 1. To complete the Supervisor field:
Tap the field and choose from the list of contacts based on the customer selected in the job.
Complete the remaining ticket fields.
-
Add ticket items.
-
Complete the ticket by selecting the Add button.
A new ticket appears in the list of tickets.
-
You can navigate through the new ticket by using the sidebar icons on the main FX Mobile Ticket Page.
Return to Step-by-Step Guides
Copy a Ticket
-
In FX Mobile, click Jobs and then open a job.
-
Select on a listed job to open it.
-
Select on Tickets.
A list of tickets for that job appears.
-
To copy a ticket, tap
 next to the ticket you want to copy.
All the information and ticket items for that ticket are copied into a new ticket. Use when you want to add a new ticket that is similar to an existing ticket.
-
On the Copy Ticket window, edit any ticket details if necessary.
-
Select Add to finish the copy.
The ticket now has been copied and you can further edit the new ticket as necessary.
Return to Step-by-Step Guides
Add a Ticket Item
-
To open a ticket, select Tickets.
-
Select the ticket.
-
Select Items on the sidebar.
If any items exist on the ticket, they would appear in a grid.
If no items exist on the ticket,
No Ticket Itemsappears on the screen.-
The Ticket Item Wizard adds price book items to the to the ticket automatically if they have Required Item selected.
-
The Rule Engine adds price book items to the ticket automatically if required by a rule
-
-
Select
.The Ticket Item Wizard displays.
-
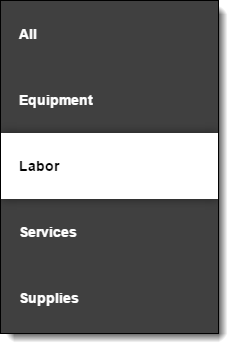
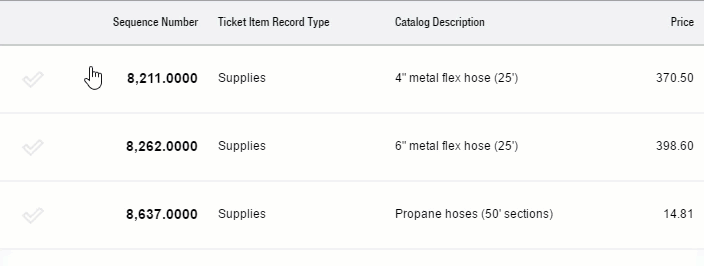
Select from the category to see the list of ticket items matching that category.
The filters along the top display the available ticket items.
-
Choose from the filters for the item type you can add.
Example 2. Ticket categoriesThe categories shown may be different depending on how tickets are set up in FieldFX Back Office. Item Type Description Price Book
Filter to view price book items records in the job’s price book.
Use the All, Equipment, Labor, Services, or Supplies entry on the side to further filter the price book items by record type.
People
Filter to view contact records linked to the labor catalog items in the job’s price book.
The contacts can be organized by their location which appears on the side.
Equipment
Filter to view the equipment records in the job’s price book.
The equipment records can further be filtered and grouped by category on the side.
Scheduled Crew
Filter to view the crew records scheduled to work on the job.
Scheduled Equipment
Filter to view the equipment scheduled for the job.
-
-
To quickly locate an item, use the keyword search bar.
As you type in characters, tickets that match appear in the list.
-
Select an item type.

The item types shown may be different depending on how tickets are set up in FieldFX Back Office. -
Select a record type.
The record types shown may be different depending on how tickets are set up in FieldFX Back Office. -
Select the desired item or items.
The item has a selected icon
 .
. -
Select
 to finish.
Child items get added automatically when you add their parent item. -
Select Yes or No to add details for the item before its saved.
If Yes, add the ticket item details.
The Ticket Item grid shows the item you have added.
Return to Step-by-Step Guides
Change Ticket Status
-
In FX Mobile, click Tickets to open a Ticket.
-
Select a ticket from those shown.
-
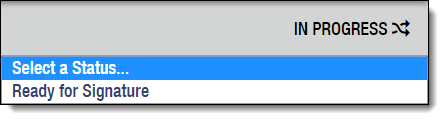
Select on the ticket status indicator in the top right of the screen.
It might say DISPATCHED TO FIELD.
-
Select the status to view the next status in the ticket’s workflow.
Depending on the ticket’s workflow, multiple statuses could be shown.
-
Select the next status in your workflow.
-
To confirm the new status for the ticket, select PROCEED in the confirmation box.
The ticket status change from the previous status to the next status is shown depending on the workflow defined for your org.
The new ticket status appears.
Depending on your setup, the ticket may display as read-only or no longer display in FieldFX Mobile after your next sync.
Return to Step-by-Step Guides
Attach a Report
-
In FX Mobile, click Tickets to open a Ticket.
-
Select a ticket from those shown.
-
Select Reports on the sidebar.
If no reports are attached to the ticket, nothing appears.
-
To attach a new report, select
 .
. -
Select from the reports listed on the sidebar.
The report shows the details from the currently selected ticket.
-
To have a customer electronically sign the report, see Capturing Signatures
You can see the final print preview of the report. Select the Print icon to print the report to a connected printer.
-
To finish, select
 .
.The report appears in the Reports section for the ticket.
Return to Step-by-Step Guides
Attach an FX Form
-
In FX Mobile, click Tickets to open a Ticket.
-
Select a ticket from those shown.
-
Select Forms from the sidebar.
If there are no forms attached to the ticket, No Attached Forms appears in the tab.
-
Select
to attach a form. -
Select an FX Form shown in the sidebar.
The FX Forms shown will be different depending on the FX Forms added to the ticket from the FieldFX Back Office.
-
Complete the form as necessary.
-
Select
 to finish the form.
 -
You can attach a report version of the FX Form to the ticket and add a signature.
The report appears on the Reports tab for the FX Form.
Return to Step-by-Step Guides
Attach a File
-
In FX Mobile, click Tickets to open a Ticket.
-
Select a ticket from those shown.
-
Select Files on the sidebar.
If there are no files attached to the ticket, You have no files is shown.
-
Select
to attach a file. -
Select the file to attach.
The file now displays in the file list.
If you attach a file and sync twice, the file no longer displays on the File tab. You may have to view the attached file in FieldFX Back Office.
Return to Step-by-Step Guides
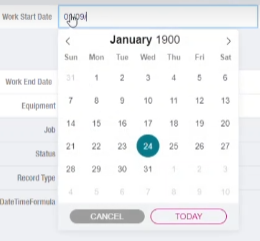
Date and Time Picker
You can use a new date and time picker to set the date and time. They won’t appear unless you toggle the Use the new date/time pickers toggle at the Home page.
|
|
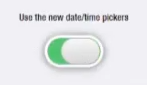
The old date/time pickers will be unavailable after 4/18/2023 and you’ll only be using the new date/time pickers.
You can switch between the date/time pickers by using the toggle slider 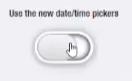 on the FX Mobile main page.
-
Click on the date and either:
-
Use the pop-up calendar to select the date. For the current date, click TODAY.
-
Type in the desired date and enter the date in the MM/DD/YYYY format.
-
-
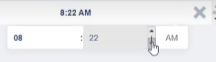
To set a time, click on a Time field.
You can use a new time picker to set the time. The new time picker won’t appear unless you toggle the Use the new date/time pickers toggle at the Home page.
Click on the time and use the scroll bars to set the Hour and Minute.
Return to Step-by-Step Guides