Schedule & Dispatch Setup
Introduction
To setup Schedule and Dispatch in FieldFX, complete the following:
-
Complete the requirements in Prerequisites
-
Configure:
Prerequisites
To set up and use FX Schedule & Dispatch, you need to:
| Have these user licenses | Have these permissions | Complete these tasks and review these topics before continuing |
|---|---|---|
|
|
Custom Metadata
Configure JSD Display Text
If a user wants a different display field for a certain SObject (see the list below), you need to go to custom metadata and to the FX5__JSD_Display_Text__mdt. There you can manage the records and update the Display Field there.
| SObjects where the display text can be customized | |
|---|---|
|
|
-
Log into your org.
-
To access Setup, click
 .
. -
In the Quick Find, type
custom metadata. -
Select Custom Metadata Types.
-
Find JSD Display Text and click Manage Records.
-
You can choose to change the Display Field field on these JSD Display Text Name:
Label JSD Display Text Name Contact Display Field
Contact_Display_Field
Crew Planning Display Field
Crew_Planning_Display_Field
Equipment Display Field
Equipment_Display_Field
Equipment Planning Display Field
Equipment_Planning_Display_Field
Job Display Field
Job_Display_Field
Price Book Item Planning Display Field
Price_Book_item_Planning_Display_Field
Time Off Display Field
Time_Off_Display_Field
-
Click Edit on the label you want to customize.
-
In Display Field, enter the text you want to appear.
-
Click Save.
-
Dashboards
A dashboard is the collection of layouts you see when you access FX Schedule & Dispatch.
The default dashboard features a standard set of layouts.
You can change the default dashboard by:
-
Defining a custom dashboard and assign it to all users:
when you assign a dashboard to all users, every user will see the dashboard when they:-
Access FX Schedule & Dispatch for the first time
-
Select FX → Reset All Settings
-
-
Defining a custom dashboard and assign it to a user profile:
when you assign a dashboard to a user profile, users assigned to the profile will see the dashboard when they:-
Access FX Schedule & Dispatch for the first time
-
Select FX → Reset All Settings
-
| To manage dashboards, you need Modify All permission for the DataStore object. |
Assign a Dashboard to All Users
-
Customize the layouts and panels on the current dashboard as necessary.
-
Complete one of the following:
-
Open the Chrome menu and select More tools → Developer tools
-
Right-click on the page and select Inspect
-
Press Ctrl-Shift-J / Command-Option-J
-
-
Select Application → Local Storage → <host address>.
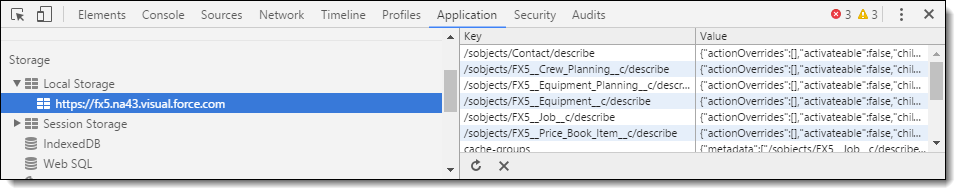
-
Locate the jsd-xxxxxxxxxxxxxxxxxx-remote key and copy its value.
-
From Setup, enter
custom settingin the Quick Find box, then select Custom Settings. -
Click Manage next to FX Settings.
-
Click Edit.
-
In JSD Default Dashboard, paste the jsd-xxxxxxxxxxxxxxxxxx-remote key value you copied.
-
Click Save.
Every user will now see the dashboard when they either:
-
Access Schedule & Dispatch for the first time
-
Select FX → Reset All Settings
-
Assign a Dashboard to a User Profile
-
Customize the layouts and panels on the current dashboard as necessary.
-
Select FX → Manage Dashboards.
-
Select a user profile.
-
Click Save.
Every user will now see the dashboard when they either:
-
Access FX Schedule & Dispatch for the first time.
-
Select FX → Reset All Settings.
You can also remove a dashboard assignment for a User Profile.
-
Remove a Dashboard Assignment for a User Profile
-
Customize the layouts and panels on the current dashboard as necessary.
-
Select FX → Manage Dashboards.
-
Select a user profile.
-
Click Remove Profile Dashboard.
Layouts
A layout features a collection of panels you can use to schedule and dispatch items.
There are two default layouts:
-
Schedule: Use to schedule jobs
-
Dispatch: Use to dispatch crew and equipment to jobs
You can add custom layouts as necessary, configure a layout’s global settings, rename, or delete a layout.
|
When you add custom layouts, the configuration is unique to your user record. If you add a layout and then open Schedule & Dispatch on another device, the new layout also displays on the second device. If you set the column width in a list view for a job timeline and then log out of Salesforce, the next time you log back into Salesforce, those column widths remain set to what you set before. |
Configure Global Settings
-
Open the layout.
-
Click the layout name and select Preferences.
-
Select display options for panels on the layout.
-
Click Apply.
Rename a Layout
-
Open the layout.
-
Click the layout name and select Rename.
-
Enter a new name.
-
Click Rename.
Panels
Panels are a component of a layout you can use to schedule or dispatch items.
You can add or remove panels from layouts as necessary.
|
When you add or remove panels to a layout, the collection is unique to your user record. For example, if you add a panel and then open the layout in Schedule & Dispatch on another device, the new layout also displays on the second device. |
Add a Panel
-
Open a layout
-
Click the layout name, select Add Panel, then select the panel to add
You must set up the Map panel before you can add it to layouts. See below for instructions on setting up the Map Panel.
-
Drag and drop the panel to the desired position
Real-Time Panel Updates
Panels don’t update automatically with the latest real-time data.
You can make panels display the latest real-time data by adding PushTopics.
PushTopics use the Force.com Streaming API to update the Job, Crew, and Equipment panels automatically after you make changes to records.
For example, you could set up a PushTopic to update job panels automatically after changes to the Projected Start Date for jobs.
|
You can find more information on the Salesforce help site:
|
Grant permission for the PushTopic Object
-
From Setup, enter
permissionin the Quick Find box, then select Permission Sets. -
Open a permission set.
-
Under Apps, click Object Settings.
-
Click Push Topics.
-
Click Edit.
-
Under Object Permissions, select Read.
-
Click Save.
-
Repeat these steps for other permissions as needed.
Add a PushTopic to Update Job Panels
You can add a PushTopic to update Job Panels.
-
Access Workbench and note the API Version.
-
Select Data → Insert.
-
Complete the following:
-
In Object Type, select
PushTopic. -
Select Single Record.
-
-
Click Next.
-
Complete the following:
-
In ApiVersion, enter the API Version you noted in the Workbench.
-
In Description, enter "Updates job panels after changes to jobs".
-
In IsActive, enter
True. -
In Name, enter
JSD_Job_UpdatesYou must start the name with JSD -
In NotifyForFields, enter
Select.This entry determines when record field changes trigger updates to panels.
Evaluating too many record field changes may cause you to exceed the Streaming API Limits for your org.
-
Set the following to
True:-
NotifyForOperationCreate
-
NotifyForOperationDelete
-
NotifyForOperationUndelete
-
NotifyForOperationUpdate
-
-
In Query, enter the following SOQL statement:
SELECT Id, Name, FX5__Projected_Start_Date__c, FX5__Projected_End_Date__c FROM FX5__Job__cThis SOQL statement determines the fields for which changes trigger updates to panels.
-
-
Click Confirm Insert.
A notification displays to indicate you added the PushTopic successfully.
-
Close Workbench
-
Grant permission use the PushTopic:
-
From Setup, enter
permissionin the Quick Find box, then select Permission Sets -
Open the FieldFX Schedule and Dispatch permission set.
-
Under Apps, click Object Settings.
-
Click Push Topics.
-
Click Edit.
-
Under Object Permissions, select Read.
-
Click Save.
-
Repeat these steps for other permission sets as needed.
-
Add a PushTopic to Update Crew Panels
-
Access Workbench and note the API Version.
-
Select Data → Insert.
-
Complete the following:
-
In Object Type, select
PushTopic. -
Select Single Record.
-
-
Click Next.
-
Complete the following:
Field Action ApiVersion
Enter the API Version noted in the Workbench.
Description
Enter
Updates contact panels after changes to crew planning records.IsActive
Enter
True.Name
Enter
JSD_Crew_Updates.You must start the name with JSD.NotifyForFields
Enter
Select.This entry determines when record field changes trigger updates to panels.
Evaluating too many record field changes may cause you to exceed the Streaming API Limits for your org.
NotifyForOperationCreate NotifyForOperationDelete NotifyForOperationUndelete NotifyForOperationUpdate
Set the following to
trueQuery
Enter the following SOQL statement:
SELECT Id, FX5__Crew_Member__c, FX5__Planned_Start_Date__c, FX5__Planned_End_Date__c, FX5__Role_on_Job__c FROM FX5__Crew_Planning__cThis SOQL statement determines which field changes trigger updates to panels. -
Click Confirm Insert.
A notification displays to indicate you added the PushTopic successfully.
-
Close Workbench.
-
Grant permission use the PushTopic:
-
From Setup, enter
permissionin the Quick Find box, then select Permission Sets. -
Open the FieldFX Schedule and Dispatch permission set.
-
Under Apps, click Object Settings.
-
Click Push Topics.
-
Click Edit.
-
Under Object Permissions, select Read.
-
Click Save.
-
Repeat these steps for other permission sets as needed.
-
Add a PushTopic to Update Equipment Panels
-
Access Workbench and note the API Version.
-
Select Data → Insert.
-
Complete the following:
-
In Object Type, select PushTopic.
-
Select Single Record.
-
-
Click Next.
-
Complete the following:
Field Action ApiVersion
Enter the API Version noted in the Workbench.
Description
Enter
Updates equipment panels after changes to equipment planning records.IsActive
Enter
True.Name
Enter
JSD_Equipment_Updates.You must start the name with JSD.NotifyForFields
Enter
Select.This entry determines when record field changes trigger updates to panels.
Evaluating too many record field changes may cause you to exceed the Streaming API Limits for your org.
NotifyForOperationCreate NotifyForOperationDelete NotifyForOperationUndelete NotifyForOperationUpdate
Set these to
True:Query
Enter the following SOQL statement:
SELECT Id, FX5__Equipment2__c, FX5__Planned_Start__c, FX5__Planned_End__c, FX5__Price_Book_Item__c FROM FX5__Equipment_Planning__cThis SOQL statement determines which fields trigger updates to panels. -
Click Confirm Insert.
A notification displays to indicate you added the PushTopic successfully.
-
Close Workbench.
List Views
List views control the type of records that display on a panel.
You can use List Views for crew lists, list of equipment, list of jobs, and list of price books.
|
The list views for panels are the same list views you can select on tabs in FieldFX Back Office. For example, the list views on the Job-list panel are the same list views you can select on the Jobs tab. |
|
You must add at least one list view for each of the Contacts, Equipment, Jobs, and Price Book Items tabs. When creating a lookup list view for an Office or Account, values including a "/" results in an error in the S&D panel. The issue was fixed so if you move to another list view, no error is produced. |
Add a Crew List View
-
Switch to FX Schedule & Dispatch.
-
Open the Contacts tab.
-
Click Create New View.
-
Complete the following:
-
Under Step 1, enter a name for the list view.
-
Under Step 2, specify criteria to determine the crew that displays on the list view.
-
Under Step 3, select the fields to display for crew shown on the list view.
-
Under Step 4, select Visible to all users.
-
-
Click Save.
Add an Equipment List View
-
Switch to FX Schedule & Dispatch.
-
Open the Equipment tab
-
Click Create New View
-
Complete the following:
-
Click Save
Add a Job List View
-
Switch to FX Schedule & Dispatch.
-
Open the Job tab.
-
Click Create New View.
-
Complete the following:
-
Under Step 1, enter a name for the list view.
-
Under Step 2, specify criteria to determine the jobs that display on the list view.
-
Under Step 3, select the fields to display for jobs shown on the list view.
-
Under Step 4, select Visible to all users.
-
-
Click Save.
Add a Price Book List View
-
Open the Price Book tab.
-
Click Create New View.
-
Complete the following:
-
Under Step 1, enter a name for the list view.
-
Under Step 2, specify criteria to determine the price book items that display on the list view.
-
Under Step 3, select the fields to display for price book items shown on the list view.
-
Under Step 4, select Visible to all users.
-
-
Click Save.
Map Panel
Set up the Map Panel
-
From Setup, enter
objectin the Quick Find box, then select Objects. -
Select Create > Objects.
-
In Custom Objects, complete these tasks in order:
Add a Geolocation Field
To the Job Object
-
In Custom Objects in Setup, click Job.
This object is managed so you can only edit certain attributes. -
Under Custom Fields & Relationships, click New.
-
Select Geolocation and then Next.
-
In Field Label, enter
Geolocation. -
In Decimal Places, enter
2. -
Click Next.
-
Click Visible twice.
-
Click Next.
-
Select the page layouts on which to include the field.
-
Click Save.
-
Continue on with adding to the Contact Object.
To the Contact Object
-
From Setup, enter
contactsin the Quick Find box. -
Select Customize > Contacts > Fields.
-
In Contact Fields, select Contact Custom Fields & Relationships and then click New.
-
Select Geolocation and then click Next.
-
In Field Label, enter
Geolocation. -
In Decimal Places, enter
2. -
Click Next.
-
Select the check boxes for the Field-Level Security for Profile options and then click Next.
-
Select the page layouts on which to include the field and click Save.
-
Continue on with adding to the Equipment Object.
To the Equipment Object
-
In Custom Objects, click Equipment.
This object is managed so you can only edit certain attributes. -
Under Custom Fields & Relationships, click New.
-
Select Geolocation and then click Next.
-
In Field Label, enter
Geolocation. -
In Decimal Places, enter
2. -
Click Next.
-
Select the check boxes for the Field-Level Security for Profile options and then click Next.
-
Select the page layouts on which to include the field.
-
Click Save.
-
Grant field permissions for the Geolocation fields.
-
Continue with Add a location-based list view for the Jobs Tab.
Add a location-based list view for the Jobs Tab
-
From the main FieldFX window, open the Jobs tab.
If not there, click the Home tab.
-
Click Create New View.
-
In View Name, enter
Jobs with Geolocation. -
Under Step 2: Specify Filter Criteria → Filter By Additional Fields, select the following:
-
Field: Geolocation (Latitude)
-
Operator: greater or equal
-
Value: 0.00

-
-
Under Step 3: Select Fields to Display → Available Fields, select the following:
-
Name
-
Customer
-
Office
-
Geolocation (Latitude)
-
Geolocation (Longitude)
-
-
Click Add.
-
Under Step 4: Restrict Visibility, select Visible to all users.
-
Click Save.
-
Continue with Add a location-based list view for the Contacts tab
Add a location-based list view for the Contacts tab
-
Open the Contacts tab.
-
Click Create New View.
-
In View Name, enter "Crew with Geolocation".
-
Under Step 2: Specify Filter Criteria → Filter By Additional Fields, select the following:
-
Field: Geolocation (Latitude)
-
Operator: greater or equal
-
Value: 0.00
-
-
Under Step 3: Select Fields to Display → Available Fields, select the following:
-
Name
-
Account Name
-
Title
-
Office
-
Geolocation (Latitude)
-
Geolocation (Longitude)
-
-
Click Add.
-
Under Step 4: Restrict Visibility, select Visible to all users.
-
Click Save.
-
Continue with Add a location-based list view for the Equipment tab.
Add a location-based list view for the Equipment tab
-
Open the Equipment tab.
-
Click Create New View.
-
In View Name, enter
Equipment with Geolocation. -
Under Step 2: Specify Filter Criteria | Filter By Additional Fields, select the following:
-
Field: Geolocation (Latitude)
-
Operator: greater or equal
-
Value: 0.00
-
-
Under Step 3: Select Fields to Display → Available Fields, select the following:
-
Name
-
Unit Number
-
Geolocation (Latitude)
-
Geolocation (Longitude)
-
-
Click Add.
-
Under Step 4: Restrict Visibility, select Visible to all users.
-
Click Save.
-
Continue with Finish Map Panel Setup.
Qualification Requirements
A qualification requirement restricts the resources you can dispatch to a job to those holding a specific qualification.
| Refer to the Displaying Qualified Resources section of the Schedule and Dispatch overview to learn how this feature works. |
You can add a qualification requirement to all jobs or specific jobs.
Complete these setup tasks:
Optional Qualification Requirements
You can make a qualification requirement optional.
This gives you the ability to dispatch resources to jobs if they don’t have the required qualification.
| Deselect Required for a qualification requirement to make it optional. |
Set Up Qualification Requirements
-
Complete these tasks in order:
Configure FX Settings
See FX Settings for more information.
-
From Setup, enter
custom settingin the Quick Find box, then select Custom Settings. -
Click Manage next to FX Settings.
-
Click Edit.
-
Deselect AutoAddJobCreatorToCrew.
-
Click Save.
-
Continue with Configure Job page layouts.
Configure Job page layouts
-
From Setup, enter
objectin the Quick Find box, then select Objects. -
Click Job.
-
Under Page Layouts, click Edit next to a page layout for FieldFX Back Office.
-
On the toolbar, click Related Lists.
-
Drag Qualification Requirements onto the layout.
-
Click the wrench icon.
-
Add these to Selected Fields:
-
Qualification
-
Account
-
Category
-
-
Click OK.
-
Click Save.
-
Repeat the above steps for other page layouts as needed.
-
Continue with Configure the Qualification Requirement page layout.
Configure the Qualification Requirement page layout
-
From Setup, enter
objectin the Quick Find box, then select Objects. -
Click Qualification Requirement.
-
Under Page Layouts, click Edit next to Qualification Requirement Layout.
-
Add these fields to the layout.
-
Job
-
Account
-
Category
-
Required
-
-
Click Save.
-
Continue with Configure Qualification page layouts.
Configure Qualification page layouts
-
From Setup, enter
objectin the Quick Find box, then select Objects. -
Click Qualification.
-
Under Page Layouts, click Edit next to a page layout for FieldFX Back Office.
-
Add the Category field to the layout.
-
Click Save.
-
Repeat the above steps for other page layouts as needed.
-
Continue with Configure existing qualifications.
Configure existing qualifications
-
Open the Qualifications tab.
-
Open a qualification.
-
In Category, specify whether the qualification applies to crew or equipment.
-
Click Save.
-
Repeat the above steps for other qualifications as needed
Add for all Jobs
You can add a qualification requirement to all jobs.
-
Open the Qualification Requirements tab.
-
Click New.
-
In Qualification, select a qualification to make required on all jobs.
Prerequisite
You must select a Category for this qualification to specify whether it applies to crew or equipment.
-
(Optional) Deselect Required to give users the ability to remove the requirement from jobs.
-
To remove a qualification requirement from a job, select the job on a calendar or timeline panel and click X on the requirement filter that displays at the top of the page.
-
You can only remove a qualification requirement from a job if the requirement doesn’t have Required selected.
-
-
Click Save.
-
Continue with Add to Jobs for a Customer.
Add to Jobs for a Customer
-
Open the Qualification Requirements tab.
-
Click New.
-
In Qualification, select a qualification to make required on the customer’s jobs.
Prerequisite
You must select a Category for this qualification to specify whether it applies to crew or equipment.
-
In Account, select the customer for which to add the requirement.
-
(Optional) Deselect Required to give users the ability to remove the requirement from jobs.
-
To remove a qualification requirement from a job, select the job on a calendar or timeline panel and click X on the requirement filter that displays at the top of the page.
-
You can only remove a qualification requirement from a job if the requirement doesn’t have Required selected.
-
-
Click Save.
-
Continue with Add to a Job.
Add to a Job
-
Open the Jobs tab.
-
Open the job.
-
Move to the Qualification Requirements related list.
-
Click New Qualification Requirement.
-
In Qualification, select a qualification to make required on the job.
Prerequisite
You must select a Category for this qualification to specify whether it applies to crew or equipment.
-
(Optional) Deselect Required to give users the ability to remove the requirement from jobs.
-
To remove a qualification requirement from a job, select the job on a calendar or timeline panel and click X on the requirement filter that displays at the top of the page.
-
You can only remove a qualification requirement from a job if the requirement doesn’t have Required selected.
-
-
Click Save.
-
Continue with Add a Custom Qualification Requirement.
Add a Custom Qualification Requirement
| If the same custom field exists on both the Job object and the Qualifications Requirement object, Schedule and Dispatch automatically enforces the requirement. |
-
Create a custom field on the Job object. Note the API name you use.
For example, create a Boolean field with an API name of
Haz_Mat__c. -
Add the new field to the Job object’s Page Layout(s).
-
Create the same custom field on the Qualification Requirements object.
Use the same API name used for the Job object.
-
Add the new field to the Qualification Requirements object’s Page Layout(s).
-
Add one or more Qualification Requirements using the field.
For example, add a Qualification Requirement where the custom Haz Mat field is set to
True. -
On a Job with the requirement, set the custom field to the value for the Qualification Requirement.
For example, on the Job, set the Haz Mat field to
True. -
Schedule and Dispatch automatically enforces the Qualification Requirement.
Background Colors
You can set background colors for each record that displays on a panel.
Background colors can be set for:
Set Automatic Job Colors
Complete the following to set background colors for jobs automatically based on status.
-
Configure the Job object:
-
From Setup, enter
objectin the Quick Find box, then select Objects. -
Click Job.
-
Under Custom Fields & Relationships, click New.
-
Select Formula.
-
Click Next.
-
In Field Label, enter
JSD Background Color. -
In Formula Return Type, select Text.
-
Click Next.
-
In JSD Background Color (Text) =, enter the following formula and replace the status names and hexadecimal values as necessary:
CASE(FX5__Status__r.Name, 'Job Setup', '#00A3C1', 'In Progress', '#0061B5', 'Job Completed in Field', '#0012A5', 'Job Complete', '#6300A5', '#FFFFFF')Refer to the W3Schools HTML Color Picker article to get hexadecimal values for common colors. -
Click Next.
-
Click Visible twice.
-
Add the field to page layouts for FieldFX Back Office.
-
Click Save.
-
-
Update permissions:
-
Grant FieldFX Back Office users Read and Edit permission for the JSD Background Color checkbox on the Job object.
-
Set Crew Member Background Color
-
Open the Contacts tab.
-
Open the contact for the crew member.
-
Click Edit.
-
In JSD Background Color, enter a hexadecimal color value.
Enter
#FF0000to set the background color as red.Refer to the W3Schools HTML Color Picker article to get hexadecimal values for common colors. -
Click Save.
-
Clear your browser’s cache.
After completing the above steps, the crew member will now display with the specified background color in the following locations:
-
Contact - List panel
-
Contact - Table panel
-
Contact - Timeline panel
-
Map panel (Crew location marker)
Set Equipment Background Color
-
Open the Equipment tab.
-
Open the equipment record.
-
Click Edit.
-
In JSD Background Color, enter a hexadecimal color value.
Enter
#FF0000to set the background color as red.Refer to the W3Schools HTML Color Picker article to get hexadecimal values for common colors. -
Click Save
-
Clear your browser’s cache
After completing the above steps, the equipment will now display with the specified background color in the following locations:
-
Equipment - List panel
-
Equipment - Table panel
-
Equipment - Timeline panel
-
Map panel (Equipment location marker)
Set Job Background Color
-
Open the Jobs tab.
-
Open the job.
-
Click Edit.
-
In JSD Background Color, enter a hexadecimal color value
Example 1. Set background color as redEnter
#FF0000.-
Refer to the W3Schools HTML Color Picker article to get hexadecimal values for common colors.
-
-
Click Save
-
Clear your browser’s cache
The job will now display with the specified background color in the following locations:
-
Job - List panel
-
Job - Table panel
-
Job - Calendar panel
-
Job - Timeline panel
-
Map panel (Job location marker)
Set Qualification Requirement Background Color
Keep in mind that to set the background color, you must use the JSD_Background_Color_QR__c API Name. The user can create a formula field using the API name to show the different requirements with a different background color depending on the field(s) the formula evaluates.
Use FX5__Qualification_Requirement__c to change the background color of the qualification requirement.
Set Crew Planning Record Background Color
-
Open the Jobs tab.
-
Open the job.
-
Under Crew Planning, click Edit next to the record.
-
In JSD Background Color, enter a hexadecimal color value.
Example 2. To Set the background color as redEnter
#FF0000.Refer to the W3Schools HTML Color Picker article to get hexadecimal values for common colors. -
Click Save.
-
Clear your browser’s cache.
The crew planning record will now display with the specified background color in the following locations:
-
Contact - Timeline panel
Set Equipment Planning Record Background Color
-
Open the Jobs tab.
-
Open the job.
-
Under Equipment Planning, click Edit next to the record.
-
In JSD Background Color, enter a hexadecimal color value.
Enter
#FF0000to set the background color as red.Refer to the W3Schools HTML Color Picker article to get hexadecimal values for common colors. -
Click Save.
-
Clear your browser’s cache.
The equipment planning record will now display with the specified background color in the following locations:
-
Equipment - Timeline panel
Record Detail Pop-Ups
Record detail pop-ups display information about the selected record.
You can configure the pop-ups for:
Configure Crew Pop-up Fields
-
From Setup, enter
objectin the Quick Find box, then select Objects. -
Click Crew Planning.
-
Configure mini page layouts for Crew Planning page layouts:
-
click Edit next to a page layout for FieldFX Back Office.
-
Click Mini Page Layout in the top right corner of the toolbar.
-
In Selected, add the fields you want to display on pop-ups for crew dispatched to jobs.
-
Click Save twice.
-
Repeat these steps for other page layouts as needed.
-
Configure Equipment Pop-up Fields
-
From Setup, enter
objectin the Quick Find box, then select Objects. -
Click Equipment Planning.
-
Configure mini page layouts for Equipment Planning page layouts:
-
click Edit next to a page layout for FieldFX Back Office.
-
Click Mini Page Layout in the top right corner of the toolbar.
-
In Selected, add the fields you want to display on pop-ups for equipment dispatched to jobs.
-
Click Save twice.
-
Repeat these steps for other page layouts as needed.
-
Configure Job Pop-up Fields
-
From Setup, enter
objectin the Quick Find box, then select Objects. -
Click Job.
-
Configure mini page layouts for Job page layouts:
-
click Edit next to a page layout for FieldFX Back Office.
-
Click Mini Page Layout in the top right corner of the toolbar.
-
In Selected, add the fields you want to display on pop-ups for jobs.
-
Click Save twice.
-
Repeat these steps for other page layouts as needed.
-