Using Timecards
Introduction
The FX Timecards module is a time management solution that makes it easier to track payable time for field employees. Use the module in FieldFX Back Office to track time off requests and collect Time cards in to a payable timesheet.
FieldFX users can enter cards using the FX Timecards app, available for Windows, Android, iOS and Windows devices. On your app store, search for FieldFX.
| Consult the requirements in FieldFX System Requirements to ensure that the FieldFX Timecards app will run properly on your device. |
Prerequisites
To setup, use, and manage FX Timecards, you need to:
| Have these user licenses | Have these permissions | Complete these tasks and review these topics before continuing |
|---|---|---|
Automatically Generate Timecards
Timecard custom settings can allow FX Timecards to automatically generate timecards from Ticket Items.
| To enable this feature, complete the Timecard Custom Settings configuration and define the appropriate Ticket Item record types that should trigger timecard creation. |
-
From FieldFX Mobile, access a Ticket
-
Add a Ticket Item for the person who completes work on the Ticket
The worker must have a User Contact record with a Job Title from Catalog defined that appears on the Ticket.
-
FieldFX automatically generates the Timecard from the Ticket Item record
Changes made to the Ticket Item on the Ticket after the Timecard generates also update the related Timecard, including deleting a Timecard record after deleting the ticket item.
FX Timecards App
|
If ticket items are used to automatically generate timecards, the field user has no need to use the FX Timecards mobile app. Automatically generated timecards cannot be managed in the FX Timecards mobile app. |
| If your Timesheet is locked or approved, any changes to related Ticket Items in Back Office affecting your hours may be blocked to keep totals accurate. |
Access the FX Timecards App
-
Download the FX Timecards app from the App Store for your device (Google Play Store for Android, App Store for iOS, or Microsoft Store for Windows devices).
-
Search for
FX Timecards.
-
-
Once the app install is done, open the app.
-
Login with your Salesforce credentials.
How to Work with Timecards
| When entering start and end times, be sure to enter the end time after the start time. |
Manually Create a Timecard
| If a Timesheet has already been approved for a pay period, new Timecards can’t be created. If you create a new timecard, it’s placed in a new unapproved Timesheet. |
-
On your mobile device, open the FX Timecards app and login with your Salesforce credentials.
-
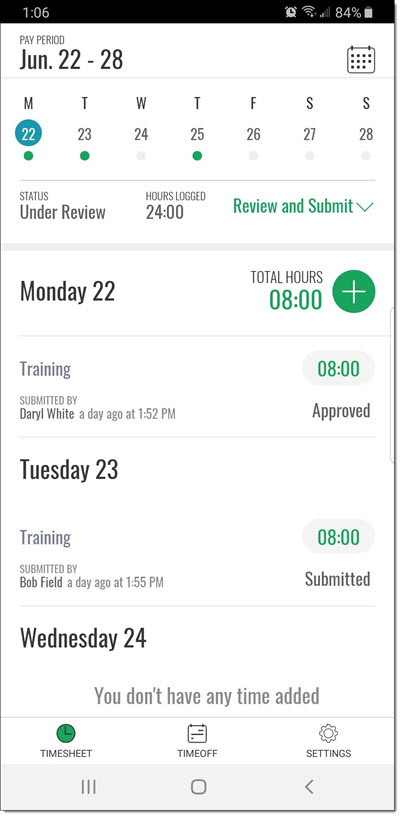
The app automatically shows the current active Pay Period.
-
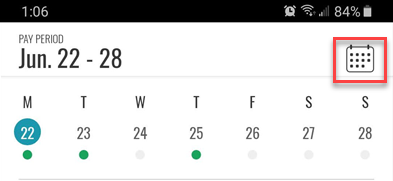
To select a different Pay Period, tap the calendar icon.
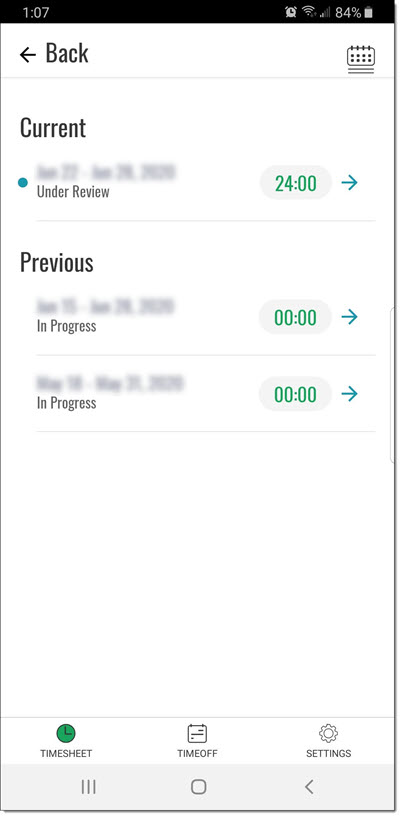
Select the Pay Period to use from the list or tap Back.
In creating a timecard, you cannot add a new pay period.
-
Tap the calendar date or scroll to the date in the pay period list.
-
Tap the green plus button for the date to add a new card.
-
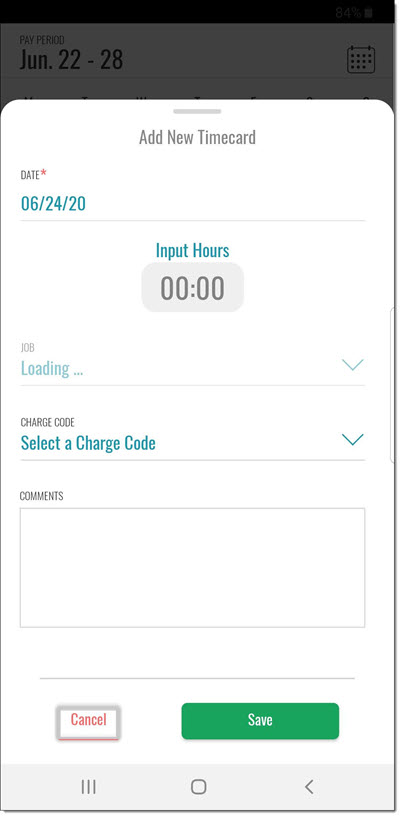
Make the following entries:
Date:
Displays the selected date (which can’t be changed).
Input Hours:
Total number of hours for the Timecard.
Click Cancel to return to the previous screen and select a different date if needed.
Job:
Select the Job worked.
Timecards can be automatically generated from the Ticket Item records on a Job.
Charge Code:
Select the type of time entry.
For example, Sick, Training, Jury Duty, and so on.
Select either a Job or a Charge Code, but not both.
Comments:
(Optional) Any notes for the supervisor or manager to know about the Timecard.
-
To create the Timecard, tap Save.
or
To discard the entries and not create a Timecard, tap Cancel.
|
You can add multiple Timecards for the same date, such as for a half sick day. |
Modify a Timecard
In modifying a Timecard, you can’t add a new pay period.
| Once the Timesheet is approved for a pay period, new Timecards can’t be created. If a new timecard is created, it’s placed in a new unapproved Timesheet. |
-
On your mobile device, open the FX Timecards app and login with your Salesforce credentials
-
The current active Pay Period automatically displays
-
To select a different Pay Period, tap the calendar icon.
Select the Pay Period to use from the list or tap Back.
-
Tap the calendar date or scroll to the date for the Timecard to change.
You can only modify Timecards that are in Submitted status.
You can review Timecards in other statuses.
-
Modify entries as needed.
-
To modify the Timecard, tap Save.
or
To discard changes, tap Cancel.
Copy a Timecard
Field workers often work the same hours for the same job or charge code for multiple days. You can copy the previous day’s Timecard entry to a new date to quickly create a Timecard. You can’t add a new pay period here.
-
On your mobile device, open the FX Timecards app and login with your Salesforce credentials
The app automatically shows the current active Pay Period.
-
You can also tap the calendar icon to select a different Pay Period.
-
To use from the pay period, select it from the list.
Or tap Back.
-
To add a new timecard to a certain date, tap the calendar date or scroll to that date.
-
Tap Copy entries from yesterday to create a Timecard just like the previous day’s Timecard
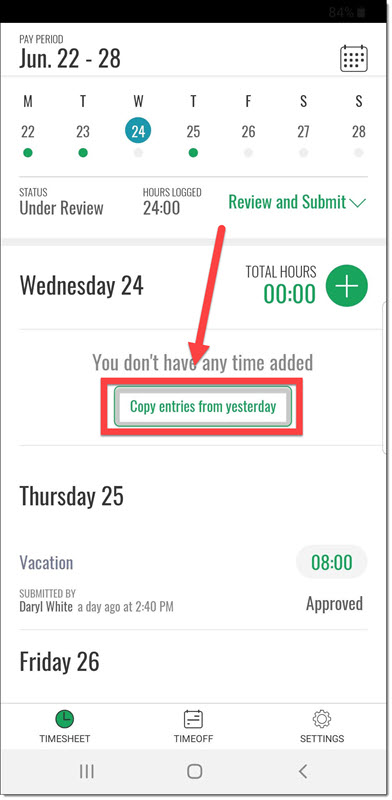
FX Timecards creates duplicates of the previous day’s Timecard(s) for the selected date.
Delete a Timecard
If you create timecards in error, a supervisor in FieldFX Back Office must delete them.
View a Timecard
In viewing a timecard, you can’t add a new pay period.
-
On your mobile device, open the FX Timecards app and login with your Salesforce credentials
The current active Pay Period automatically displays
-
(Optional) If necessary, tap the calendar icon in the top right to select a different Pay Period
Select the Pay Period to use from the list or tap Back.
-
Tap the calendar date or scroll to the date for the Timecard to change.
-
Review the Timecard.
-
To exit, Tap Done.
or
To discard the changes, tap Cancel.
How to Work with Timesheets
Timesheets collect all of the Timecards for a pay period. Unapproved Timecards in a Timesheet can be modified. After submitting a Timesheet, the Timesheet and its Timecards can’t be modified the FX Timecards mobile app.
| Once the Timesheet is approved for a pay period, new Timecards can’t be created. If a new timecard is created, it’s placed in a new unapproved Timesheet. |
Submit a Timesheet
In submitting a timesheet, you can’t add a new pay period.
-
On your mobile device, open the FX Timecards app and login with your Salesforce credentials.
The app automatically shows the current active Pay Period.
-
To select a different Pay Period, tap the calendar icon.
-
To use, select the Pay Period from the list.
Or
Tap Back.
-
-
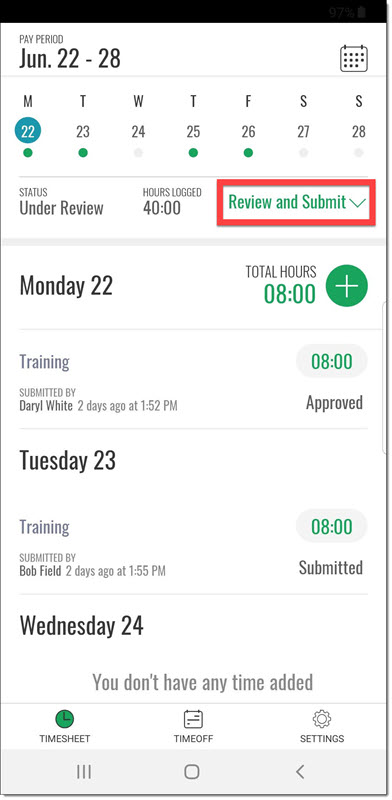
Review the Hours Logged for the Timesheet and modify any unapproved Timecards as necessary
-
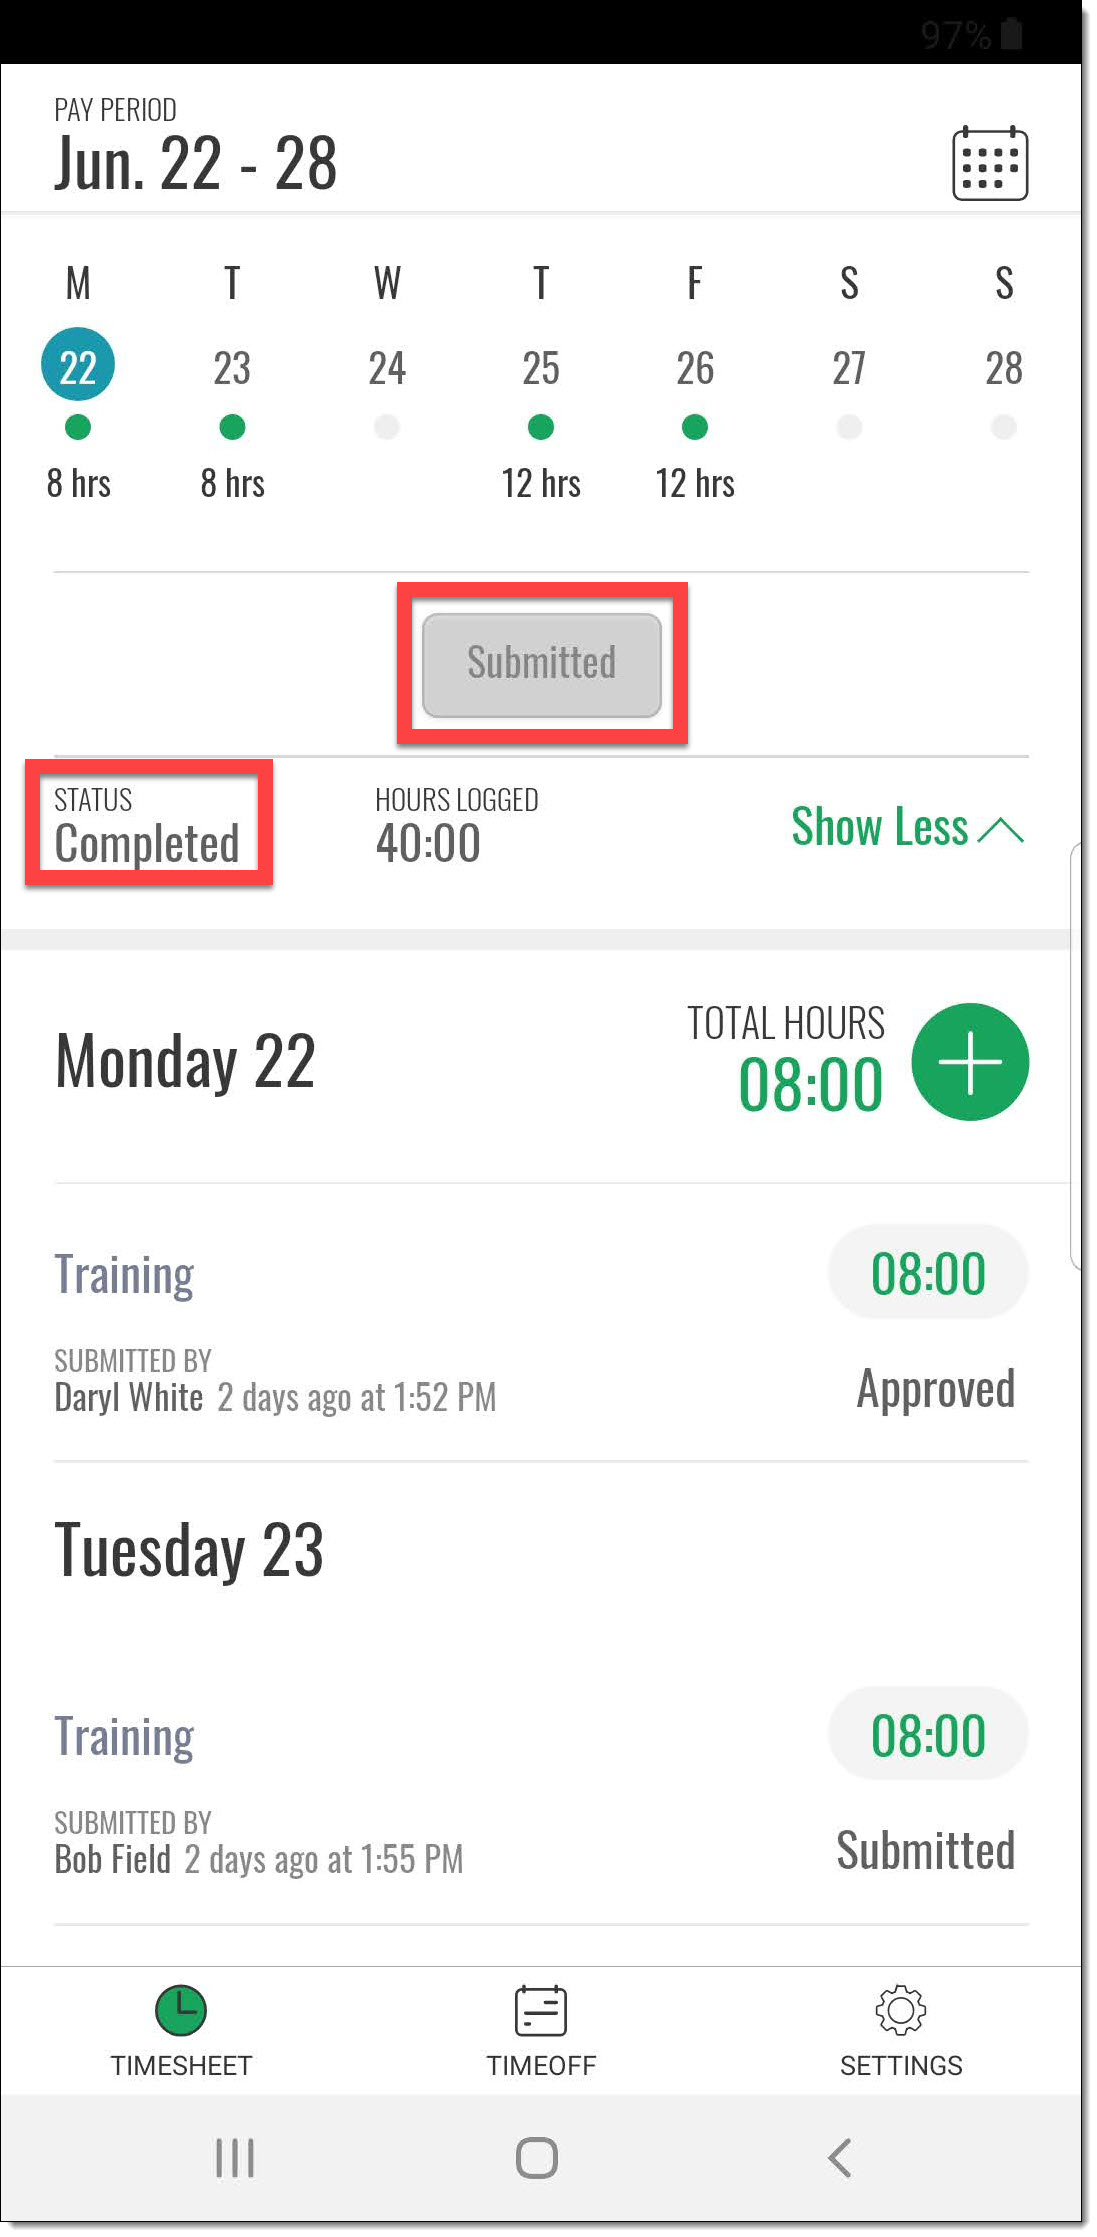
TapReview and Submit
-
Tap Submit Timesheet
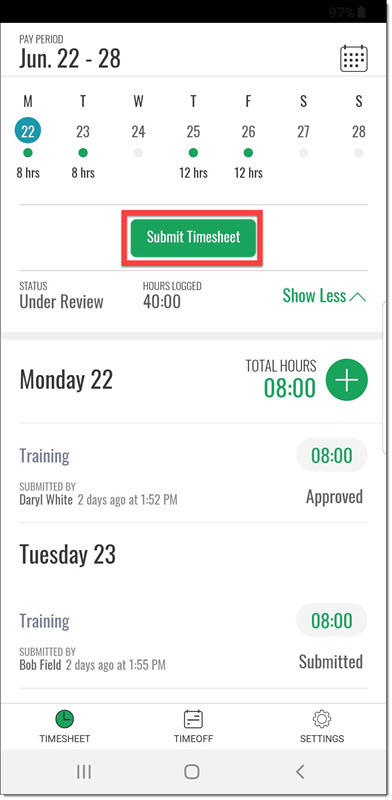
The Timesheet submits and the updates to Completed
At this point, the Timesheet and its Timecards cannot be modified in the FX Timecards app.
How to Work with Time Off Requests
Add a Time Off Request
-
On your mobile device, open the FX Timecards app and login with your Salesforce credentials.
-
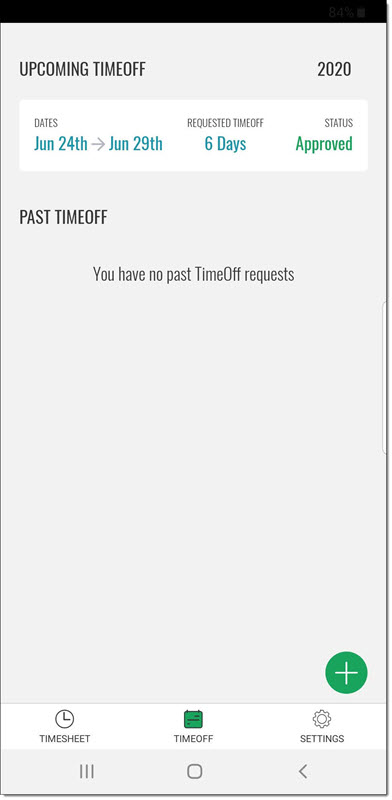
Tap Timeoff.
You can see the upcoming and past timeoff requests.
-
To add a Time Off request, tap the green Plus button at the bottom of the screen.
-
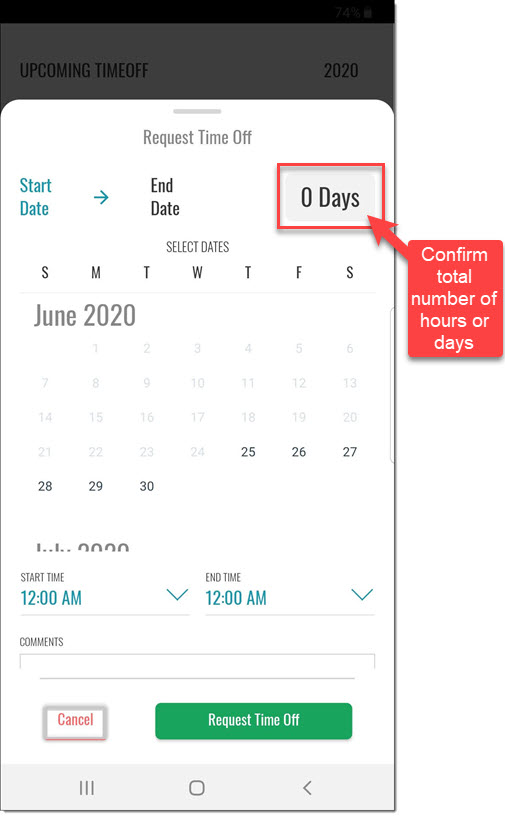
Make the following entries:
-
Start Date: Date time off begins
-
End Date: Date time off ends (can be the same as Start Date)
-
Start Time: (optional) Time off beginning time
When you tap the time, a clock displays to help select the hour, then the minutes.
Make sure to specify whether the time is AM or PM.
-
End Time: (optional) Time off stop time
When you tap the time, a clock displays to help select the hour, then the minutes.
Specify whether the time is AM or PM.
-
Comments: Additional information to share with the supervisor about the request
-
-
Confirm the amount of days or hours is correct at the of the screen.
-
To send the request, tap Request Time Off.
or
To discard the request and not send it, tap Cancel.
Cancel a Time Off Request
|
You can only cancel Pending Time Off Requests. |
-
On your mobile device, open the FX Timecards app and login with your Salesforce credentials.
-
Tap Timeoff.
You can see the Upcoming and Past Time Off requests.
-
To cancel the request, tap the Time Off request.
The request must be in Pending Status.
-
Tap Cancel Request.
FieldFX Back Office
When working with FX Timecards, you can work with Timecards, Timesheets or Time Off Requests.
How to Work with Timecards
When you work with Timecards in FieldFX Back Office, you can:
Automatically Generated Timecards
Timecards automatically generate from Labor type Ticket Items. Generated timecards automatically update as needed as the related Labor item changes.
For example, deleting the ticket item deletes the timecard.
Updating the Quantity (Qty.) on the ticket item updates the hours on the timecard. The status updates to In Progress.
Generated Timecards take the Ticket Item’s Start Date.
If there is no Start Date for the Ticket Item, the Ticket’s Date is used. If no timesheet is available for the pay period for the user, one is automatically generated with a pay period date calculated using the current active Pay Period’s *Week Start Day.
|
Timesheets aren’t generated if:
Timecards are still created even if no Timesheet is created. |
| For Ticket Items linked to an unlocked, unapproved Timesheet where the Ticket is not approved, changes to the Ticket Item generate or update related Timecards and the Timesheet Total Hours. If the associated Timesheet is locked or approved, FX Timecards blocks changes to key Ticket Item fields instead of updating Timecards or Timesheet totals. |
Add a Timecard
| If a Timesheet has already been approved for a pay period, new Timecards can’t be created. If you create a new timecard, it’s placed in a new unapproved Timesheet. |
-
Open the Timecards tab.
-
Click New.
-
Make the following entries:
If you do not see any of the fields, ask your system administrator to modify the page layout.
Entry
Action
Timesheet
(optional) Select the Timesheet for the Timecard
Status:
Select Submitted, Approved, or Rejected
Start Time:
Enter the beginning work Date and Time
End Time:
Enter the stop work Date and Time
Input Time:
Total time worked
Use as an alternative to specifying a Start Time and End Time
User:
Select the person the card is for
Job:
Job worked for the entered time
Ticket Item:
Select the Ticket Item from the Job for the entered time
Do not select a Job and Ticket Item if a Charge Code is selected
Charge Code:
Select the type of time
Do not select a Charge Code if a Job and Ticket Item are selected.
Comments:
Notes for the Timecard
-
Click Save.
or
Click Save and New to save the Timecard and add a new one.
Edit or Approve a Timecard
-
Open the Timecards tab.
-
Search for and select the Timecard to change.
-
Click Edit from the action bar.
-
Make the necessary changes.
For example, change the Status to Approved.
-
Click Save.
Delete a Timecard
-
Open the Timecards tab.
-
Open the timecard.
-
Click Delete from the action bar.
-
Click OK.
How to Work with Timesheets
A Timesheet is a set of Timecards for a pay period. Timesheets are called Pay Periods in the FX Timecards mobile app.
When working with Timesheets in FieldFX Back Office, you can:
Automatically Generated Timesheets
When a user with an FX Timecards license is added to a ticket’s labor ticket item, FX Timecards checks for an existing Timesheet with the correct pay period and generates one if needed. Timesheets automatically generate as needed for Timecards if the following are true:
-
Pay Periods are defined
-
There is an active, unexpired Pay Period
Generated Timesheets use a date range calculated from the active Pay Period’s Week Start Day.
Add a Timesheet
|
Timesheets are called Pay Periods in the FX Timecards mobile app. |
-
In Back Office, open the Timesheets tab.
-
Click New.
-
Make the following entries:
If you do not see any of the fields, ask your system administrator to modify the page layout.
Field Entry User:
Select the person the Timesheet is for
Start Time:
Enter the first day of the Pay Period
End Time:
Enter the last day of the Pay Period
Status:
Select the status for the Timesheet
Status Purpose In Progress
Open for adding Timecards
Under Review
Being reviewed by a supervisor
Approved
Ready for payment
Rejected
Not to be paid
Completed
Submitted by user for review
Total Hours:
Total of hours worked on the Timecards for the Timesheet.
This field is automatically updated.
-
Click Save.
or
Click Save and New to save the Timesheet and add a new one.
Edit or Approve a Timesheet
-
Open the Timesheets tab.
-
Search for and select the Timesheet to change.
-
Click Edit from the action bar.
-
Make the necessary changes.
For example, change the Status to Approved.
-
Click Save.
| Once the Timesheet is approved for a pay period, new Timecards can’t be created. If a new timecard is created, it’s placed in a new unapproved Timesheet. |
| Total Hours on a Timesheet is automatically calculated from related Timecards. For Ticket Items linked to an unlocked, unapproved Timesheet where the Ticket itself is not approved, changes to those Ticket Items can generate or update related Timecards and Timesheet Total Hours. When the associated Timesheet is locked or approved, FX Timecards instead blocks changes to key Ticket Item fields (Contact, Record Type, Date Start, and Date End) to prevent conflicts with the locked Timesheet. |
Delete a Timesheet
-
Open the Timesheets tab.
-
Open the Timesheet.
-
Click Delete from the action bar
-
Click OK
Working with Time Off Requests
When you work with time off requests, you can add, track and review, edit/approve/reject, or delete requests.
Add a Time Off Request
-
Open the Time Off tab.
-
Click New.
-
Make the following entries:
If you do not see any of the fields, ask your system administrator to modify the page layout.
User:
The Person who the request is for.
Status:
Select Submitted, Approved, or Rejected
Start Time:
Enter the beginning work Date and Time
End Time:
Enter the stop work Date and Time
User:
Select the person the card is for
Type:
Select the code for the request.
Example 2. Status ExamplesPTO, Sick, Bereavement, or Jury Duty.
Options are configured for your organization.
Comments:
Notes for the Time Off request.
-
Click Save.
or
Click Save and New to save the request and add a new one.
Edit or Approve a Time Off Request
-
Open the Time Off tab.
-
Search for and select the Time Off Request to change.
-
Click Edit from the action bar.
-
Make the necessary changes.
For example, change the Status to Approved.
-
Click Save.
Delete a Time Off Request
-
Open the Time Off tab.
-
Open the request.
-
Click Delete from the action bar.
-
Click OK.
Recommended Reading
-
FX Timecards Overview - Learn what FX Timecards does.
-
FX Timecards Minimum Permissions - Learn the minimum permissions required to manage timecards.