FXL Data Grid Setup
Prerequisites
-
Complete the Salesforce Lightning AppBuilder training before setting up and configuring the FXL Data Grid for the first time.
-
To set up the FXL Data Grid, you need the following licenses:
-
To set up the FXL Data Grid, you must be using Lightning Experience with FieldFX Back Office and have the FieldFX Lightning Managed Package installed.
-
To set up the FXL Data Grid, you need:
-
System Administrator permissions
-
Add the FXLC sessionPage Visualforce page to user profiles or permission sets.
Without permission to this Visualforce page, users will not be able to view the FXL Data Grid v2.
-
Basics
| For clarity and simplicity, the FXL Data Grid v2 will simply be referred to as the FXL Data Grid in this document. |
When selecting the Lightning component, select the grid with "v2" appended to the name.
The FXL Data Grid is a versatile record management tool in FieldFX Back Office when using Lightning Experience.
You can set up an FXL Data Grid for use with any record type in FieldFX.
You can also set up FXL Bulk Editing, FXL Stage Pricing, and the FXL Bundle Maker for use with an FXL Data Grid after you have already added and configured it.
Setting Up FXL Data Grid
|
This grid only applies to Back Office and does not change what displays in Field FX Mobile. To see what determines what a user sees in the mobile app, see Configuring FieldFX Mobile Screens. |
-
Switch to the Lightning Experience
-
Access the applicable record page
Example 1. Use the FXL Data Grid to manage Price Book Item recordsScenario
You want to use the FXL Data Grid to manage price book item records.
-
From your Home page, click Price Books.

-
Click the price book for which you want to use the FXL Data Grid to manage price book items.

-
-
Configure FXL Data Grid Details]
-
Set up Bulk Editing to be used with the FXL Data Grid
-
Set up Stage Pricing to be used with the FXL Data Grid
Configuring FXL Data Grid Details
Basics
-
The API names of Salesforce objects and object fields are required to configure any of the FXL Data Grid fields.
-
The most accurate way to enter the API names is to obtain them from the Object Manager or from workbench.
The FXL Data Grid supports the use of and displays image fields as read-only.
-
The documentation below uses examples from Tickets and Quotes because these objects are very commonly used with the Grid. However, the grid is not limited to these objects and can be used with any object.
Design Time Attributes
Required Attributes
-
Salesforce Object - This is the API name of the object to display.
Example 2. Show Ticket ItemsFor example, if you want to show ticket items, then use
FX5__Ticket_Item__c. -
Object Fields - The API names of the fields to display.
While not really required, the grid will not be useful without something entered in this field. The field names should be separated by a comma. Do not end the list of fields with a comma.Example 3. Adding Ticket Items to a TicketFor example, if adding Ticket Items to a Ticket, you might use the following list of fields:
Name,FX5__Price_Book_Item__c,FX5__Standby_Price__c,FX5__Price__cThe grid should be fairly resilient, however, if the grid does not display the expected results then you should verify this list is correct. -
Related Object Lookup - While not technically a required field, it is necessary in most cases. In the previous example of showing ticket items, this field should have the API name of the ticket object (
FX5__Ticket__c) so that the grid is constrained to show only ticket items for the current ticket. If you leave this field blank, then the grid would show all ticket items for all tickets!-
For the Lookup to properly filter results, Remote Site Settings must be defined.
-
If a connection to the remote site is not defined, an error results when the Lookup is called.
-
Add the domain (not the entire URL) listed in the error message to the Remote Site Settings to resolve the error.
-
-
Unique ID - The grid needs a unique name so that it can communicate correctly with other Lightning components.
You can enter anything in this field, as long as it is unique. “Ticket Item Grid”, "George", and "FDG-1234" are all acceptable.
Optional (but Recommended) Attributes
| You do not need to enter any values in these attributes in order for the grid to be operational. However, the grid may not work as expected unless you enter values for these attributes. These attributes are focused on functional behavior of the grid. |
-
API Name of the Parent Column - This attribute identifies the field in that controls the parent-child relationship.
-
For Ticket Items, this would be the field
FX5__Parent_Ticket_Item__c. -
If you do not make an entry in this attribute, then the grid will not show any parent-child relationships, even if they are defined in the data. This is completely appropriate if there is no parent-child relationships.
-
For Quote Items, this would be the field
FX5__Parent_Quote_Item__c.If this grid is used on an object that does contain parent-child relationships, then this field should be considered required!
-
-
API Name of the Item Requires a Parent Column - This attribute identifies the field that indicates an item is required to have a parent and cannot be a stand-alone item.
-
For Ticket Items, this is the
FX5__PBI_Requires_Parent_Item__cfield. -
For Quote Items, this would be the field
FX5__PBI_Requires_Parent_Item__c. -
This attribute is intended to support objects that use Price Book Items. You should leave this field blank on unrelated objects.
For example, if you are showing Accounts, then this attribute would not be appropriate.
-
-
API Name of the Item Requires a Parent Column - This attribute will identify the field which indicates an item is required to be on a ticket,quote, etc.
-
For Ticket Items, this would be the
FX5__Rule_Required_Item__cfield if CPQ is enabled.For Quote Items, this would be the
FX5__Rule_Required_Item__cfield if CPQ is enabled. -
This attribute is mainly intended to support CPQ. When the rule engine adds a required item it will mark the item as required in this field. By adding the field name to this attribute, then the grid will not allow the user to delete this required item. If this attribute is not set, then the user will be able to delete the item from the grid, but Salesforce will reject the change and it will generate an error for the user.
-
-
API Name of the isArchived Column - This attribute will identify the field which indicates a row has been archived.
Optional Attributes
You do not need to enter any values in these attributes in order for the grid to be operational. In many cases, you do not need to ever enter values in these attributes. These attributes focus on cosmetic aspects of the grid, rather than functional aspects.
-
SOQL filter for determining which records to show - Any valid SOQL statement to limit the records that display in the grid.
For example, to only display Ticket Items with a record type of Labor, enter
RecordType.Name='Labor'as the SOQL filter. -
Number of Sticky Columns - The number of columns on the left side of the grid that will not scroll. If you do not enter anything in this attribute, then the left-most columns will scroll off the screen when the user scrolls to the right.
-
Initial Sort Column - The API name of the column to use for sorting the first time the grid is displayed.
The grid remembers the user’s last sort preference. This value determines the initial view of the page.
-
Initial Sort Direction - ASCending or DESCending. See note above.
-
Display link to view record - When this option is selected then the grid will display an icon on each row that will take the user to the record detail page.
-
Read-Only - This attribute forces the grid to always be in read-only mode regardless of permissions, status, or any other attribute.
-
Expand Children by default - When this attribute is selected, then the grid will display all children when the grid loads. If this option is not selected, then only the parents will be visible until the user clicks the icon to display children.
-
Disable multi-select and use single select - When selected, the grid displays radio buttons instead of checkboxes next to items. Users can only select one item from the grid to act on and the option to select all items is not available.
When multi-select is disabled, selecting a parent item does not select its children unless the parent item is deleted, in which case the children are also deleted. -
Remember selected items after refresh - When selected, items marked as selected in the grid remain selected after the grid reloads, such as taking an action on the selected items
For example, generating an invoice from selected tickets.
-
Action Button settings (JSON string) - Reserved for future development; currently unused
Optional (performance related) Attributes
| You do not need to enter any values in these attributes in order for the grid to be operational. The attributes listed here relate to the performance of the grid. In many cases, you will never need to enter any values here. If you are working with very large data sets, or very wide, or very complex datasets then you may need to experiment with different settings. |
-
Number of Rows in Page - The number of rows to request from the server in a single call. Keep this number small to increase performance for most objects. Given the variability in the number and types of columns, it may be necessary to experiment with different values to optimize performance.
-
When retrieving objects that only have a very small number of columns but a large number of rows, then performance may improve with a very large value in this field.
-
When retrieving a very large number of columns, then performance may improve by using smaller numbers for this attribute.
-
-
Number of Pages in Buffer - This is the number of pages held in memory. In general, increasing this value will increase performance. However, holding too much in memory will eventually use all available memory and performance will degrade quickly.
Create Custom Filters
We added the ability to create custom filters for a grid’s lookup fields.
Custom filters override Salesforce filters for lookup fields.However, you cannot save values.A validation error results.
| Custom filters are not supported for bulk edit. |
-
Create a Static Resource file named
fx_GridV2_CustomSearch.js -
Copy the sample file contents and then customize it for your needs
fx_GridV2_CustomSearch.jswindow.fx_GridV2_CustomSearch = { uid: { // [Unique ID of the grid] Contact_StartS__c: { // [Field Api Name] FX5__Contact__c: { // [Lookup field target object] QueryFilter: "(LastName=NULL OR LastName LIKE 'S%')", // [Filter] QueryFields: "Name,LastName,FirstName", // [Display fields on lookup object] KeywordSearchFields: "LastName", // [Search fields on lookup object] OrderBy: "LastName" // [Sort field on lookup object] } }, // Multiple fields can be specified }, // Multiple grids can be specified };
| Custom filters allow for advanced queries.These queries can provide finely tuned results that are not possible apart from these programmatic custom filters. |
Advanced Custom Filter Scenario
|
The example scenario utilizes several additional fields and objects beyond standard FieldFX installations. Service Locations are not a standard feature of FieldFX. This example shows the power of custom filters beyond standard Salesforce capabilities. |
Scenario
When working with a Ticket, a field worker must select the service location where the work is performed, but should only see a list of service locations that are valid for the matching quote. Service Location appears on multiple grids on the Ticket object’s page layout.
window.fx_GridV2_CustomSearch = {
  qiball: { // [Unique ID of the grid]
    Service_Location__c: { // [Field Api Name]
      Service_Location__c: { // [Lookup field target object]
        QueryFilter: "Service_Location__c=true AND Status__c!='Inactive' AND (Id IN (Select Service_Location__c from BTSL__c where Bill_To__c = '@@FX5__Quote_Item__c.FX5__Quote__c.FX5__CustomerAccount__c@@' AND Is_Active__c=true))", // [Filter]
        QueryFields: "Name,AMS_ID__c,BillingCity,BillingState", // [Display fields on lookup object]
        KeywordSearchFields: "Name,AMS_ID__c", // [Search fields on lookup object]
        OrderBy: "Name" // [Sort field on lookup object]
      }
    },
    // multiple fields can be specified
  },
  tiball: { // [Unique ID of the grid]
    Service_Location2__c: { // [Field Api Name]
      Service_Location2__c: { // [Lookup field target object]
        QueryFilter: "Service_Location__c=true AND Status__c!='Inactive' AND (Id IN (Select Service_Location__c from BTSL__c where Bill_To__c = '@@FX5__Ticket_Item__c.FX5__Ticket__c.FX5__Job__c.FX5__CustomerAccount__c@@' AND Is_Active__c=true)) AND (Id in (Select Account__c from Territory_Assignment__c where Territory__c = '@@FX5__Ticket_Item__c.FX5__Ticket__c.Territory__c@@' and Status__c='A'))", // [Filter]
        QueryFields: "Name,AMS_ID__c,BillingCity,BillingState", // [Display fields on lookup object]
        KeywordSearchFields: "Name,AMS_ID__c", // [Search fields on lookup object]
        OrderBy: "Name" // [Sort field on lookup object]
      }
    },
    // multiple fields can be specified
  },
  // multiple grids can be specified
};
Setting Up FXL Bulk Edit
Basics
-
The API names of Salesforce objects and object fields are required to configure the FXL Bulk Edit fields for the FXL Data Grid.
-
The most accurate way to enter the API names is to obtain them from the Object Manager.
-
The object for FXL Bulk Edit must match the object for the FXL Data Grid you have already added and configured.
-
Optionally, configure custom labels for the FXL Bulk Edit Lightning Component.
Step-by-Step Guide
-
Drop FXL Bulk Edit to the record page with the FXL Data Grid already added and configured
-
Select FXL Bulk Edit where it is placed on the page to display the configurable fields to the right
-
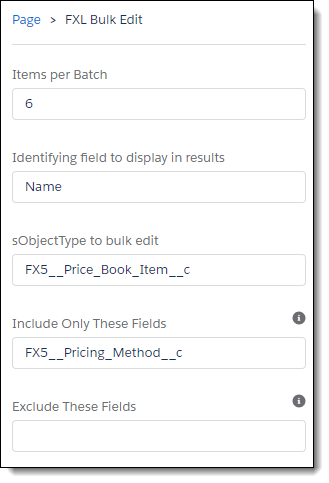
Obtain the API name of the records' object and enter it in sObjectType to bulk edit
-
Obtain the API names of any additional objects you want to display in FXL Bulk Edit and enter them separated by commas in Identifying fields to display in results
-
Optionally choose only one of the following:
-
Obtain the API names of the specific fields you want to limit bulk editing to and enter them separated by commas in Include Only These Fields.
-
Obtain the API names of the specific fields you want to exclude from bulk editing and enter them separated by commas in Exclude These Fields
-
-
Click Save
-
If this is the first time FXL Bulk Edit has been set up on the page, activate the configuration of the page as the Org default
-
Click Back

-
Verify FXL Bulk Edit is displaying the object you selected.
Setting up Bulk Edit for Dependent Lookup Fields
Basics
-
For most fields, the default Salesforce Lookup Control functions as expected.
-
The default lookup control does not work for dependent fields.
-
A custom search popup provides a filtered lookup for dependent fields.
Step-by-Step Guide
-
Obtain the API names of objects for the dependent fields
-
Obtain the API names of the dependent fields you want to filter for bulk editing
-
Create or modify an fxl_searchSettings.js Static Resource file to include a
bulkEditfunction for the desired dependent field filtered lookup -
Verify the Bulk Edit Control is added to the object’s lightning page
-
Verify the fields have been added to the grid columns on the lightning page
Example 1 - Bulk Edit Contacts Should Match the 'First Letter of Contact' Field
Scenario
On Quote Items, we have a verification that the entry in Contact field starts with the character entered in a first_letter_of_contact field.
When doing a bulk edit on the Contact field, only valid entries that match the entry in first_letter_of_contact for the controlling record should display.
| For this example, we assume the objects, fields, and verification rule already exist. |
To accomplish this lookup with verification for a bulk edit, the following code is added to the fxl_searchSettings.js Static Resource file.
bulkEdit: {
  "FX5__Quote_Item__c": {
    "Contact__c": {
      "QueryFilter": "(LastName=NULL OR LastName LIKE '@@first_letter_of_contact__c@@%')",
      "QueryFields": "Name,LastName,FirstName",
      "KeywordSearchFields": "LastName",
      "OrderBy": "LastName"
    }
  }
}
Example 2 - Bulk Edit Wells for Selected Quote
Scenario
We have an object that tracks well sections.
The Quotes object has a reference field to the well sections object.
We also have a lookup from the Quote Items to the well section object.
When we are looking at Quote Items, we want to be able to bulk edit the well section, but the bulk edit should only allow well sections for the displayed quote.
| For this example, we assume that the objects and fields already exist. |
To accomplish this, we add the following code to the fxl_searchSettings.js Static Resource file.
bulkEdit: {
  "FX5__Quote_Item__c": {
    "well_section__c": {
      "QueryFilter": "(Quote__c='@@FX5__Quote__c@@')",
      "QueryFields": "Name",
      "KeywordSearchFields": "Name",
      "OrderBy": "Name"
    }
  }
}
Setting Up FXL Stage Pricing
Basics
-
Stage pricing can be set up on Tickets and Quotes.
-
The object for FXL Stage Pricing must match the object for the FXL Data Grid you have already added and configured.
-
Optionally, configure custom labels for the FXL Stage Pricing Lightning Component.
Step-by-Step Guide
-
Drop FXL Stage Pricing to the record page with the FXL Data Grid already added and configured
-
Click Save
-
If this is the first time FXL Stage Pricing has been set up on the page, activate the configuration of the page as the Org default
-
Click Back
-
Verify FXL Stage Pricing is displaying where you expected
Setting Up the FXL Bundle Maker
Basics
The FXL Bundle Maker enables dynamic parenting within the FXL Data Grid.
This component works on the following objects:
-
FX5__Ticket__cThe component defaults are configured for the Ticket object.
-
FX5__Quote__c -
FX5__Invoice__c -
FX5__Price_Book__c
The Bundle Maker works by searching for a parent item from items already on the grid (existing items) or adding a new item from the catalog.
| Parent items must be Price Book Items with Dynamic Parenting enabled. |
Optionally, configure custom labels for the FXL Bundle Maker Lightning Component.This allows for custom labels or internationalization (i18n) and translation.
Step-by-Step Guide
-
Drop FXL Bundle Maker to the record page with the FXL Data Grid already added and configured
-
For Ticket record pages, the component is preconfigured.
For other objects, make the following entries:
-
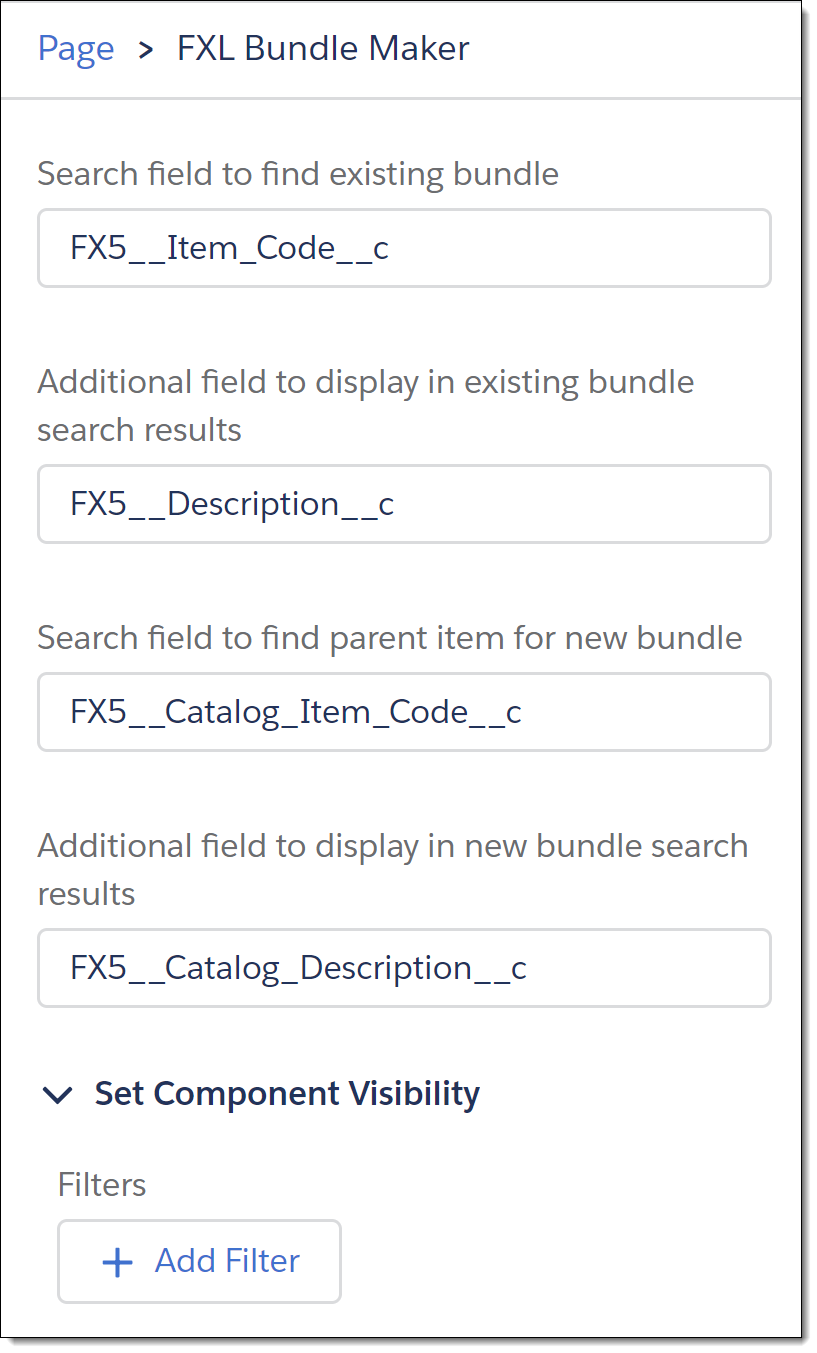
Search field to find existing bundle: Field to search in the grid for the existing item to use as the parent
Recommended entries:
-
Price Book:
FX5__Catalog_Item_Code__c -
Quote:
FX5__Catalog_Item__c -
Invoice:
FX5__Catalog_Item__c
-
-
Additional field to display in existing bundle search results: Additional field to display for search results when searching the grid for an existing item to use as the bundle’s parent. Adds a second line to the search results. Recommend using a description field.
Recommended entries:
-
Price Book:
FX5__Catalog_Description__c -
Quote:
FX5__Description__c -
Invoice:
FX5__Description__c
-
-
Search field to find parent item for new bundle: Field to search in Catalog items for a new item to use as the parent
Recommended entries:
-
Price Book:
Name -
Quote:
FX5__Catalog_Item_Code__c -
Invoice:
FX5__Catalog_Item_Code__c
-
-
Additional field to display in new bundle search results: Additional field to display for search results when searching Catalog Items for a new item to add to the grid to be the bundle’s parent. Adds a second line to the search results. Recommend using a description field.
Recommended entries:
-
Price Book:
FX5__Catalog_Description__c -
Quote:
FX5__Description__c -
Invoice:
FX5__Description__c
-
-
-
Click Save
-
If this is the first time the FXL Bundle Maker has been set up on the page, activate the configuration of the page as the Org default
-
Click Back
-
Verify FXL Bundle Maker is displaying where you expected.